Free download: Top 10 Natural & Easy Remedies for Joint Pain from Home. Learn these helpful remedies.
Estimated Reading Time: 4 minutes read
Our wrists help us do many things every day, like picking up objects, writing, or using a computer. But sometimes, we can feel pain on the thumb side of the wrist. This is called radial-sided wrist pain. It can make simple tasks hard and painful. There are exercises that can help reduce this pain and make our wrists stronger.
Exercise can play a significant role in helping with wrist pain. They help us feel better now and keep our wrists strong so we can avoid more pain in the future.

Table of Contents
Causes and Symptoms of Radial-Sided Wrist Pain
The radial side of the wrist houses several tendons, ligaments, and bones. Overuse, strain, or injuries can lead to discomfort in this area. Additionally, certain conditions, such as De Quervain’s tenosynovitis (inflammation of tendons on the thumb side of the wrist) or radial tunnel syndrome, can manifest as pain on this side.
Common indications of radial-sided wrist pain include:
- A sharp or aching pain on the thumb side of the wrist.
- Swelling or stiffness around the wrist joint.
- Pain exacerbated by thumb or wrist movement.
- A reduced range of motion or strength in the wrist.
The Importance of Structured Exercise
Addressing wrist pain through targeted exercise can be a game-changer. It’s not just about pain relief; it’s about strengthening the structures supporting the wrist, improving flexibility, and enhancing overall wrist health. A balanced regimen consisting of stretches, isometric exercises, and resistance training is fundamental in this journey.
A. Stretches
Stretches help increase flexibility, ease stiffness, and improve blood flow to the affected area. Regularly stretching the wrist can lead to improved motion and less pain over time. It can also serve as a preventive measure, reducing the likelihood of future pain or injury.
1. Wrist Flexion Stretch


- Straighten your arm and bend your wrist forward as if signaling someone to “come.”
- Use your opposite hand to gently apply pressure across the back of your hand and pull it towards you until you feel a stretch on the top of your forearm.
- Hold for 30 seconds.
- Repeat 5 times, then move to the other arm.
2. Wrist Extensor Stretch

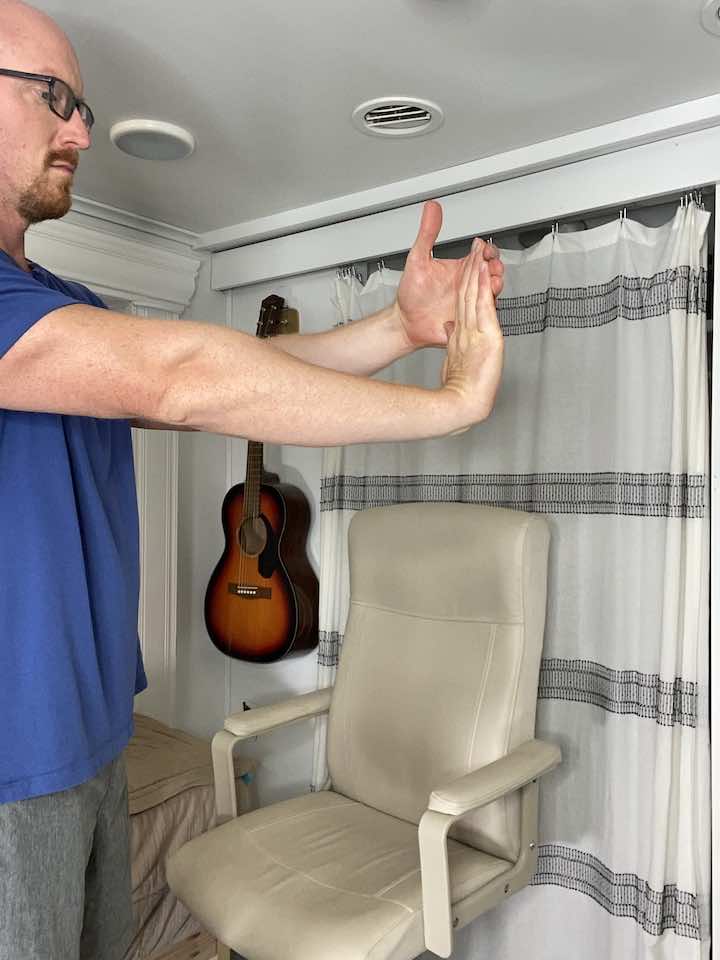
- Straighten your arm and bend your wrist as if signaling someone to “stop.”
- Use your opposite hand to gently apply pressure across the palm and pull it toward it until you feel a stretch inside your forearm.
- Hold for 30 seconds.
- Repeat 3 times, then move to the other arm.
B. Isometric Exercises
Isometric exercises can be a cornerstone for wrist rehabilitation. They involve contracting the muscles without moving the wrist joint. This helps strengthen the muscles, stabilize the joint, and reduce pain without causing strain or excessive movement.

1. Wrist Radial Deviation Isometric
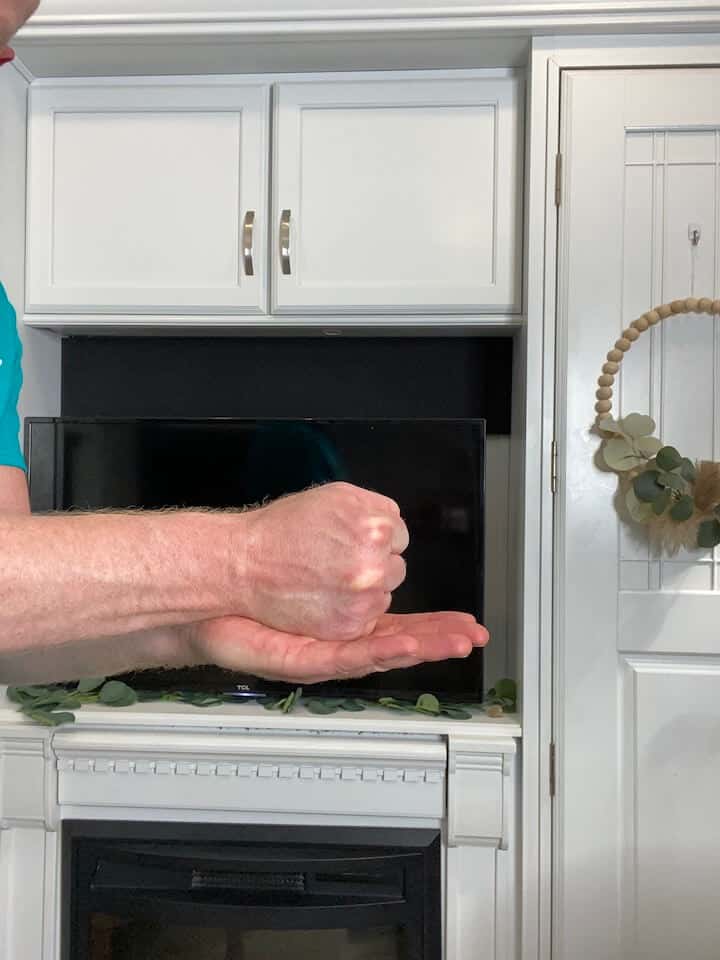
- Make a first with your injured hand.
- Then, place your uninjured hand against your fist.
- Gently Push your wrist downwards against resistance without changing the angle of your wrist.
- Hold the press for 5 seconds, 10 repetitions, and 2 sets in each of the four directions.
2. Grip Strength


- Begin with the injured wrist supported in whatever position feels most comfortable (e.g. on a table, pillow or resting on your legs).
- Position the arm neutral so that the thumb is pointed towards the ceiling.
- Gently squeeze the object and hold for 5 seconds, then relax.
- Repeat 10 repetitions for 2 sets.
C. Resistance Training
Resistance training, especially with resistance bands, focuses on strengthening the muscles surrounding the wrist. Stronger muscles offer better support to the wrist joint, distribute the load more efficiently during tasks, and reduce the risk of injury. With time and consistency, resistance training can significantly improve wrist function.
1. Wrist Radial Deviation with Resistance Band
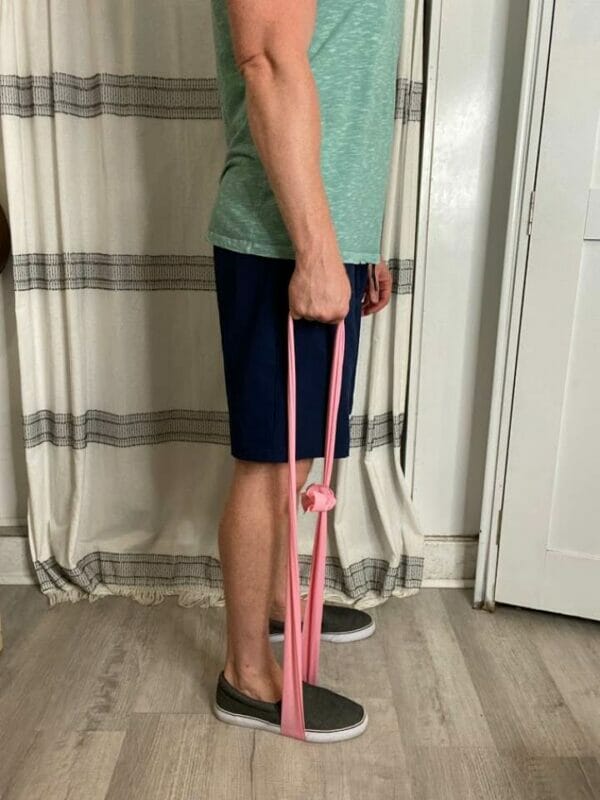
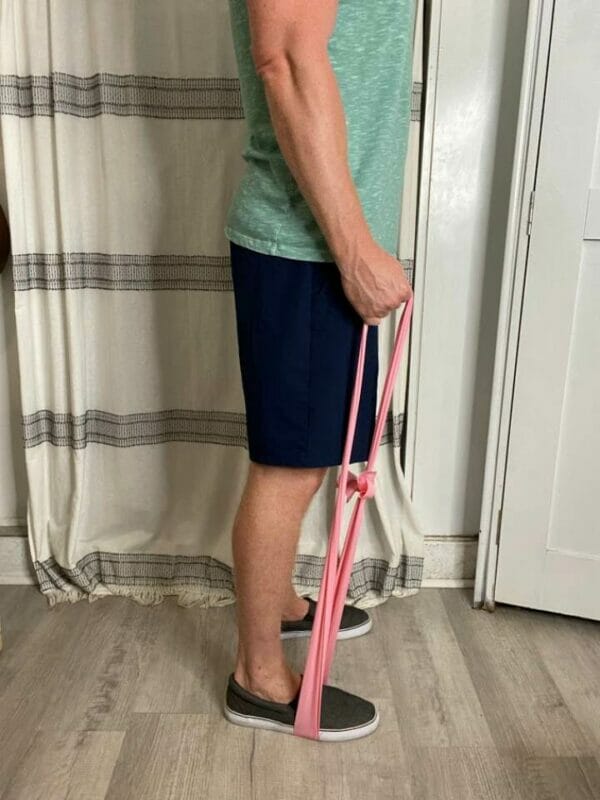
- Position yourself the same way you did in wrist radial deviation range of motion above.
- Hold one end of the band in the affected hand and place the other end under a foot to anchor it.
- With the hand and wrist already positioned with the thumb up towards the ceiling, slowly bend your wrist up towards the ceiling, hold for 2 seconds, then return to where you began.
- Repeat 10 repetitions for 2 sets.
Remember, while these exercises target the radial side, overall wrist strengthening is crucial for balanced support and health.
Conclusion
Radial-sided wrist pain can pose a challenge, but with consistent and targeted exercise, the road to relief and strength is well within reach. Embracing a holistic approach, understanding the importance of overall wrist health, and dedicating time to exercise can substantially improve comfort and function.
It’s always crucial to listen to your body. If any exercise causes discomfort beyond a mild stretch, it might be a good idea to pause and seek professional advice. Over time, a tailored exercise regimen, combined with proper care and attention, can offer lasting relief from radial-sided wrist pain.
Wondering What's Next?
Discover 11 Easy, At-Home “Stretch Exercises” for Stronger, Pain-Free Joints (click below)