
Free download: Top 10 Natural & Easy Remedies for Joint Pain from Home. Learn these helpful remedies.
Estimated Reading Time: 6 minutes read
Bone spurs, also known as osteophytes, are small bony projections that can form along the edges of bones, including those in the wrist. These spurs are often a result of the body trying to heal itself.
Over time, the cartilage that cushions our joints wears away, leading the body to produce extra bone in a futile attempt to repair the damage.

While some people might have bone spurs without even knowing it, others might experience significant discomfort and pain. Wrist bone spurs can hinder everyday activities, but thankfully, specific exercises can help alleviate the pain and improve wrist function.
Table of Contents
Causes and Symptoms of Wrist Bone Spurs
Bone spurs in the wrist commonly arise due to the wear and tear of the joint, which can result from conditions like osteoarthritis. When the protective cartilage in our joints wears down, bone rubs against bone, which may lead to the formation of spurs.
This is the body’s response to reduced cartilage, an effort to improve joint stability. Common symptoms of wrist bone spurs include:
- Sharp pain or a dull ache in the wrist.
- Swelling around the joint.
- Stiffness or reduced mobility in the wrist.
- Pain that worsens with activity or movement of the wrist.
Strengthening and Rehabilitating the Wrist: Effective Exercises for Bone Spurs
Bone spurs in the wrist can cause discomfort, often affecting our daily tasks. But did you know that specific exercises can help ease this pain?

These exercises are crafted to address wrist bone spur challenges. Their primary focus? To bolster strength, increase flexibility, and promote overall joint health.
Before diving into these routines, keeping a few things in mind is essential. Always begin each exercise carefully, being attentive to how your body responds. The goal is to aid the condition, not worsen it. So, let’s explore these exercises and embark on a journey toward better wrist health!
A. Begin with Isometrics
Starting with isometric exercises can be beneficial for those with wrist bone spurs. These exercises focus on contracting the muscle without moving the joint. They’re a great way to strengthen your wrist without causing more irritation or pain:
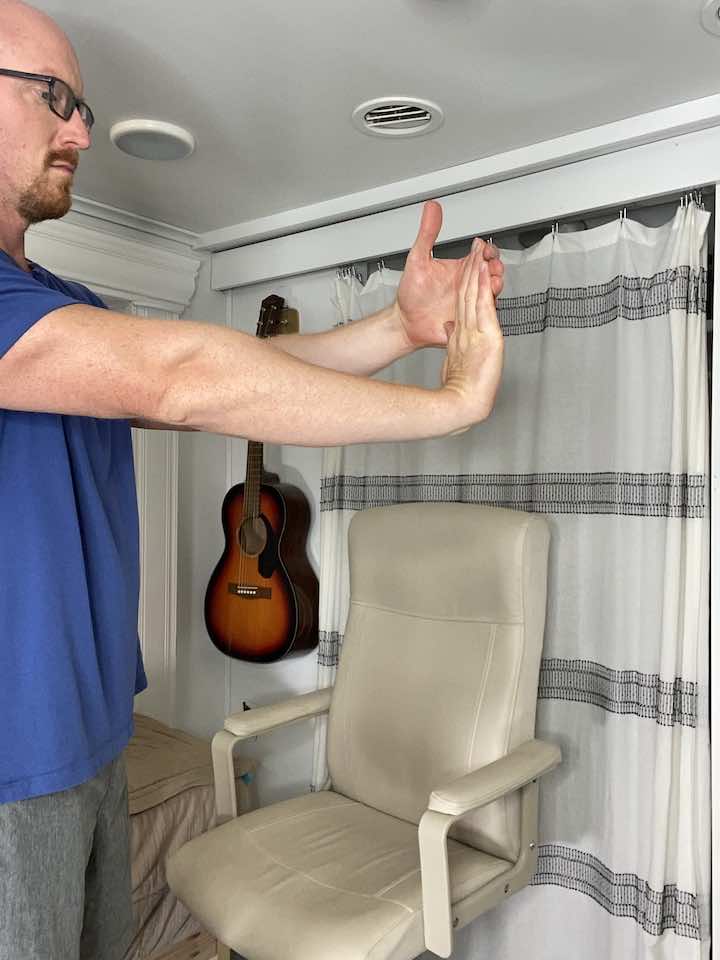
1. Isometric Wrist Strengthening
- Make a first with your injured hand.
- Then place your uninjured hand against your fist.
- Gently push the injured fist into the uninjured hand. Muscles should activate, but the injured wrist should not move.
- Adjust where you press your fist to activate the different muscles that support your wrist.
- You’ll press your wrist four ways: up, down, and then on each side.
- Hold the press for 5 seconds, 10 repetitions, and 2 sets in each of the four directions.
a. Wrist Flexion

Push your wrist upwards against resistance without changing the angle of your wrist.
b. Wrist Extension
Push your wrist upwards against resistance without changing the angle of your wrist.

c. Ulnar Deviation

Push your wrist upwards against resistance without changing the angle of your wrist.
d. Radial Deviation
Push your wrist downwards against resistance without changing the angle of your wrist.

B. Stretches
After working on isometric exercises, it’s good to incorporate some stretches. Stretching can help to improve flexibility, reduce stiffness, and increase the range of motion in the wrist:
1. Wrist Flexion Stretch


- Straighten your arm and bend your wrist forward as if signaling someone to “come.”
- Use your opposite hand to gently apply pressure across the back of your hand and pull it towards you until you feel a stretch on the top of your forearm.
- Hold for 30 seconds.
- Repeat 5 times, then move to the other arm.
2. Wrist Extension Stretch

- Straighten your arm and bend your wrist as if signaling someone to “stop.”
- Use your opposite hand to gently apply pressure across the palm and pull it toward it until you feel a stretch inside your forearm.
- Hold for 30 seconds.
- Repeat 3 times, then move to the other arm.
C. Resistance Training
Once you’ve built some foundational strength and flexibility, you can begin resistance training exercises. These exercises will further enhance the wrist’s strength and can help combat the pain and limitation caused by bone spurs:
1. Wrist Flexion Stretch with Resistance Band


- Position yourself just like with wrist extension, only this time the palm should be facing up towards the ceiling, with the wrist straight.
- You can again use either a resistance band (light, medium or heavy) anchored under your foot or a light-free weight (2-3 lb).
- Slowly flex the wrist (moving the palm towards you), then return to neutral.
- Repeat 10-15 repetitions for 2-3 sets.
2. Wrist Extension Stretch with Resistance Band

- Position yourself seated with the working arm supported on a table, such as your coffee table. The wrist and hand should be hanging off the edge of the table.
- The palm should be facing down towards the floor, with the wrist straight.
- You can use either a resistance band (light, medium or heavy) anchored under your foot or a light-free weight (2-3 lb).
- Slowly extend the wrist (moving the top of the hand back towards you), then return to neutral.
- Repeat 10 repetitions for 3 sets.
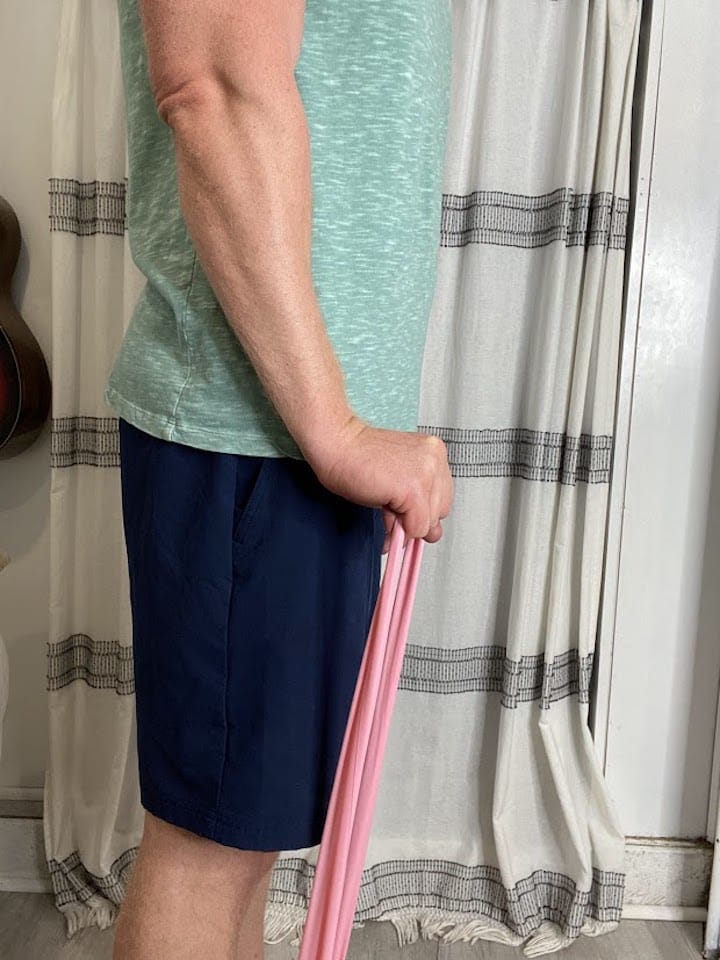
3. Wrist Ulnar Deviation with Resistance Band


- Place a resistance band under your foot (opposite side of your injured wrist) and hold on to the band with the injured hand.
- Hold the band with your hand so that your palm is facing the floor, and there is tension on the band.
- Keep your hand in a fist and move your wrist so that your pinky side it moving to the side. It’s not a big movement, so don’t try to force extra ROM if it’s painful!
4. Wrist Radial Deviation with Resistance Band


- Place a resistance band under your foot (same side of your injured wrist) and hold on to the band with the injured hand.
- Hold the band with your hand so that your thumb is facing the ceiling and there is tension on the band.
- keep your hand in a fist and move your wrist so that your fist moves up and down. It’s not a big movement from the wrist so don’t try to force extra ROM if it’s painful!
Conclusion
Wrist bone spurs can be a source of pain and discomfort, but with the right exercises, you can manage and reduce your symptoms. By starting with isometrics, moving to stretches, and then integrating resistance training, you give your wrist a comprehensive approach to healing and strength.
As always, it’s crucial to consult with a medical professional before starting any new exercise routine to ensure it’s safe and effective for your specific condition.

Wondering What's Next?
Discover 11 Easy, At-Home “Stretch Exercises” for Stronger, Pain-Free Joints (click below)