
Free download: Top 10 Natural & Easy Remedies for Joint Pain from Home. Learn these helpful remedies.
Estimated Reading Time: 6 minutes read
You’ve just spent hours creating your masterpiece on the piano or typing out the family newsletter, and your wrist begins to voice its discomfort. That, my friends, is wrist strain, a pesky little gremlin that loves to pop up uninvited. And if you’re anything like me, you might try to ignore it at first, treating it like a pesky fly buzzing around your summer picnic. But here’s the thing: wrist strain isn’t a fly. It’s more like an unwelcome house guest that refuses to leave.
Repetitive actions can cause wrist strain or be a symptom of a more serious condition like carpal tunnel syndrome, tendonitis, or arthritis. It’s not something to be ignored or brushed off. Just as you wouldn’t ignore that unwelcome guest eating all your biscuits and leaving crumbs on the couch, you shouldn’t ignore your wrist when it’s crying out for help.

Table of Contents
The Early Bird Catches the Wrist Pain
Let’s consider the importance of addressing wrist pain sooner rather than later. It’s tempting to dismiss the initial discomfort or write it off as a sign of a hard day’s work. However, like those weeds in your garden, if you don’t deal with them promptly, they’ll only grow into a bigger problem.
The first sign of wrist strain might be a mild twinge or discomfort, something that feels more annoying than alarming. But don’t be fooled by its seemingly harmless nature. As with most health concerns, early detection and intervention are key. The longer we ignore the signals our body sends us, the harder it can be to set things right.
Adopting a “better safe than sorry” approach can do wonders for your wrist health. With the right set of exercises and a touch of commitment, it’s possible to alleviate wrist strain and even prevent unwelcome visits. So, why wait for the pain to become a full-blown issue when you can tackle it head-on from the start? After all, a stitch in time saves nine!
Exercises for Wrist Strain: Your New Morning Routine
A. The Gentle Path
When your wrist starts to feel like it’s writing a protest letter, it’s time to introduce some gentle exercises. No, I’m not talking about pumping iron. We’re not looking to turn your wrist into Schwarzenegger; we’re aiming for a more Fred Astaire approach.

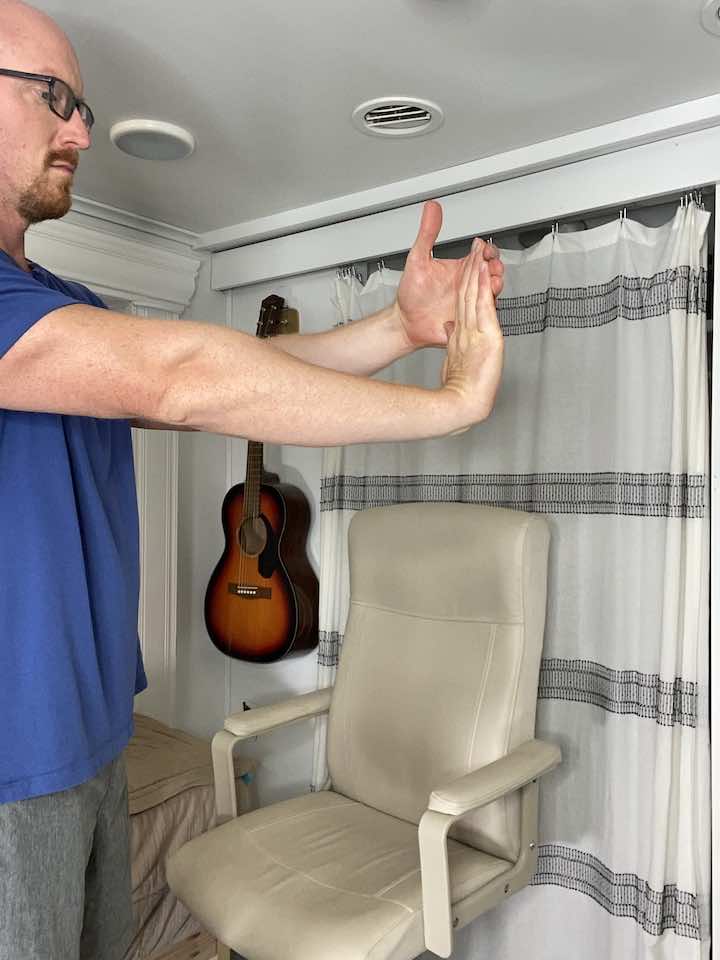
1. Isometric Wrist Strengthening
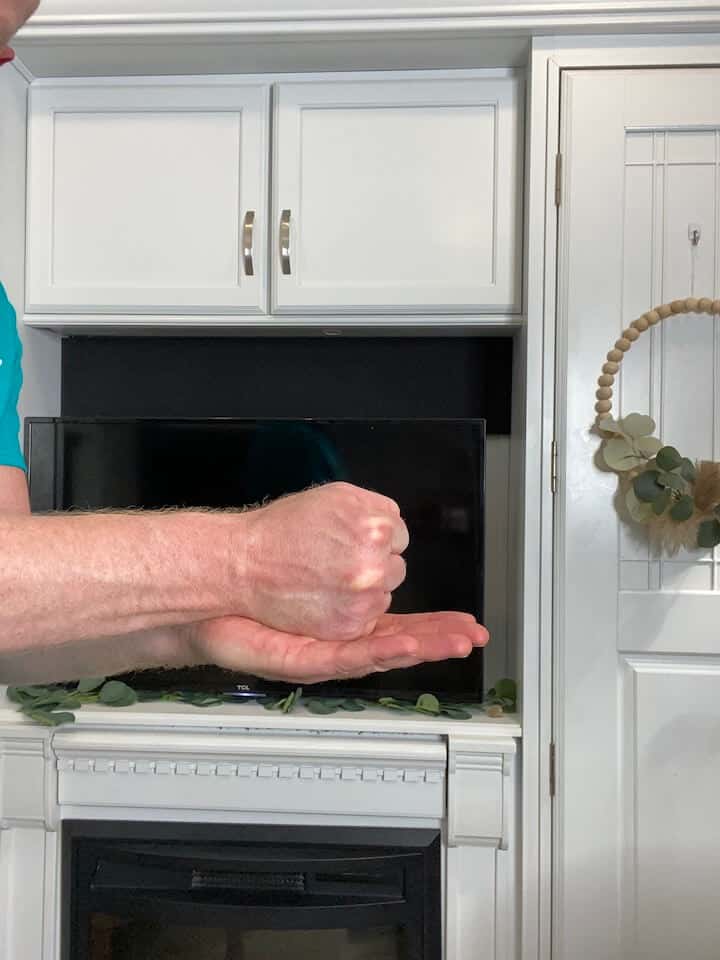
- Make a first with your injured hand.
- Then place your uninjured hand against your fist.
- Gently push the injured fist into the uninjured hand. Muscles should activate, but the injured wrist should not move.
- Adjust where you press your fist to activate the different muscles that support your wrist.
- You’ll press your wrist four ways: up, down, and then on each side.
- Hold the press for 5 seconds, 10 repetitions, and 2 sets in each of the four directions.
a. Wrist Flexion

Push your wrist upwards against resistance without changing the angle of your wrist.
b. Wrist Extension
Push your wrist upwards against resistance without changing the angle of your wrist.
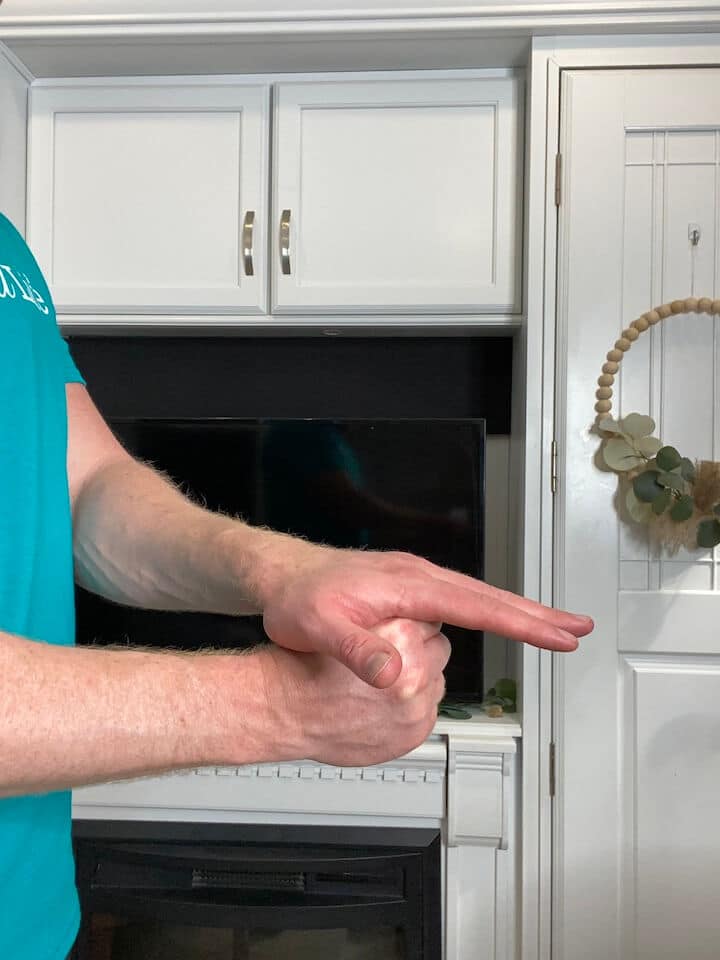
c. Ulnar Deviation

Push your wrist upwards against resistance without changing the angle of your wrist.
d. Radial Deviation
Push your wrist downwards against resistance without changing the angle of your wrist.
B. Less Pain, More Gain: Turning up the Heat
When your wrist starts feeling more lively, it’s time to level up. Like the community center bingo, we’re about to turn up the heat!
1. Wrist Lifts

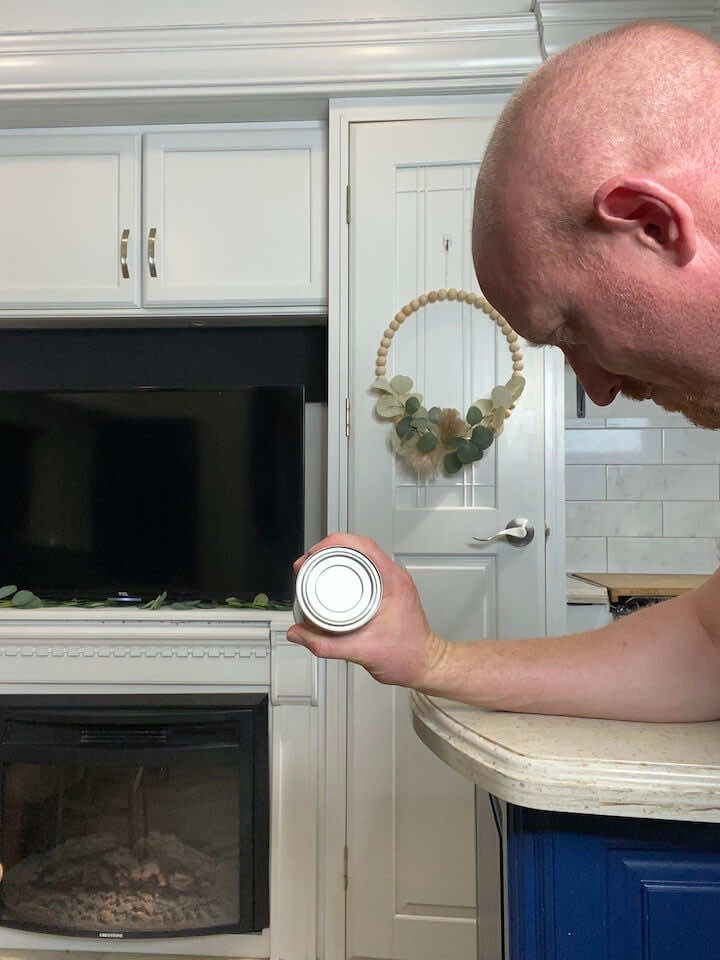
- Sit in a chair with a soup can or lightweight in your hand.
- Rest your forearm on a table or on your lap, with your palm facing downward and your wrist in a neutral position.
- Keep your elbow bent at a 90-degree angle.
- Lift the weight by flexing your wrist and raising your hand up toward your body.
- Hold the contraction for a few seconds, then slowly lower the weight back down to the starting position.
- Make sure to isolate the movement to your wrist and avoid using your forearm to lift the weight.
- Repeat the movement for 10 repetitions and 3 sets, and gradually increase the weight or resistance as you progress.
2. Wrist Curls
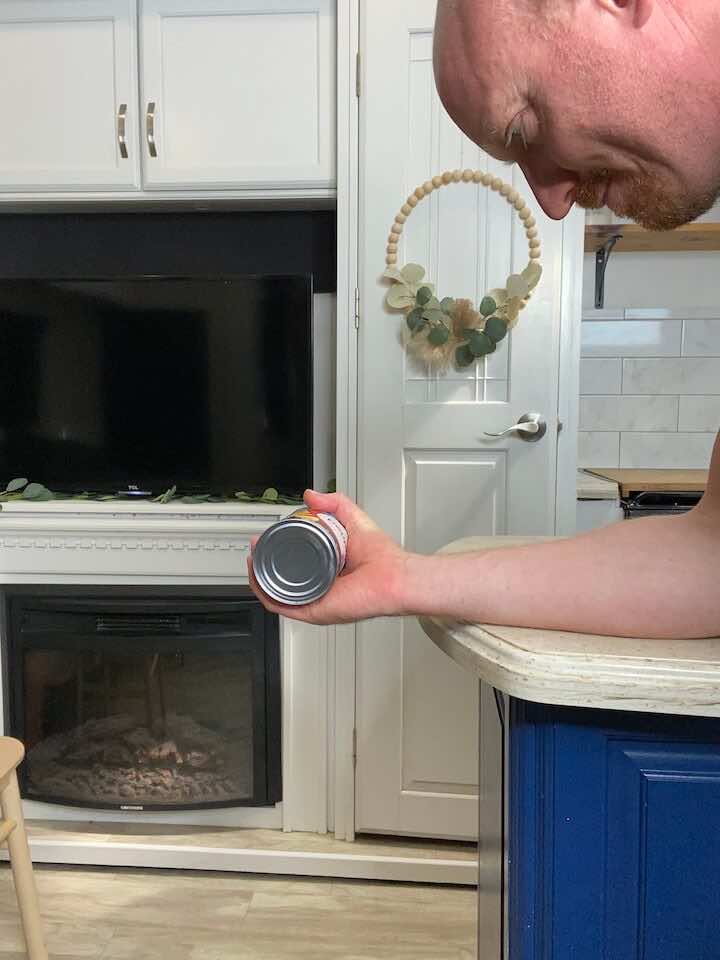

- Sit in a chair with a soup can or lightweight in your hand.
- Rest your elbow on a table, with your palm facing upward and your wrist in a neutral position.
- Keep your forearm still and isolated, and lift your wrist by curling it toward your body.
- Hold the contraction for a few seconds, then slowly return to the starting position.
- Remember to isolate the wrist and avoid using your forearm to lift the weight.
- Repeat the movement for 10 repetitions and 3 sets, and gradually increase the weight or resistance as you progress.
3. Wrist Ulnar Deviation with Resistance Band
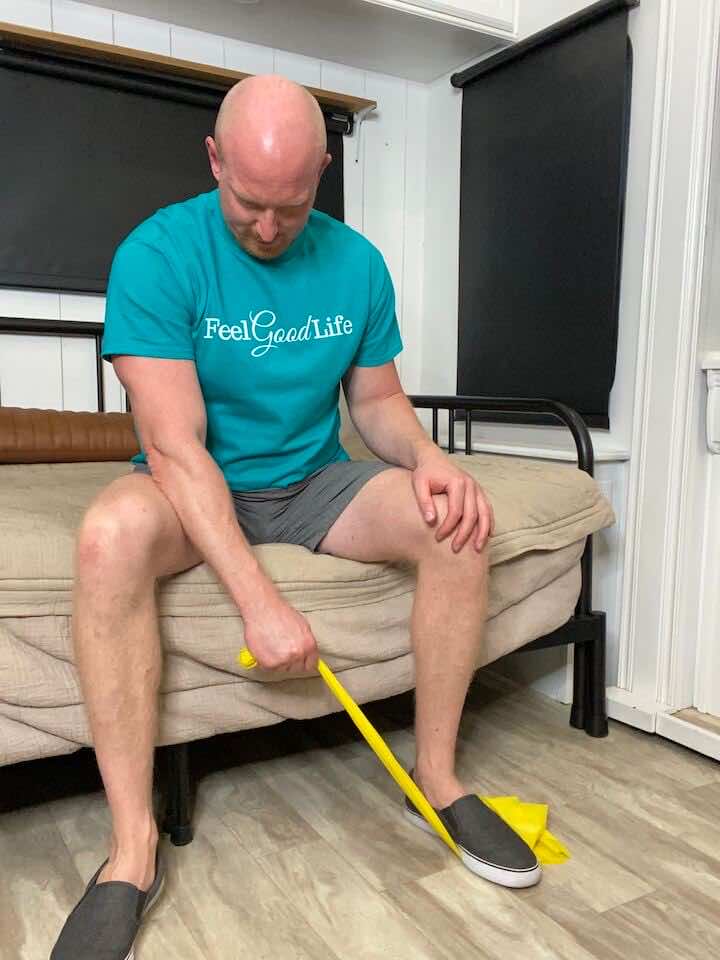

- Place a resistance band under your foot (opposite side of your injured wrist) and hold on to the band with the injured hand.
- Hold the band with your hand so that your palm is facing the floor, and there is tension on the band.
- Keep your hand in a fist and move your wrist so that your pinky side it moving to the side. It’s not a big movement, so don’t try to force extra ROM if it’s painful!
4. Wrist Radial Deviation with Resistance Band
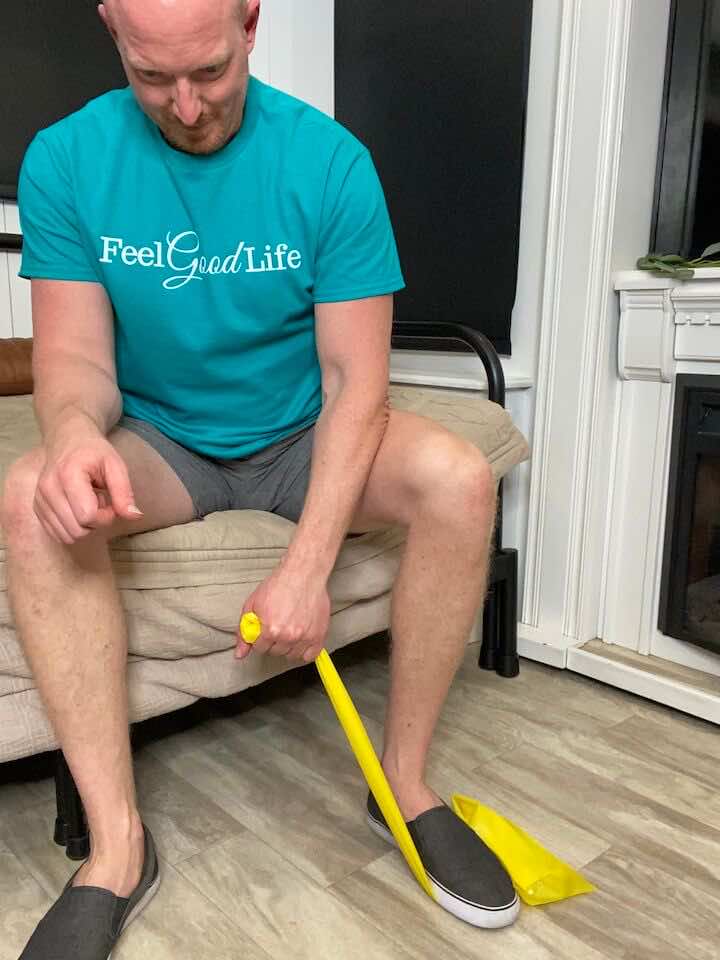

- Place a resistance band under your foot (same side of your injured wrist) and hold on to the band with the injured hand.
- Hold the band with your hand so that your thumb is facing the ceiling and there is tension on the band.
- keep your hand in a fist and move your wrist so that your fist moves up and down. It’s not a big movement from the wrist so don’t try to force extra ROM if it’s painful!
5. Wrist Flexion Stretch


- Straighten your arm and bend your wrist forward as if signaling someone to “come.”
- Use your opposite hand to gently apply pressure across the back of your hand and pull it towards you until you feel a stretch on the top of your forearm.
- Hold for 30 seconds.
- Repeat 5 times, then move to the other arm.
6. Wrist Extension Stretch

- Straighten your arm and bend your wrist as if signaling someone to “stop.”
- Use your opposite hand to gently apply pressure across the palm and pull it toward it until you feel a stretch inside your forearm.
- Hold for 30 seconds.
- Repeat 3 times, then move to the other arm.
Conclusion: Your Wrist, Your Power
So there we have it – your personal toolkit for a sprightly wrist. Isn’t it nice to know you’ve got the power to keep wrist strain at bay? Remember, just like the best gossip, a good routine is best shared.
So why not show your friends what you’ve learned? Maybe you can reach for these exercises next time your wrist feels a twinge instead of the remote. Ready to give your wrist the standing ovation it deserves?
Wondering What's Next?
Discover 11 Easy, At-Home “Stretch Exercises” for Stronger, Pain-Free Joints (click below)