Free download: Top 10 Natural & Easy Remedies for Joint Pain from Home. Learn these helpful remedies.
Estimated Reading Time: 7 minutes read
We’ve all been there – you’re midway through a workout, pushing yourself to the limit when suddenly, you feel a sharp pull in your inner thigh. The usual culprit? Your adductor muscles. They’re crucial components in our bodies, facilitating movement and balance.
However, they’re quick to sound the alarm when we push them too hard or move incorrectly. This can sometimes feel like a significant setback on your fitness journey but fear not. The good news is that the path to recovery is well-charted, and you can start right at home.

The path to recovery begins with understanding your injury, implementing some effective home treatment strategies, and having patience. We’ve compiled a comprehensive guide to help you understand your adductor muscles, including how to rehabilitate them through simple exercises. Read on to discover how you can turn the tables on your injury and make your way back to full health.
Table of Contents
Understanding Your Adductor Muscles
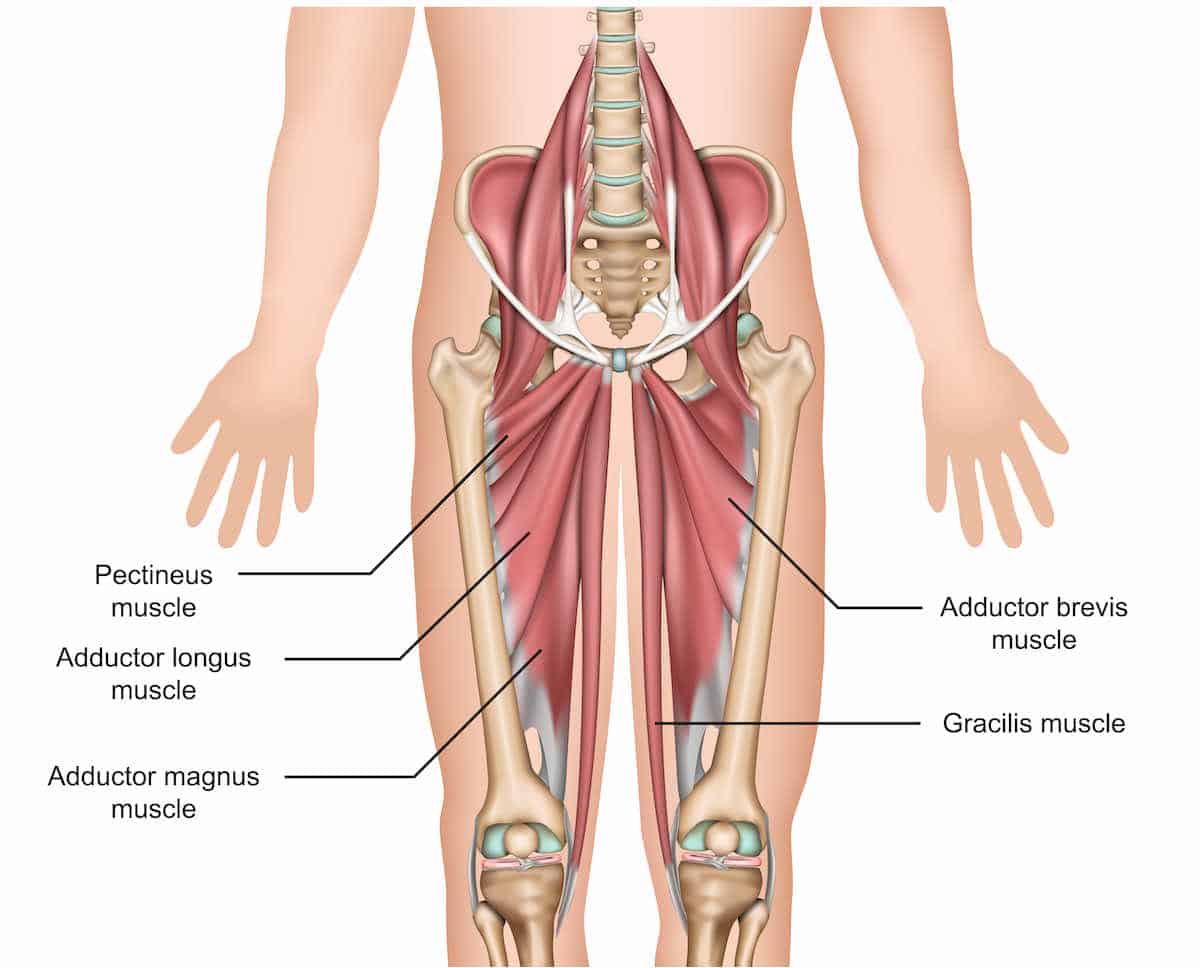
First, let’s learn about the real heroes here – the adductor muscles. These are the group of muscles located in your inner thigh, working quietly in the background, making our everyday movements possible. They’re like a well-oiled machine, working together to facilitate hip movements and keeping us stable as we move. The adductor muscle group includes the adductor longus, brevis, magnus, gracilis, and obturator externus.
However, like every hardworking hero, they’re susceptible to strain or injury, which can result in uncomfortable groin pain and decreased mobility. Thankfully, there are ways to soothe the discomfort and speed up your recovery. Rest is essential, but a regimen of specific exercises can truly catalyze your journey back to full mobility and strength.
Stretching: The First Step Towards Healing
Often, stretching is considered the less glamorous cousin of strength training and cardio in our workout routines. Yet, it plays an incredibly crucial role in any successful recovery program. The benefits it offers your injured adductor muscles are invaluable – it enhances flexibility, reduces stiffness, and promotes better blood flow to the area, accelerating the healing process. It’s like gifting your muscles a relaxing day at the spa, letting them rejuvenate and heal.
Consider these stretches that are particularly beneficial for your adductor muscles:
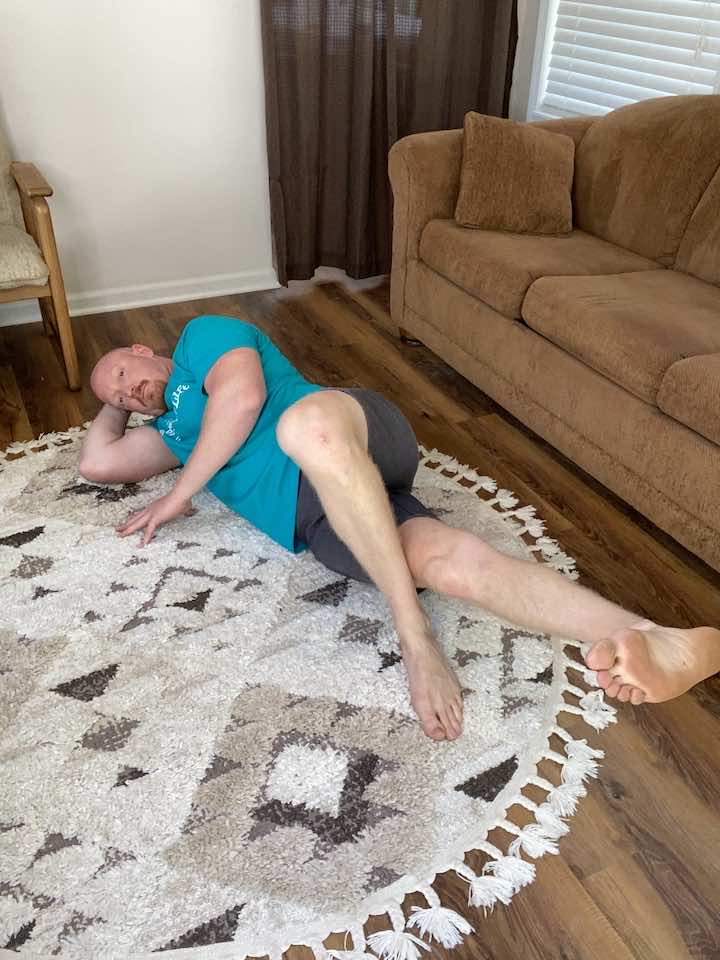
1. Butterfly Stretch
This stretch is a classic, effective way to target your inner thigh muscles.
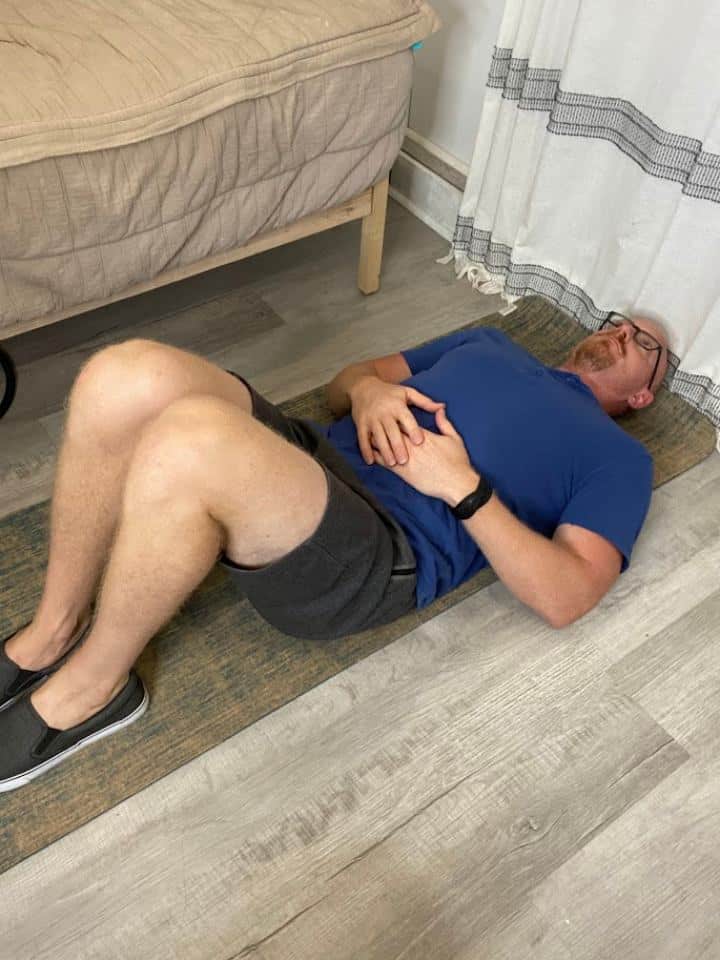
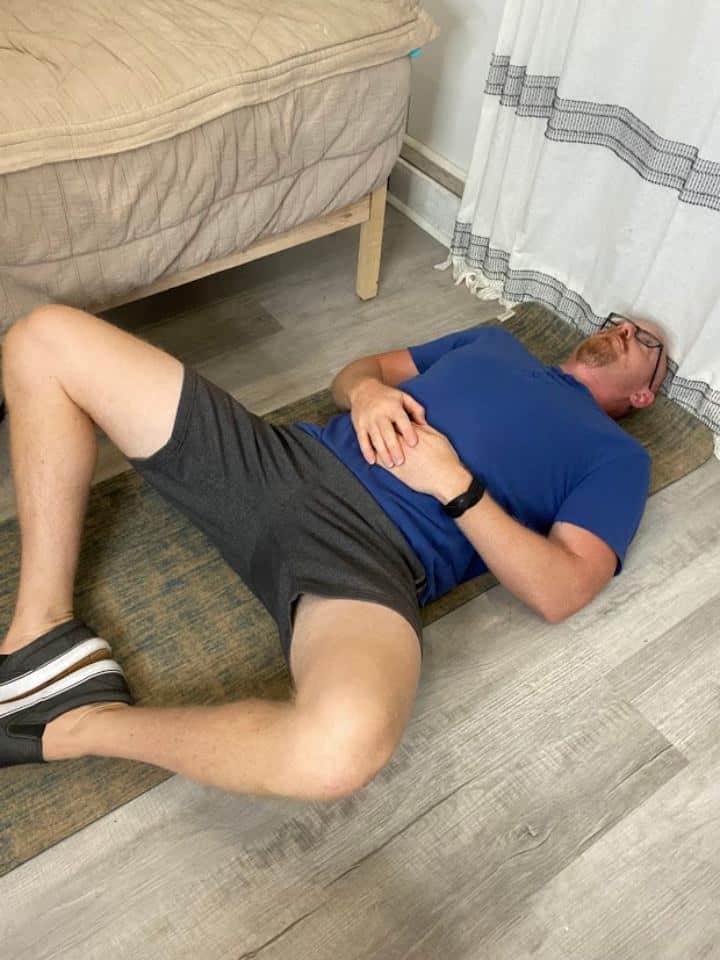
- Begin on your back with your knees bent and feet flat on the surface (you can lay on your bed, couch, or floor). The feet and knees should be together.
- Slowly allow the knees to open apart from each other. Allow the thighs to move towards the floor as far as the hips allow.
- Make sure to avoid arching in the low back.
- Try to hold the stretch anywhere from 30-60 seconds.
2. Sumo Squat Stretch
It might sound intimidating, but this stretch is a gentle way to open up your hips and stretch those inner thigh muscles.


- Step out wide with your toes pointed out towards the corners of the room; your knees should be pointed in the same direction as your feet.
- Lower down into the squat.
- Push up through your heels to a standing position.
Tip: Tuck your hips in to keep your back neutral when performing this squat. We can tend to arch our back with this type of squat.
3. Side Lunge Stretch
This is a dynamic stretch that not only works on your adductor muscles but also engages your entire lower body.


- Stand tall with your hands on a steady surface if you feel unsteady. You can use a counter, sink, or chair (no chairs with wheels) to hold on to for balance.
- Step out to the side so that you’re in a wide stance.
- Shift your weight to your right side. Keep your right knee over your ankle, then bring your hips back.
- To sand, push through your right heel and straighten your right leg.
- Do this exercise 10 times in each set.
- Complete 3 sets of the exercise.
4. Standing Hip Openers
This stretch, as the name suggests, opens up your hips and works on your adductor muscles simultaneously.
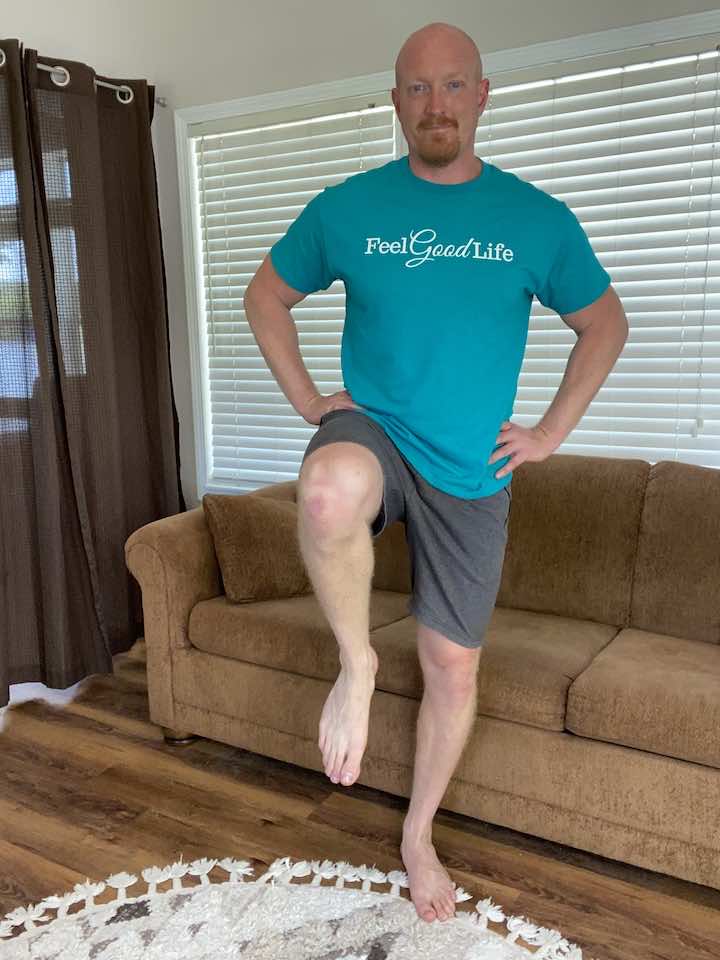


- Stand next to a counter or sturdy chair for support if needed.
- Bend your right knee, lifting your foot slightly off the ground.
- Make a big circle with your right hip, opening it out to the side.
- Then, reverse the movement and make a big circle in the opposite direction.
- Repeat this hip circle motion 10 times on your right side.
- Switch to your left side and repeat the same hip circles for 10 repetitions.
- Focus on maintaining your balance and control throughout the exercise.
- Complete 3 sets of the exercise.
Strengthening: Next Level of Rehabilitation
Once you’ve worked on stretching and loosening up those muscles, it’s time to move to the next level of rehabilitation – strengthening. Strengthening your adductor muscles is crucial in ensuring they can withstand future strains and stresses. Think of it as on-the-job training for your muscles, preparing them to return to their daily tasks.
Try the following strengthening exercises:
5. Inner Hip Strengthener
This exercise specifically targets the inner thigh muscles, making them stronger and more resilient.

- While lying on your back, knees bent, and feet flat on the floor, place a ball or rolled towel between your legs.
- Gently squeeze the ball or towel for 5 seconds before relaxing.
- Repeat for a total of 10 times.
- Complete 3 sets of the exercise.
6. Side Lying Hip Adduction
This exercise works not only on your adductor muscles but also on your core, providing overall strength.
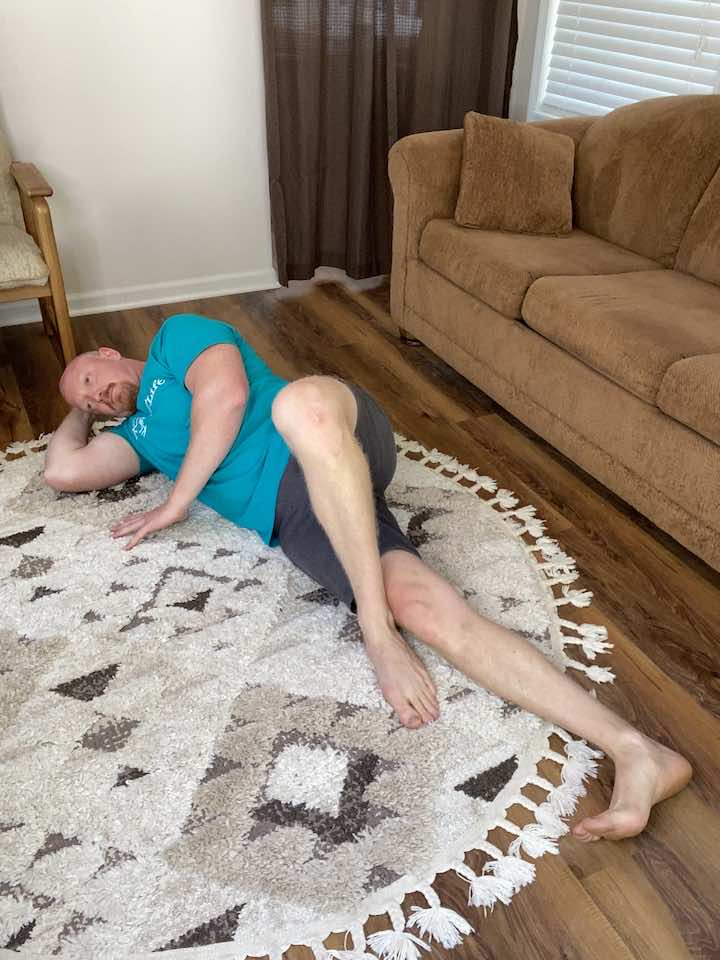
- Lie on your side with your top leg bent and your bottom leg straight and positioned slightly in front of the top leg.
- Ensure that the foot of your bottom leg is pointing straight forward.
- Lift your bottom leg a few inches off the floor, keeping the movement controlled and controlled.
- Lower your leg back down to the starting position.
- Repeat this leg lift for 10 repetitions.
- Complete 3 sets of leg lifts on each side.
- Focus on engaging your inner thigh muscles throughout the exercise.
7. Standing Hip Adduction
This is an advanced exercise that should be attempted once you’ve built up some initial strength.
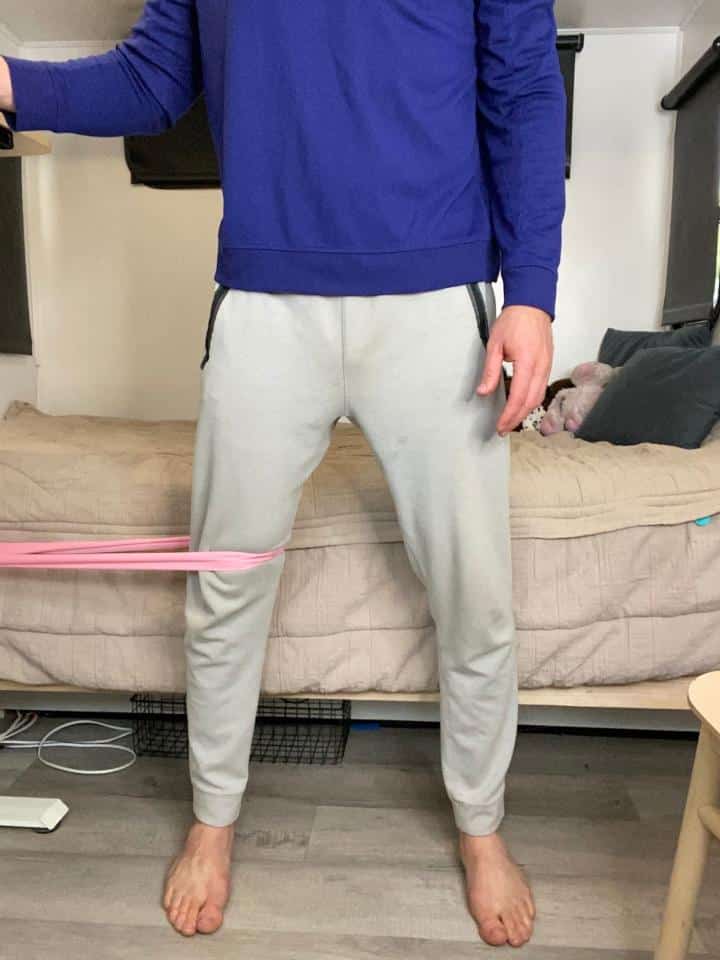
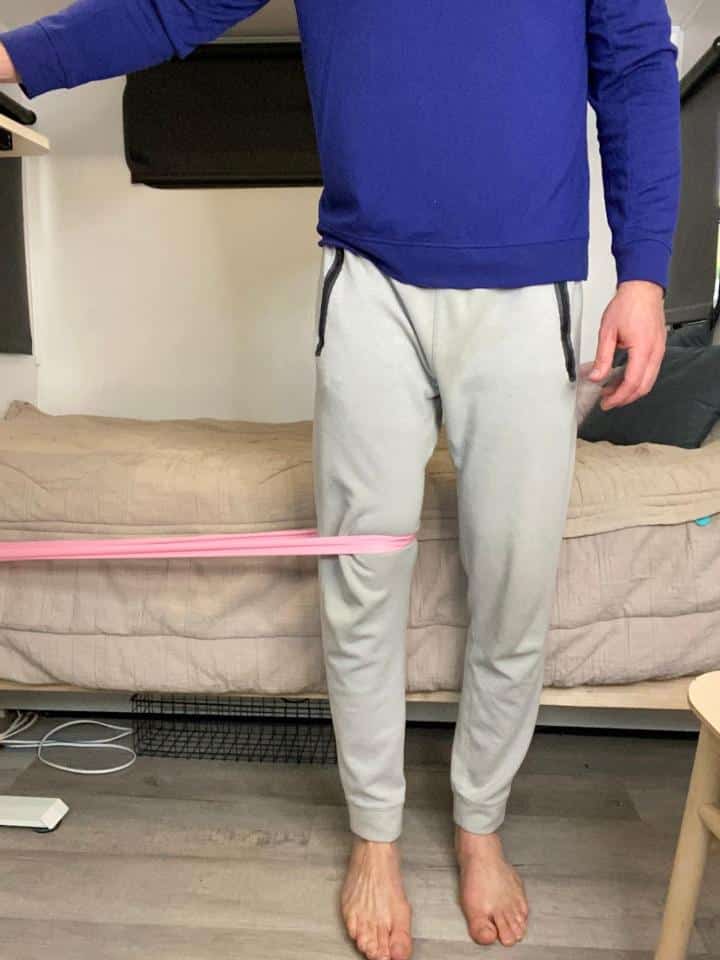
- Tie a resistance band (light, medium, or heavy resistance) securely around a stable object, such as a table leg.
- Stand with the painful leg inside the loop of the band, positioning yourself so that the working leg is closest to the attachment point of the band.
- Step away from the attachment point to create some tension on the band.
- Keep the working knee straight throughout the exercise.
- Pull the leg inward, towards the opposite leg, engaging the inner thigh muscles.
- Release the leg back to the starting position.
- Repeat this inward pull for 10-15 repetitions.
- Complete 2-3 sets of the exercise.
Conclusion
Recovering from an adductor muscle injury might feel daunting like you’re at the starting line of a marathon. But remember, every marathon starts with a single step. These exercises and stretches provide a roadmap to recovery, allowing you to take control of your healing process. By dedicating a little time each day to stretching and strengthening, you’ll soon see improvements in flexibility, strength, and reduction in pain.
Healing isn’t a sprint, it’s a marathon, and it’s okay to move at your own pace. However, always remember to listen to your body throughout this process. If an exercise causes pain or discomfort, take a step back. You’ve got this! Here’s to your recovery journey, may it be filled with patience, perseverance, and the sweet victory of overcoming the challenge.
Wondering What's Next?
Discover 11 Easy, At-Home “Stretch Exercises” for Stronger, Pain-Free Joints (click below)