Free download: Top 10 Natural & Easy Remedies for Joint Pain from Home. Learn these helpful remedies.
Estimated Reading Time: 6 minutes read
Recovering from a hip replacement surgery is a crucial time for patients. The focus is on healing and regaining strength without causing any harm to the new hip. Following the right rehabilitation strategies can make a significant difference in recovery speed and effectiveness. Rehabilitation after hip replacement surgery involves specific exercises and care tips that help patients return to their daily activities more quickly and safely.
This article will delve into the essential rehabilitation strategies for post-hip replacement patients, highlighting the importance of following the surgeon’s advice, understanding the causes and symptoms of potential complications, and embracing a set of exercises and care tips designed to foster a smooth recovery.
Table of Contents
Understanding Post-Hip Replacement Rehabilitation
The journey to recovery after hip replacement surgery requires patience, care, and adherence to professional advice. The primary focus keyword here is ‘Rehabilitation Strategies for Post-Hip Replacement Patients’, emphasizing the tailored approach needed for each individual.
A successful rehabilitation process not only aids in quick recovery but also ensures the longevity of the hip replacement. It’s vital to understand the causes and symptoms associated with post-surgery complications to avoid them and ensure a smooth rehabilitation process.
Causes of Complications After Hip Replacement
- Infection: Infections can occur at the surgery site or deep within the joint.
- Blood Clots: The risk of blood clots increases after surgery, potentially blocking blood flow.
- Hip Dislocation: Certain movements can cause the new hip joint to dislocate.
- Wear and Tear: Over time, the artificial hip can wear down or loosen.
- Nerve Damage: Surgery can sometimes affect the nerves around the hip area.
- Stiffness: Lack of movement can lead to stiffness in the hip joint.
Infection may result from bacteria entering during or after surgery. Blood clots form due to decreased mobility, while hip dislocation can happen if the hip is placed under too much stress or moves improperly.
Wear and tear are common in all artificial joints due to everyday use. Nerve damage may occur due to the surgical procedure itself, and stiffness is often a consequence of not following prescribed movements or exercises.

Symptoms to Watch For
- Pain: Increased or persistent pain around the hip area.
- Swelling: Swelling in the hip or leg can indicate complications.
- Redness or Warmth: Signs of infection can include redness or warmth near the incision.
- Difficulty Walking: Struggling more than expected with walking could signal an issue.
- Change in Leg Length: A feeling that one leg is longer than the other post-surgery.
- Popping or Grinding Sensations: These could indicate that the artificial joint is not moving smoothly.
Persistent pain or swelling might indicate infection or blood clots. Redness or warmth around the incision site also points towards infection. If walking becomes increasingly difficult, it might be a sign of hip dislocation or other complications. A change in leg length could suggest a dislocation while popping or grinding, which may be due to wear and tear of the artificial joint.
Effective Rehabilitation Exercises
Before diving into the recommended exercises, it’s crucial to underline the importance of adhering to the exercises approved by your surgeon. Generally, after hip replacement surgery, there are movement restrictions that patients must follow, such as not flexing the hip past 90 degrees or crossing legs past the midline for 6-12 weeks, depending on the surgery specifics.
1. Mini Squats
Mini squats will target the quadriceps and the glutes.
- Begin with the feet flat on the floor about hip width apart. In this position, make sure you begin with the knees neutral and not in hyperextension.
- Slowly sit the hips back towards the heels as the knees bend to about a 30-45 degree angle. As you do this motion, you should notice the torso will hinge forward to help counterbalance you sitting back towards the heels.
- Hold the position at the bottom of the mini squat for up to 5 seconds, then return to your starting position.
- Repeat 10-15x for 2-3 sets.
2. Straight Leg Raise
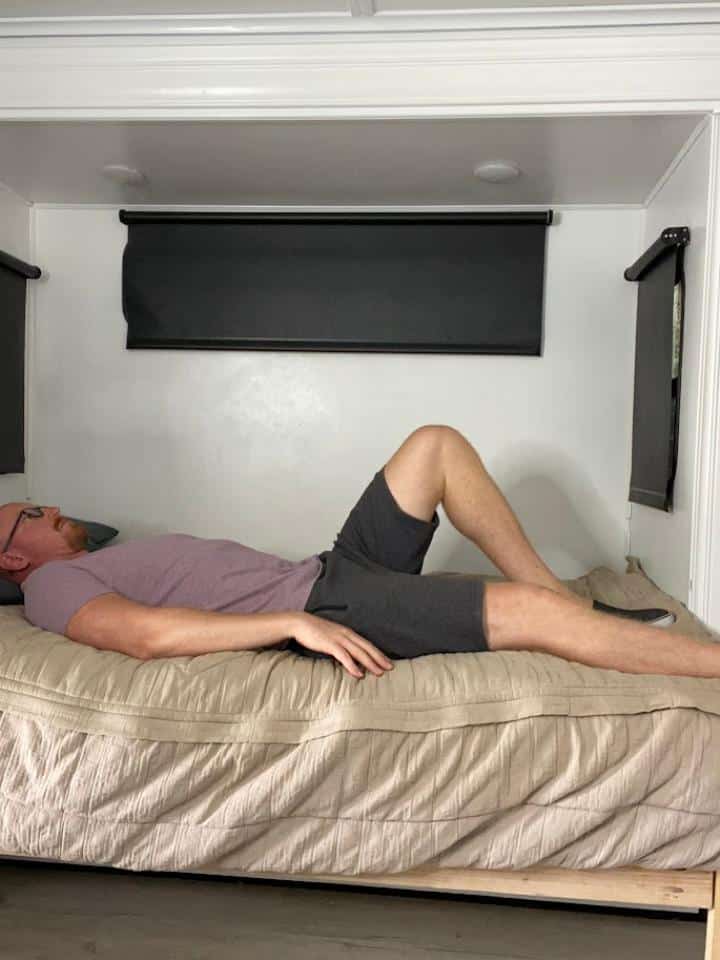
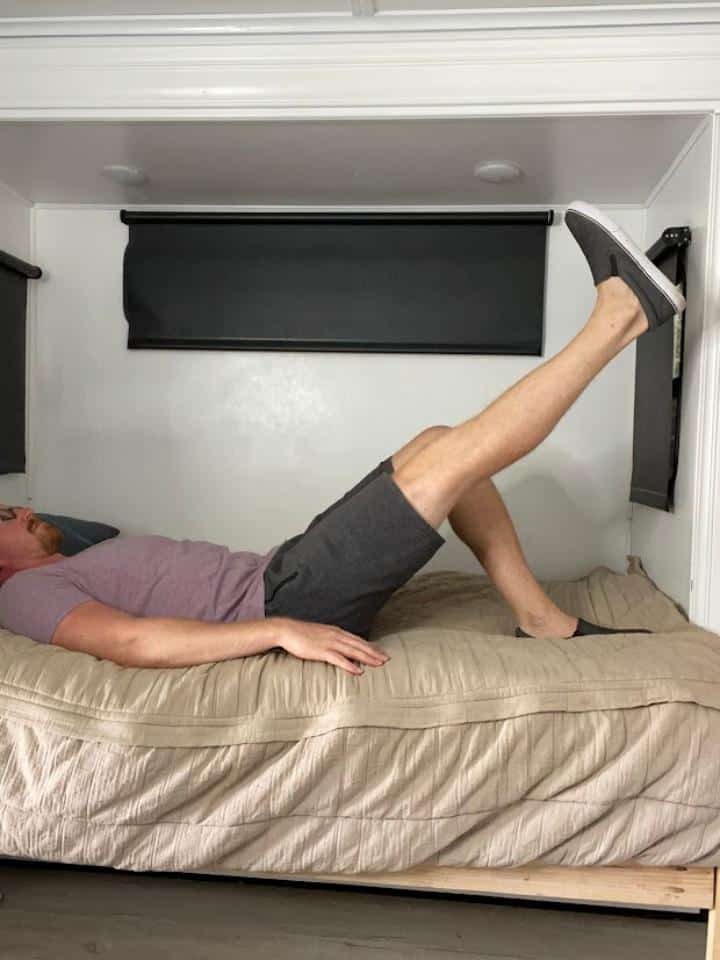
- Starting position: Laying flat on your back with the injured leg straight in front of you and the healthy knee bent with the foot flat on the surface (can lay on the floor, couch, or bed).
- Squeeze the quadriceps, just like in the quad set.
- Hold this squeeze, keeping the knee straight, and lift the entire injured leg in one motion off the surface. Lift the leg until the thighs are at an equal height with each other.
- Lower and return to your starting position.
- Repeat 10 repetitions for 3 sets.
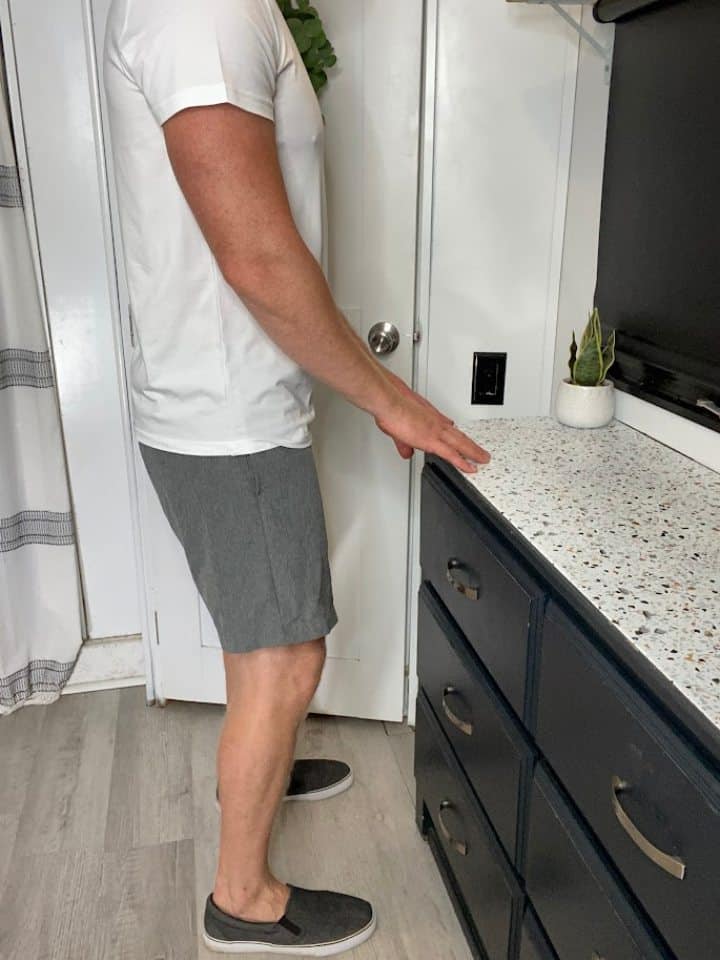
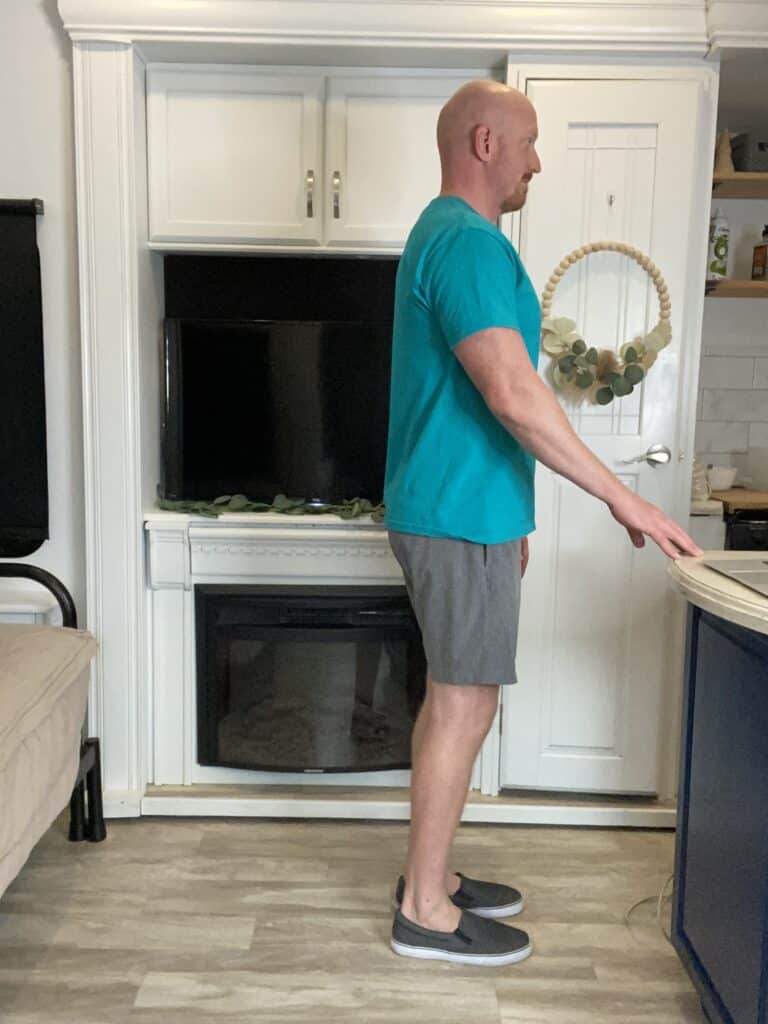
3. Standing Hip Lifts


- Stand tall with one hand placed on a bed or chair. Balance on your left leg, keeping a soft bend in your knee to keep from locking out.
- Leading with your heel, lift your right leg out to the side. Be sure not to lean to the left.
- Repeat 10 times per leg.
- Complete 3 sets of the exercise.
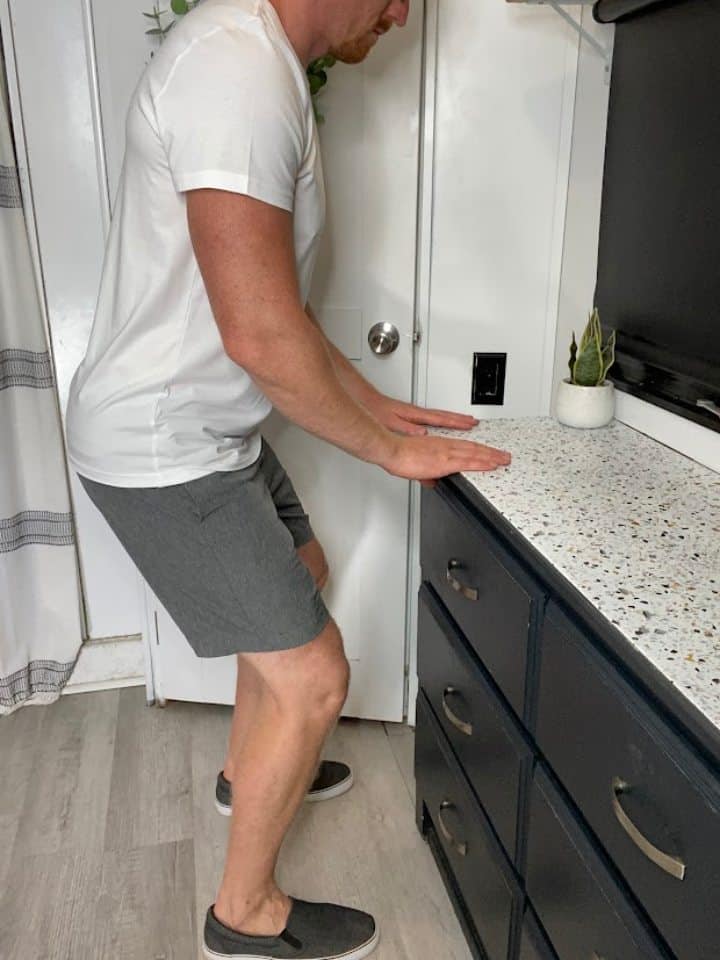
4. Standing Hip Extension
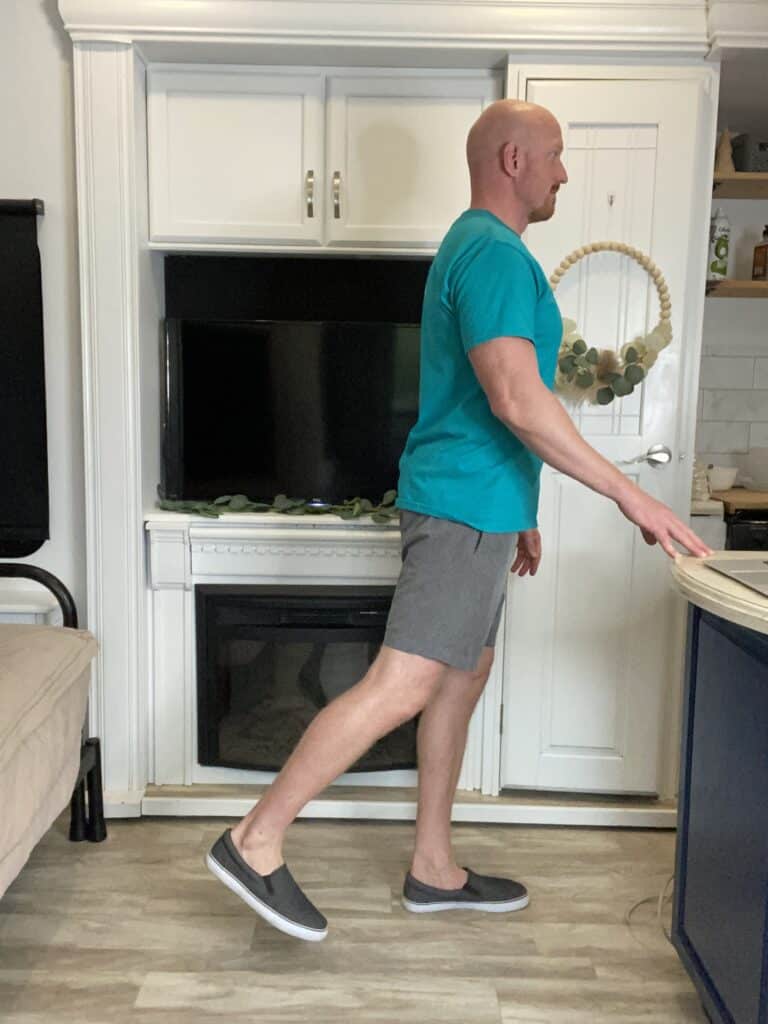
- Stand tall with your hands placed on a steady surface. You can use a counter, sink, or chair (no chairs with wheels) to hold on to for balance.
- Shift your weight onto your left leg, keeping a soft bend in your left knee to keep it from locking out.
- Then, keeping your toes pointed forward and your right leg straight, lift your right leg back a few inches, then lower back down.
- Repeat 10 times per leg for 3 sets.
5. Standing Calf Raises
- Stand facing a wall or sturdy surface for balance.
- Place your feet hip-width apart.
- Slowly lift your heels as high as you can and then lower them back down.
- Repeat for 10 repetitions for 3 sets.
These exercises aim to strengthen the muscles around the new hip, improve flexibility, and enhance blood circulation to aid in the healing process. Remember, these exercises are general guidelines, and it’s essential to follow the specific regimen given by your surgeon.
Care Tips for Post-Hip Replacement Patients
Caring for your new hip involves more than just physical exercises; it’s about adopting a lifestyle that promotes healing and protects your new joint.
- Follow Post-Op Instructions: Heed your surgeon’s advice regarding movement restrictions and medication.
- Maintain a Healthy Diet: Nutrition plays a crucial role in healing and overall health.
- Stay Active: Regular, surgeon-approved activities help maintain strength and mobility.
- Avoid High-Impact Activities: Protect your new hip from activities that could cause damage or dislocation.
- Use Assistive Devices as Needed: Walkers, canes, and grab bars can help prevent falls and injuries.
- Regular Check-Ups: Attend all follow-up appointments with your surgeon to monitor your recovery.
Conclusion
Rehabilitation after hip replacement surgery is a journey that requires dedication, patience, and careful adherence to professional advice. By understanding the potential causes and symptoms of complications, patients can take proactive steps to avoid them. Following a surgeon-approved exercise regimen is key to strengthening the hip and surrounding muscles, ensuring a smoother recovery.
Additionally, adopting comprehensive care tips will further protect the new hip and promote overall well-being. With the right rehabilitation strategies, patients can enjoy a quicker return to their daily routines and an improved quality of life post-hip replacement. Remember, every step taken in following these guidelines brings you closer to regaining your mobility and independence.

Wondering What's Next?
Discover 11 Easy, At-Home “Stretch Exercises” for Stronger, Pain-Free Joints (click below)