
Free download: Top 10 Natural & Easy Remedies for Joint Pain from Home. Learn these helpful remedies.
Estimated Reading Time: 5 minutes read
Did you know that one of the most important ways you can prevent carpal tunnel syndrome is by having an ergonomic desk setup? You may spend hours in front of your desk every day, and if it’s not positioned correctly, you’re putting yourself at risk of developing wrist pain.
If you spend a lot of time in front of a desk, read on for some easy tips to adjust your workspace.

We have put together information to help your body stay in the most natural alignment possible and avoid developing carpal tunnel syndrome.
Table of Contents
What is Carpal Tunnel?
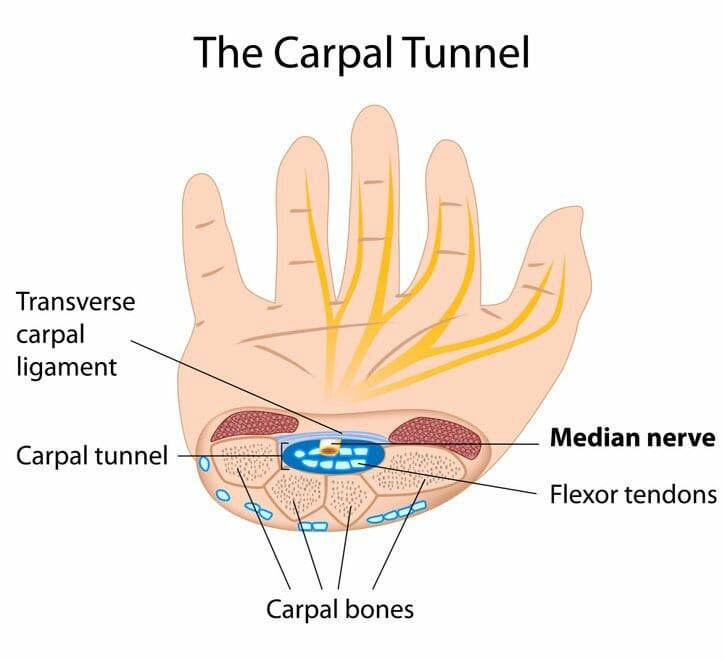
Carpal tunnel syndrome (CTS) is a collection of symptoms that occur due to impingement, AKA compression, of the median nerve.
This nerve begins in the neck, runs down the arm, through the wrist, and into the thumb (first), second, third, and part of the fourth finger and is called the median nerve.
The term “carpal” refers to the eight small bones that make up the wrist, collectively named the carpal bones.
The term “tunnel” refers to the small space between these wrist bones that allow the median nerve and other structures to pass through and into the hand.
So, carpal tunnel syndrome describes the symptoms you feel when inflammation causes the median nerve to be compressed within the carpal tunnel.
What movements contribute to carpal tunnel syndrome?
Anyone can develop CTS through repetitive wrist motion and prolonged position of the wrist in a non-neutral position (flexed, extended, rotated, etc.).
One common way people develop CTS is by their posture and positioning while working at a desk.

What are the symptoms of carpal tunnel syndrome?
You may have CTS if you have wrist pain, numbness, or tingling in your thumb (1st), 2nd, 3rd, and part of the 4th fingers.
Your symptoms may be more bothersome at night, depending on how you position your wrist during sleep.
In addition to the treatment for carpal tunnel syndrome, you can reorganize your workspace to help promote a neutral and natural posture.
Few Critical Tips for Proper Carpal Tunnel Desk Setup
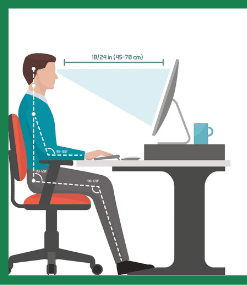
1. Proper Monitor Position
The first tip is to position your monitor level with your head so that you can keep your neck in a neutral position while you work. Try to avoid tilting your head down for prolonged periods.
You can easily find adjustable monitor and laptop stands that will bring your monitor to the perfect height for your body.
We recommend getting a Bluetooth keyboard and mouse if you work with a laptop.
This way, you can freely raise the laptop to the proper level without losing your ability to type or navigate.
2. Keyboard Placement on Desk

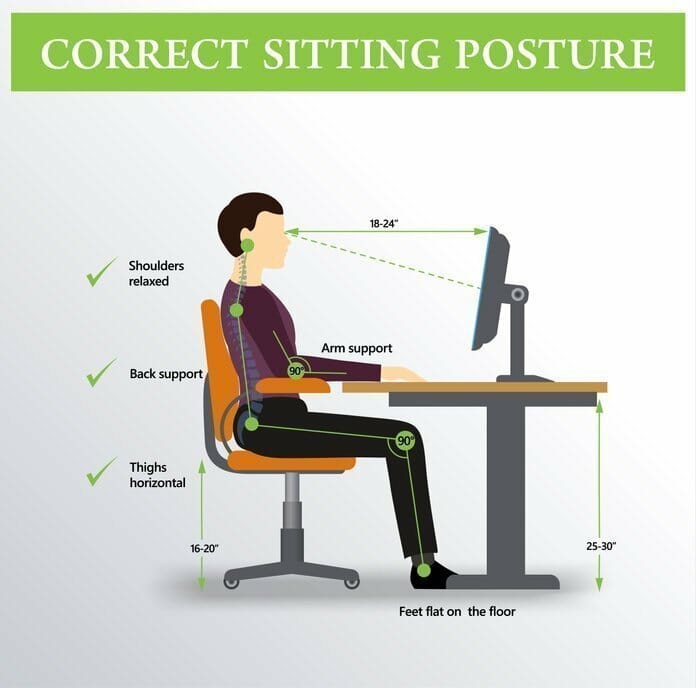
Second, you’ll want to position your keyboard and mouse on the desk in a way that allows your head, neck, shoulders to relax and your elbows to stay at around a 90-degree angle.
Try not to position your keyboard too far away from you; otherwise, you will have to lean forward to reach it.
Likewise, avoid putting it too near you at the edge of the desk; otherwise, it will take your arms out of the desired angle of healthy alignment.
3. Ergonomic Accessories
You can even find special ergonomic keyboard and mouse options that keep your hands and arms at their most relaxed and natural angles.

These are designed specifically to prevent nerve compression and pain and may be helpful for you.
If you can, try to sample several at a store to find the best fit for you. Wrist rests are available, and if they are comfortable for you, then you can use them.
Some people find that wrist rests make their symptoms worse, so don’t try to force it. If it doesn’t work for you, don’t use it.
4. Chair Placement
Next, your chair position is very integral to good postural health. Try to find an adjustable chair that will allow you to keep your knees parallel to your hips and bent at a 90-degree angle.
Keep your feet flat on the floor to evenly distribute your weight from your hips through your legs and feet.
The most crucial point is to purposely set your workstation up to promote keeping your body in a relaxed and neutral position without slouching.
5. Standing Desk
Does a standing desk help with carpal tunnel ? Yes! There are plenty of advantages to standing while you work. It is easier to move around and keep your body in proper alignment.
However, standing desks usually take some time to get used to, taking up to weeks for some people.
If you want to use a standing desk, we recommend starting by alternating between sitting and standing.
If you notice your standing posture starts to suffer, it’s time to sit down! When you feel ready, you can stand up again.
6. Take Breaks!

Finally, be sure to take frequent breaks while you’re working. If you sometimes forget to take breaks, set a timer every 20-30 minutes to help remind you to stand up, stretch, arch your back, turn your head, and do some shoulder rolls.
Doing this will loosen any tension that may have developed during the previous working session.
CTS may sound like an isolated problem, but if left unaddressed can begin to take away your ability to do your daily activities.

Minor changes to your habits can make a big difference over time, and we want to help you.
This is the third post we have created to help you improve and prevent carpal tunnel syndrome.
We also have a free 4-week guide to help you get the best results possible from our recommendations.
Consistency will make the difference in relieving and preventing CTS, so keep up the excellent work, and you’ll begin to feel results.
Click here to download the Free 4-week Guide.
Wondering What's Next?
Discover 11 Easy, At-Home “Stretch Exercises” for Stronger, Pain-Free Joints (click below)