Free download: Top 10 Natural & Easy Remedies for Joint Pain from Home. Learn these helpful remedies.
Estimated Reading Time: 7 minutes read
We’ve all been there – one minute, you’re minding your own business, walking around the house or enjoying a stroll outdoors, and the next, you’re unexpectedly meeting the ground with a rather unpleasant thud. As we age, these little mishaps tend to happen more frequently, and unfortunately, our bodies aren’t as resilient as they used to be.
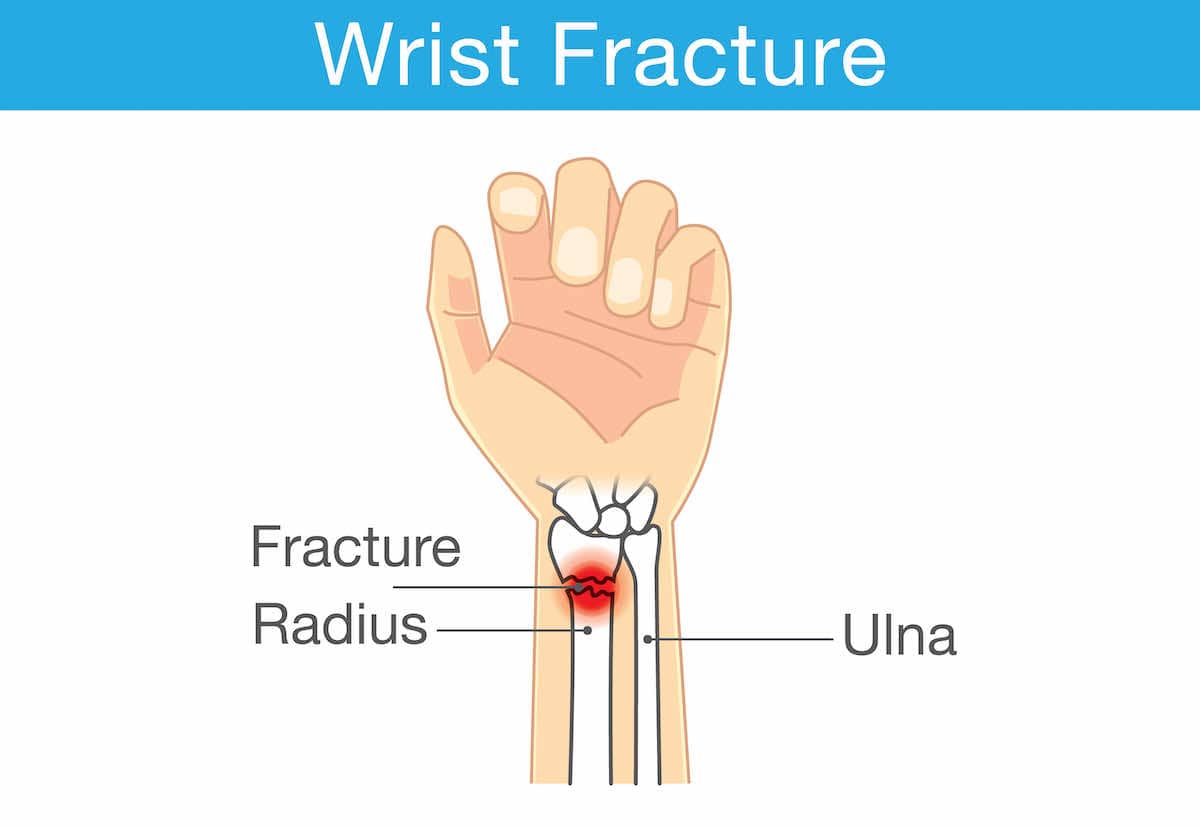
Sometimes, these accidents can result in a fractured wrist, leaving us feeling helpless and wondering how we ever managed to do so much with just one hand.

Wrist fractures and wrist instability are relatively common, especially among older adults. As we age, our bones lose density and become more fragile, increasing the risk of a fracture from a simple fall or an awkward landing. In fact, wrist fractures account for about 25% of all broken bones in older adults. Talk about putting your hands in harm’s way!
Our wrists are like the unsung heroes of our daily activities. They’re involved in almost everything we do, from stirring a cup of coffee to waving goodbye to our loved ones. So, it’s only natural that they sometimes bear the brunt of our clumsiness.
But fear not, my friends! Just because you’ve fractured your wrist doesn’t mean you’re condemned to a life of one-handed activities and awkward conversations about how you injured yourself. With the right rehab exercises, you can get your wrist back in tip-top shape and reclaim your two-handed glory.
In the following sections, we’ll introduce you to some fantastic wrist fracture rehab exercises that can help speed up your recovery and get you back to doing all the things you love (hopefully with a bit more grace).
The Road to Recovery – Rehab Exercises for Wrist Fractures
Before we dive into the nitty-gritty of wrist rehab exercises, let’s take a moment to appreciate the importance of patience and dedication in your recovery journey. It’s easy to get discouraged when you’re dealing with a fractured wrist, but remember that with time, effort, and a dash of humor, you’ll soon be back to your old self, flexing those wrist muscles like a pro!
A. Isometric Strength Exercises
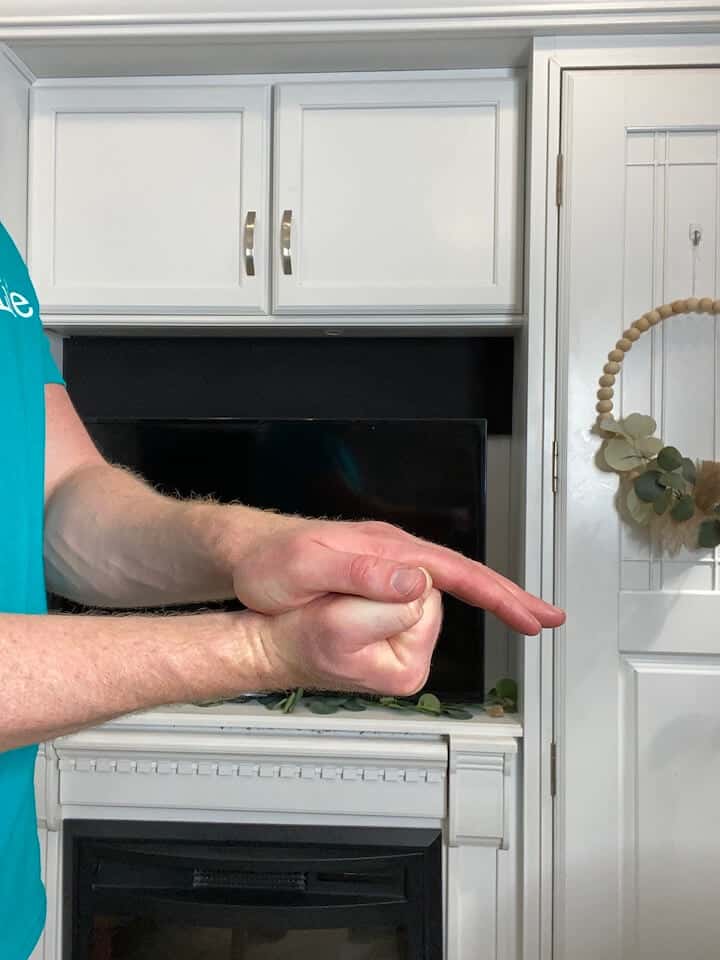
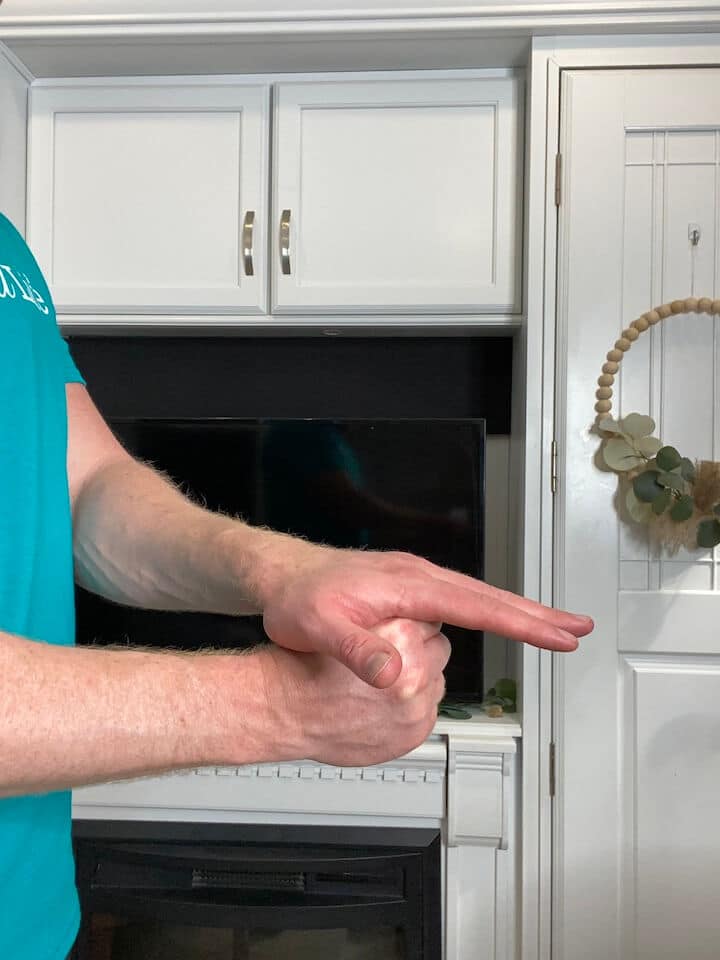
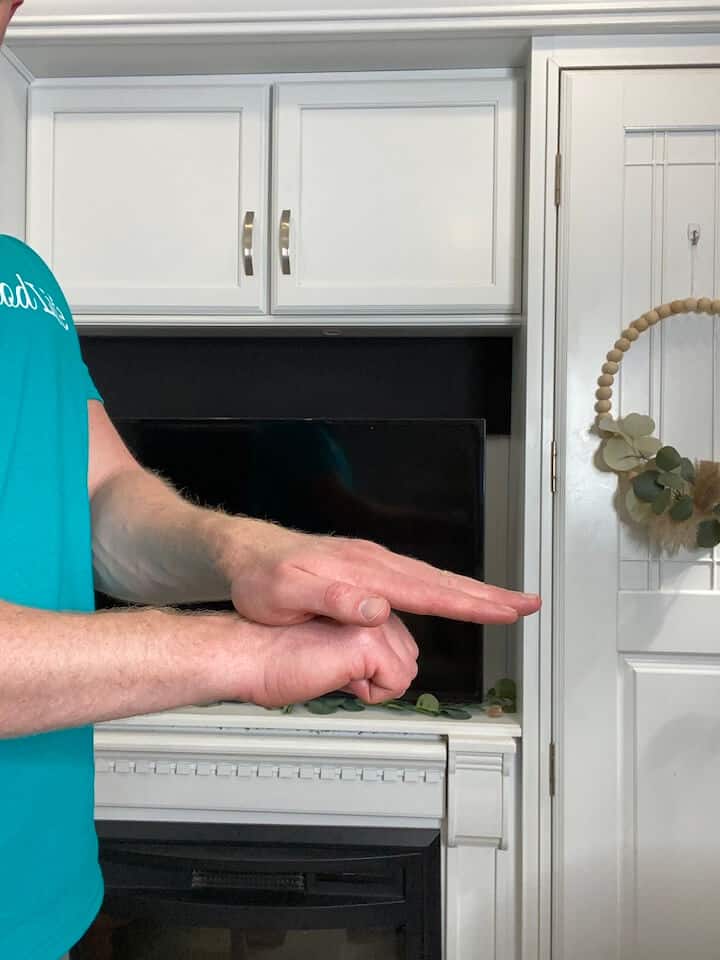
1. Isometric Wrist Strengthening
- Make a first with your injured hand.
- Then place your uninjured hand against your fist.
- Gently push the injured fist into the uninjured hand. Muscles should activate, but the injured wrist should not move.
- Adjust where you press your fist to activate the different muscles that support your wrist.
- You’ll press your wrist four ways: up, down, and then on each side.
- Hold the press for 5 seconds, 10 repetitions, and 2 sets in each of the four directions.
a. Wrist Flexion
Push your wrist upwards against resistance without changing the angle of your wrist.
b. Wrist Extension
Push your wrist upwards against resistance without changing the angle of your wrist.
c. Ulnar Deviation
Push your wrist upwards against resistance without changing the angle of your wrist.
d. Radial Deviation
Push your wrist downwards against resistance without changing the angle of your wrist.
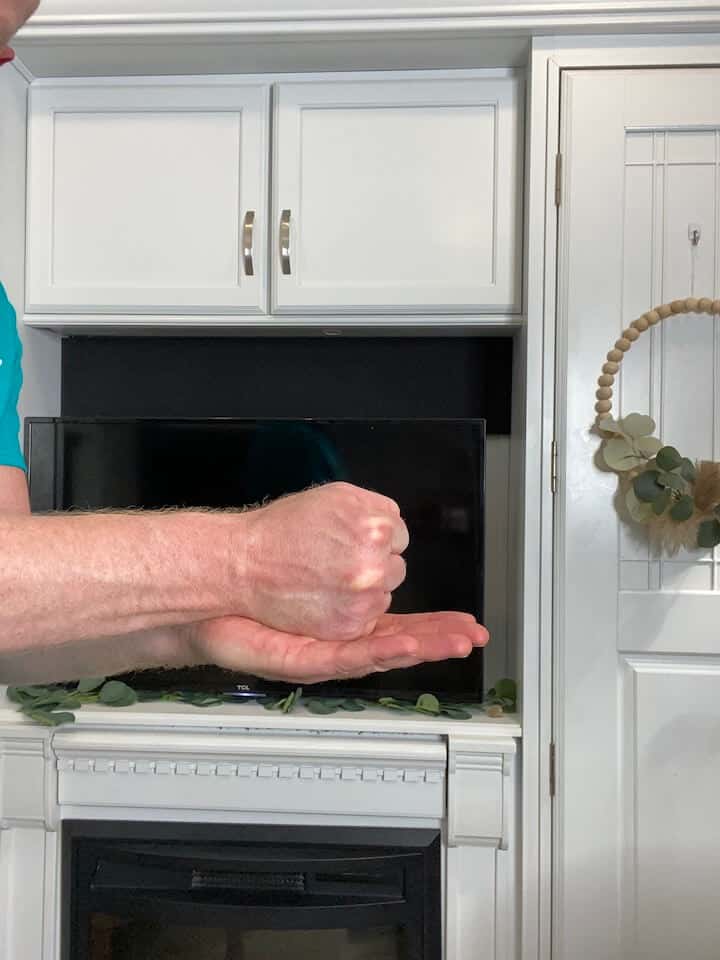
2. Tennis Ball Squeezes

- Sit at a table, leaning on the edge with your forearm. Grab a tennis ball in the palm of your hand.
- Squeeze your hand into the tennis ball and hold for 5 seconds. Release and repeat 10 times and 2 sets.
- If this becomes too easy, create a bigger gap between your fingers — the bigger the gap, the greater the challenge.
B. Range of Motion (ROM) Exercises
1. Gentle Wrist ROM


- Slowly bend and straighten your wrist.
- Move your wrist side to side.
- Do each movement 10 times.
- Repeat the exercises 3 times a day.
- Start with a gentle range of motion and gradually increase it as you feel comfortable.
- Don’t push too hard or fast, and stop if you feel any pain or discomfort.
2. Wrist Flexion Stretch
- Position yourself just like with wrist extension, only this time the palm should be facing up towards the ceiling, with the wrist straight.
- You can again use either a resistance band (light, medium or heavy) anchored under your foot or a light-free weight (2-3 lb).
- Slowly flex the wrist (moving the palm towards you), then return to neutral.
- Repeat 10-15 repetitions for 2-3 sets.
3. Wrist Extension Stretch
- Position yourself seated with the working arm supported on a table, such as your coffee table. The wrist and hand should be hanging off the edge of the table.
- The palm should be facing down towards the floor, with the wrist straight.
- You can use either a resistance band (light, medium or heavy) anchored under your foot or a light-free weight (2-3 lb).
- Slowly extend the wrist (moving the top of the hand back towards you), then return to neutral.
- Repeat 10 repetitions for 3 sets.
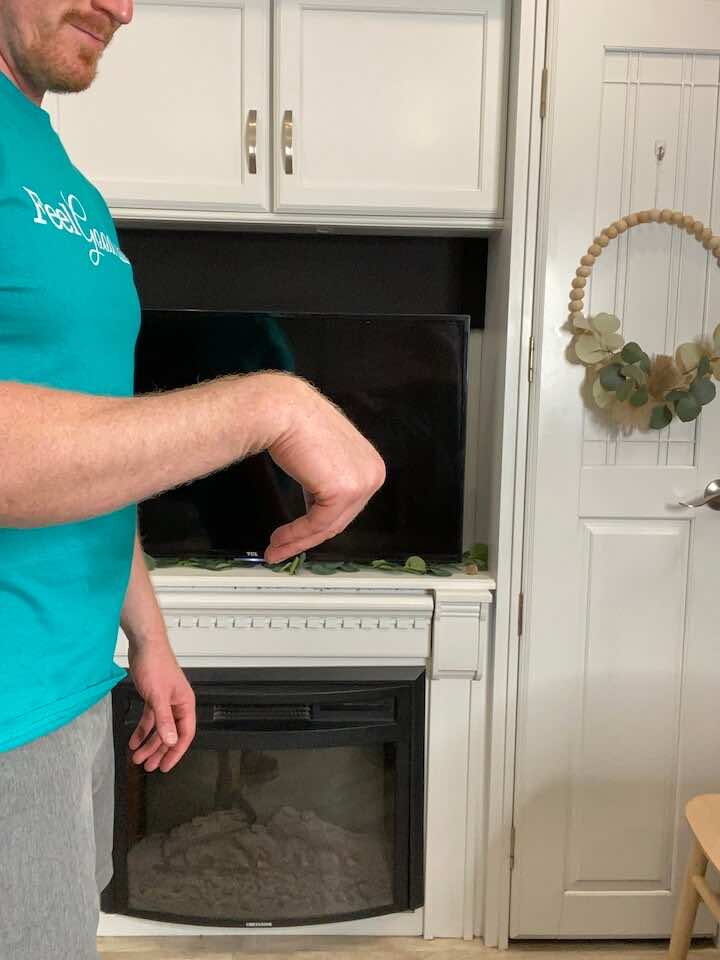
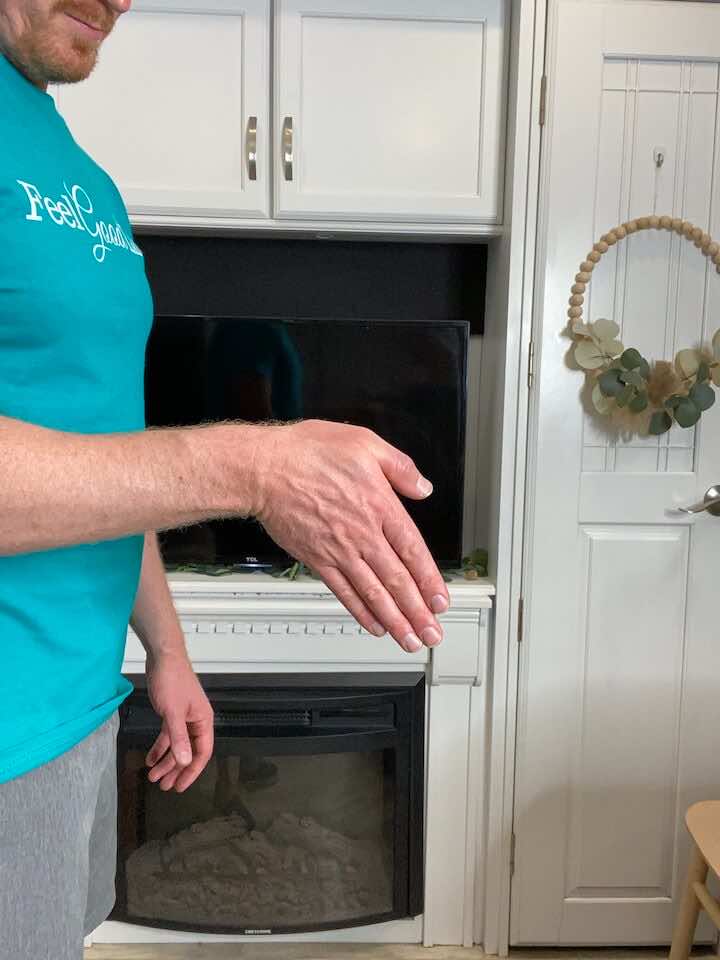
4. Hand Flip


- Place your hand on a steady surface.
- Try to rotate your hand so that your palm is facing up as much as you can – hold for 5 seconds.
- Try to rotate your hand so that your palm is facing down as much as you can – hold for 5 seconds.
- Repeat 10 repetitions.
C. Advanced Exercises (When Pain Improves)
1. Wrist Lifts

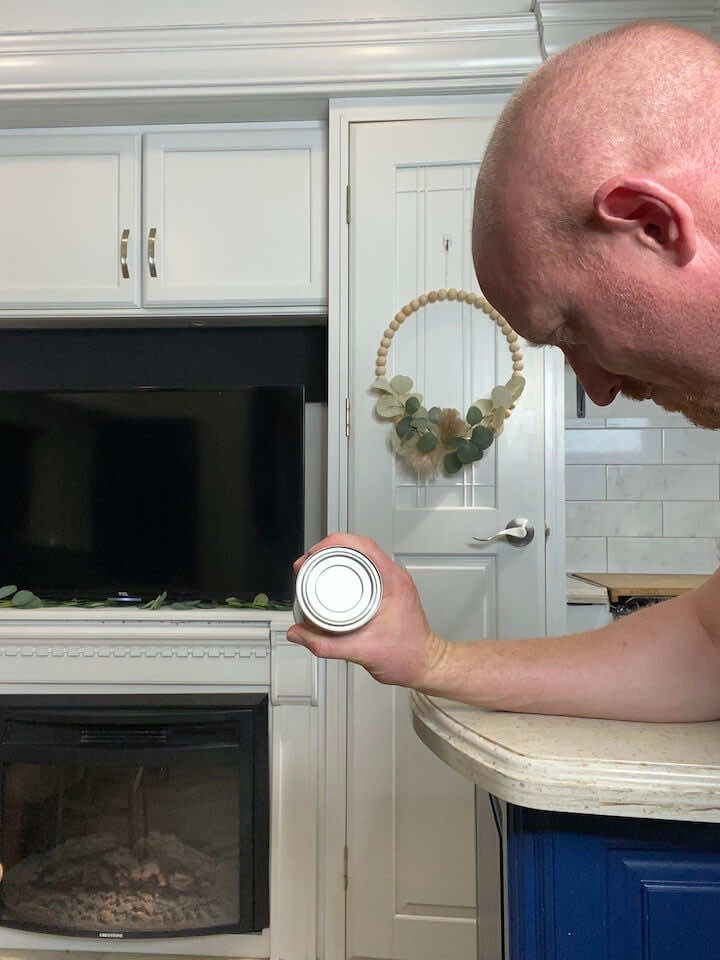
- Sit in a chair with a soup can or lightweight in your hand.
- Rest your forearm on a table or on your lap, with your palm facing downward and your wrist in a neutral position.
- Keep your elbow bent at a 90-degree angle.
- Lift the weight by flexing your wrist and raising your hand up toward your body.
- Hold the contraction for a few seconds, then slowly lower the weight back down to the starting position.
- Make sure to isolate the movement to your wrist and avoid using your forearm to lift the weight.
- Repeat the movement for 10 repetitions and 3 sets, and gradually increase the weight or resistance as you progress.
2. Wrist Curls
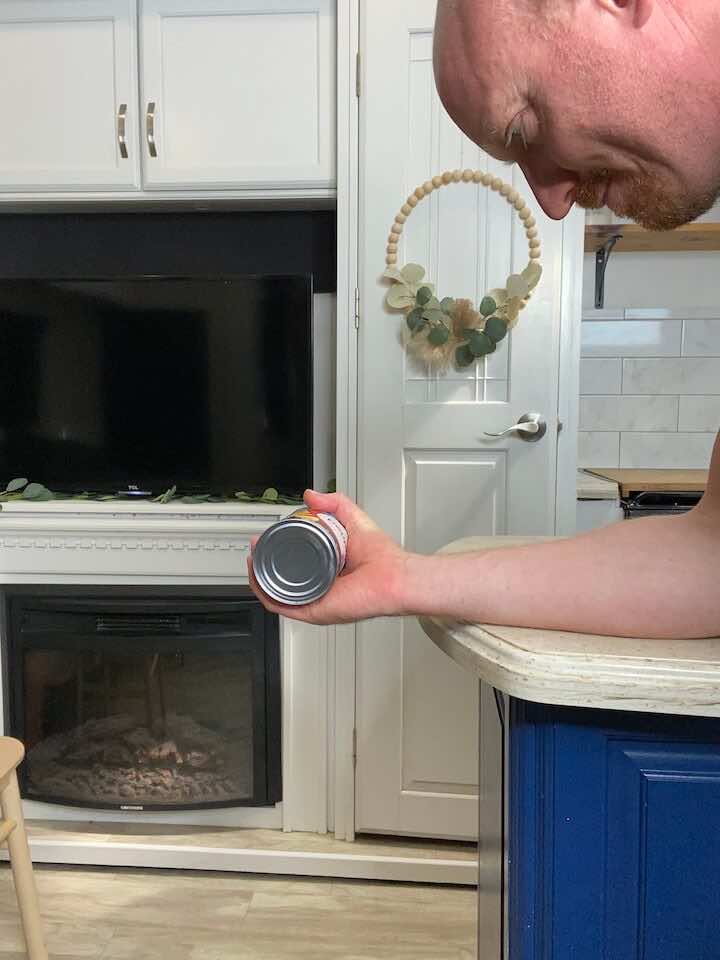
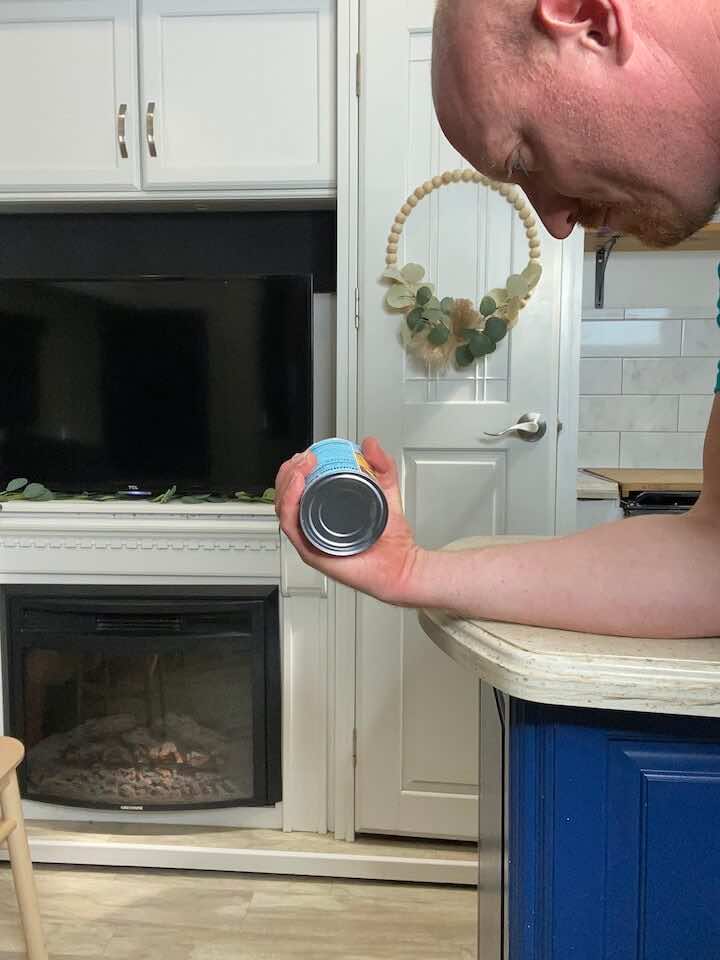
- Sit in a chair with a soup can or lightweight in your hand.
- Rest your elbow on a table, with your palm facing upward and your wrist in a neutral position.
- Keep your forearm still and isolated, and lift your wrist by curling it toward your body.
- Hold the contraction for a few seconds, then slowly return to the starting position.
- Remember to isolate the wrist and avoid using your forearm to lift the weight.
- Repeat the movement for 10 repetitions and 3 sets, and gradually increase the weight or resistance as you progress.
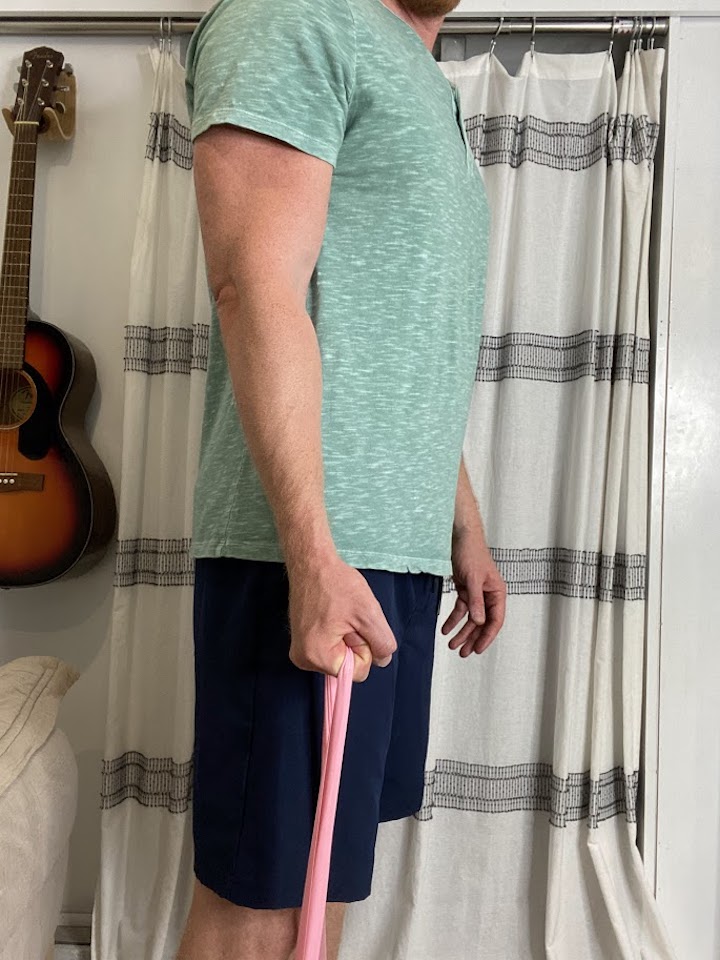
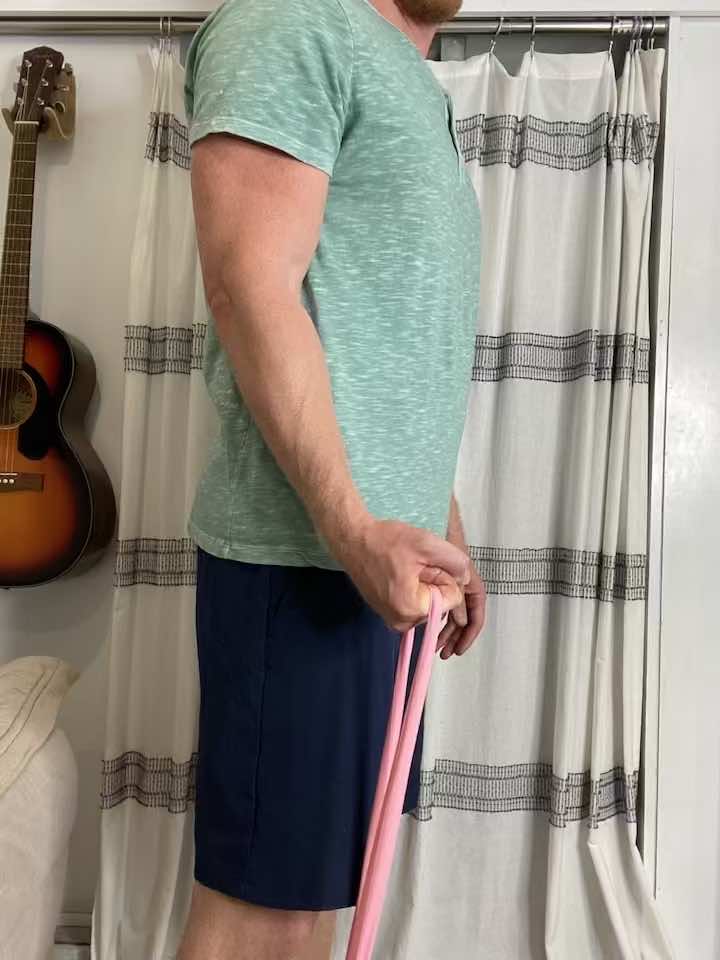
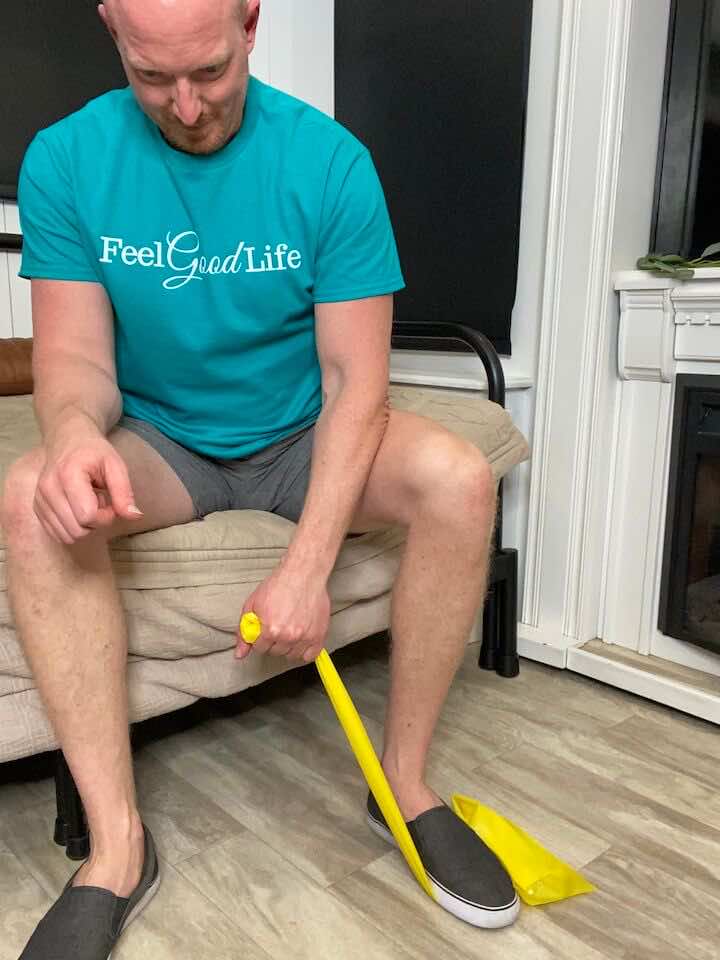
3. Wrist Ulnar Deviation with Resistance Band
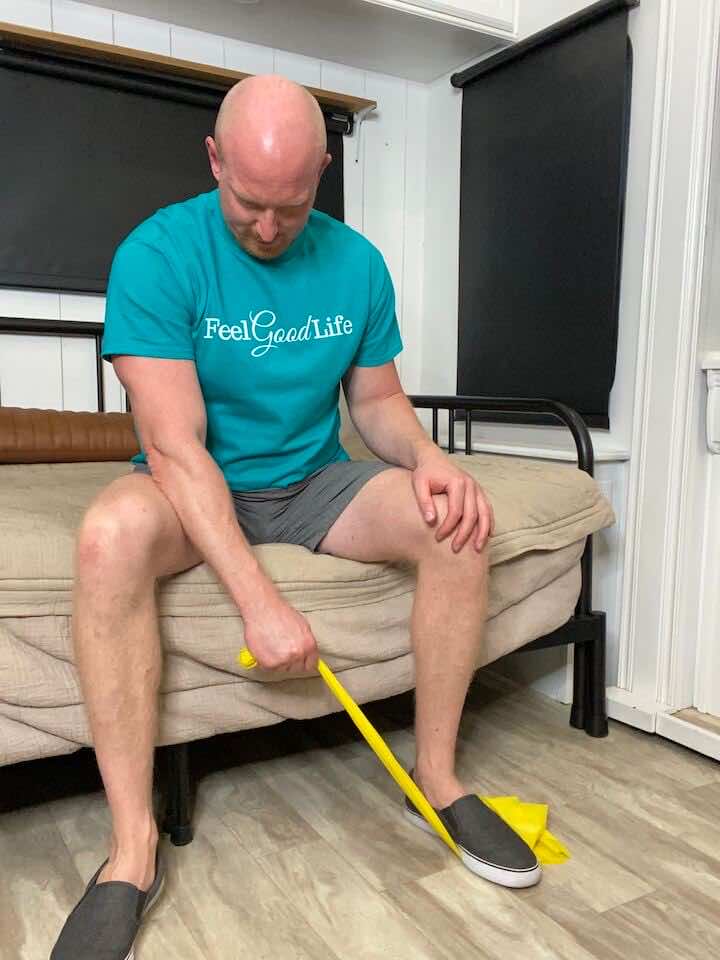
- Place a resistance band under your foot (opposite side of your injured wrist) and hold on to the band with the injured hand.
- Hold the band with your hand so that your palm is facing the floor, and there is tension on the band.
- Keep your hand in a fist and move your wrist so that your pinky side it moving to the side. It’s not a big movement, so don’t try to force extra ROM if it’s painful!
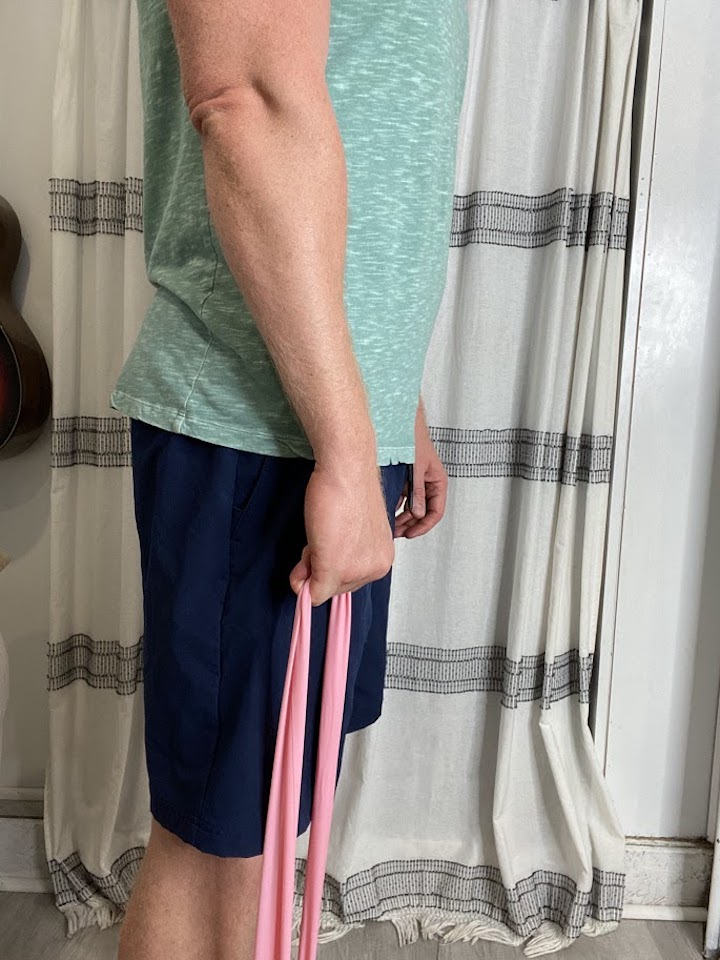
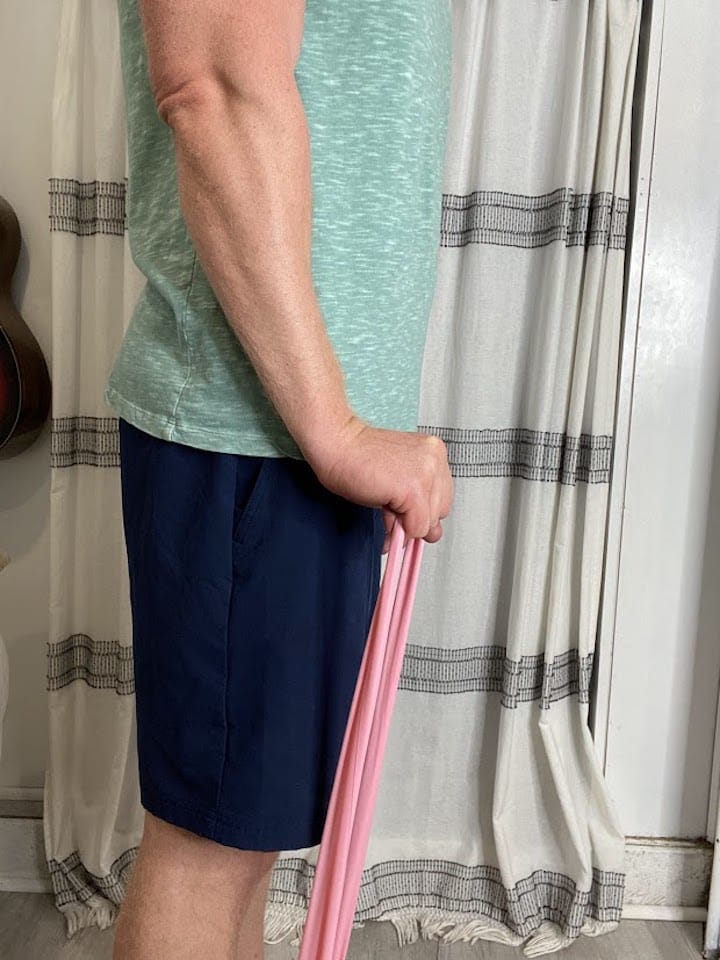
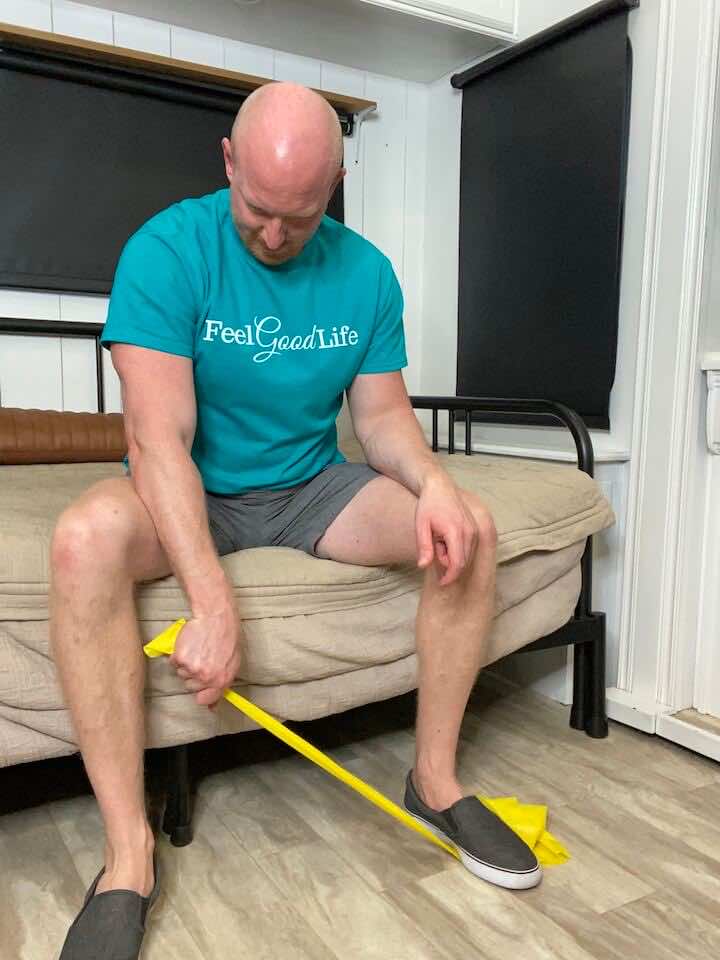
4. Wrist Radial Deviation with Resistance Band

- Place a resistance band under your foot (same side of your injured wrist) and hold on to the band with the injured hand.
- Hold the band with your hand so that your thumb is facing the ceiling and there is tension on the band.
- keep your hand in a fist and move your wrist so that your fist moves up and down. It’s not a big movement from the wrist so don’t try to force extra ROM if it’s painful!
But remember, always consult your healthcare professional before starting any exercise program, especially if you’re nursing an injury. After all, we wouldn’t want you to end up in a cast-astrophic situation!
Conclusion: Embrace the Journey to a Stronger Wrist
As you progress through your rehab journey, remember to listen to your body, follow your healthcare professional’s advice, and, most importantly, stay positive. With patience, humor, and the right set of exercises, you’ll be on your way to a speedy recovery from your wrist fracture. After all, a strong wrist is just around the corner, and you’ll soon be waving goodbye to your one-handed days!
Wondering What's Next?
Discover 11 Easy, At-Home “Stretch Exercises” for Stronger, Pain-Free Joints (click below)