
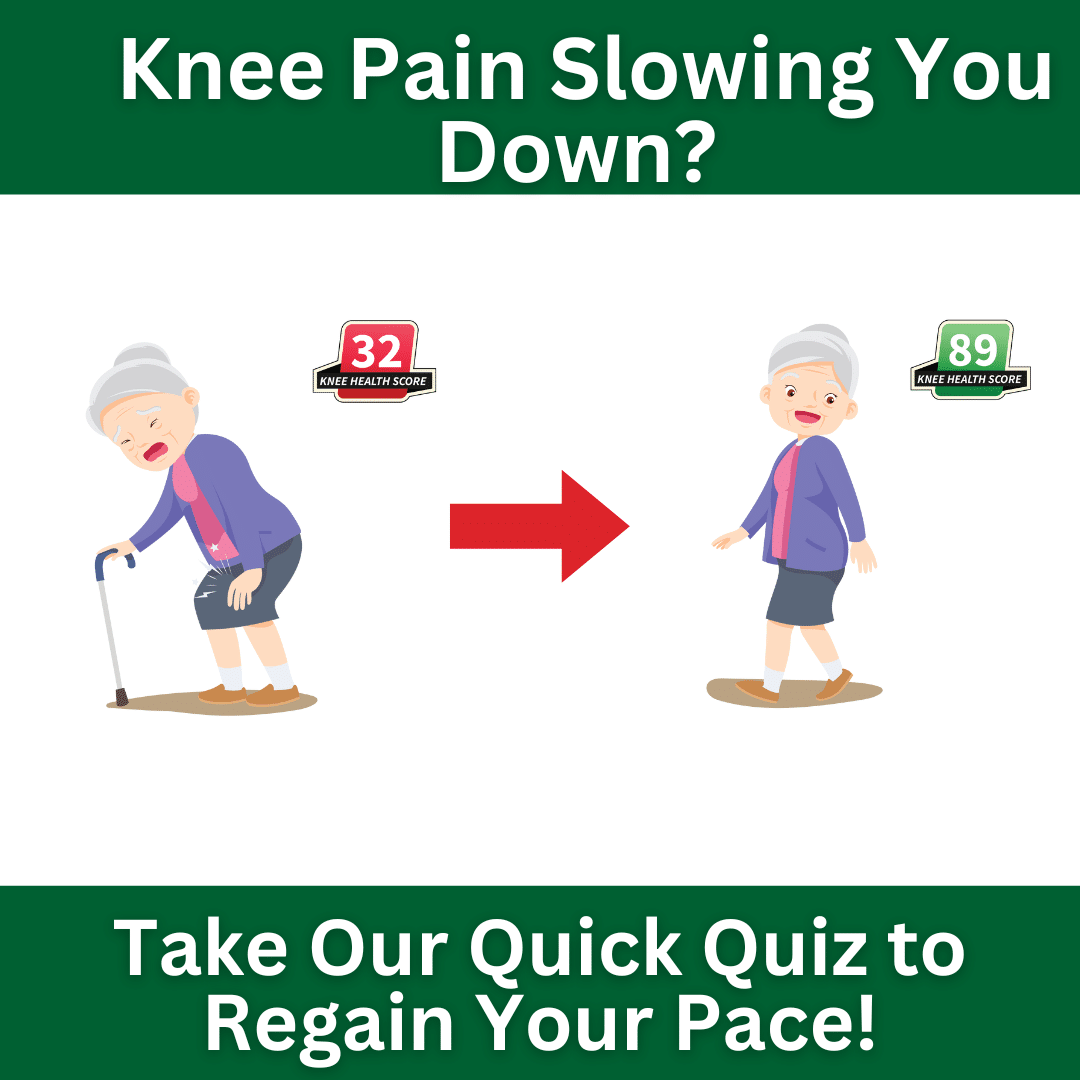
Free download: Top 10 Natural & Easy Remedies for Joint Pain from Home. Learn these helpful remedies.
Estimated Reading Time: 8 minutes read
Hey there, my friend! Are you feeling a bit stiff in the lower back? Don’t worry; it happens to the best of us, especially as we get a little older. But the good news is that some simple stretches can help relieve that tightness and discomfort.
You see, as we age, our muscles tend to get a bit tighter and less flexible, which can lead to lower back pain. But, by doing some gentle stretches, we can loosen up those muscles and alleviate that pain.

Now, I know what you might be thinking – “I’m too old for all that stretching nonsense!” But trust me; it’s never too late to start taking care of your body. Plus, who doesn’t want to feel a bit more limber and spry, right?
So, let’s get to it! I will walk you through nine stretches specifically designed to help relieve that tightness in your lower back. And, don’t worry, I promise they’re not too complicated or strenuous.
Oh, I almost forgot! Before we dive into these stretches, let’s talk more about why the lower back can tighten up in the first place.
The lower back is made up of complex structures such as bones, muscles, ligaments, and nerves. When any of these structures are injured or strained, it can cause tightness and pain in the lower back. The most common causes of lower back pain are poor posture, muscle imbalances, and lack of exercise. Sitting for prolonged periods, especially with poor posture, can cause the muscles in your lower back to weaken and become tight, resulting in pain and discomfort.
But fear not, my friend! Stretching is an effective way to relieve lower back pain and stiffness. When you stretch your muscles, it increases blood flow to the affected area, which promotes healing and reduces inflammation. Stretching also improves your range of motion, reduces muscle tension, and improves your posture. Incorporating regular stretching into your routine can prevent future lower back pain and improve your overall physical health.
Now, I know that stretching might sound a bit intimidating, especially if you’re worried about causing further injury or pain. But don’t worry; we’ve got some tips to help you stretch safely.
Firstly, it’s important to warm up your muscles before stretching. You can do this by doing some light cardio or dynamic stretching. Take it slow and gentle when stretching, avoiding any sudden or jerky movements. Hold each stretch for 15-30 seconds and repeat each stretch 2-3 times. If you experience any pain or discomfort while stretching, stop immediately and consult a healthcare professional.
So, are you ready to give these stretches a try? Trust me, your lower back will thank you for it!
Table of Contents
9 Best Stretches for a Stiff Lower Back
Before we dive into these 9 best stretches for a stiff lower back, let’s make a commitment to prioritize exercise in our daily routine. It doesn’t have to be anything crazy – just a few minutes of movement each day can make a big difference in how we feel.
So, let’s get moving and make exercise a regular part of our day! And, don’t forget to share your thoughts on these stretches in the comments below – let’s support each other in our fitness journeys!
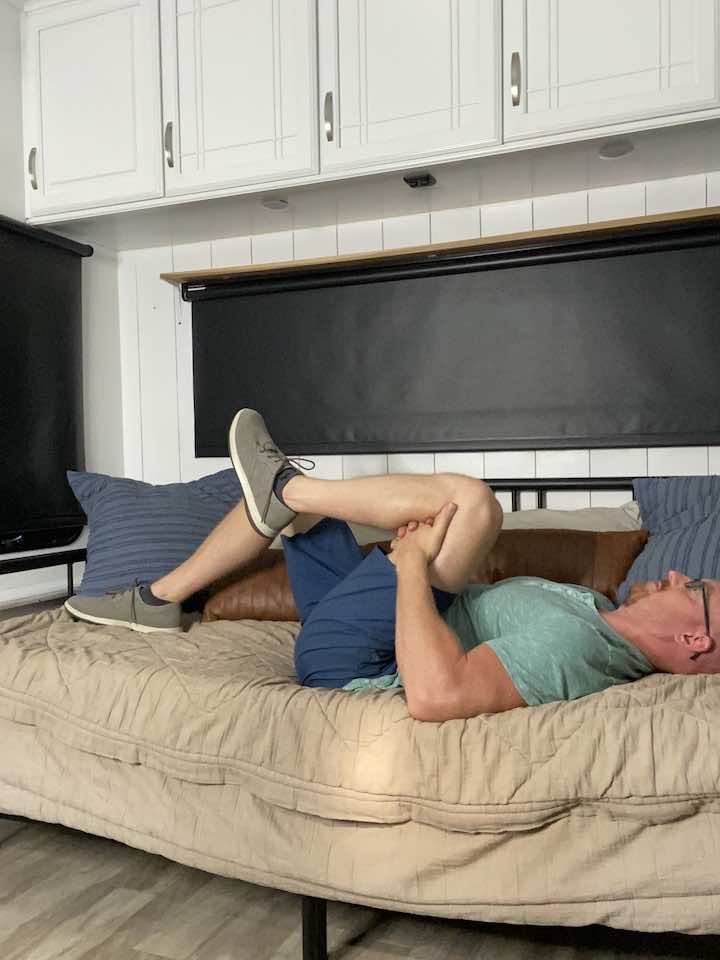
1. Piriformis Stretch

- Lay on your back on your floor, bed, or couch.
- Bend both knees so the feet are flat on the surface.
- Cross the leg to be stretched over the opposite thigh, so that it’s fully resting on that leg.
- Take the opposite hand and place it on the outside of the thigh on the leg to be stretched.
- Gently pull the thigh towards the opposite hip (avoid allowing the hip and/or back to lift off the surface).
- Hold for at least 30 seconds or up to 1 minute.
2. Sitting Hamstring Stretch
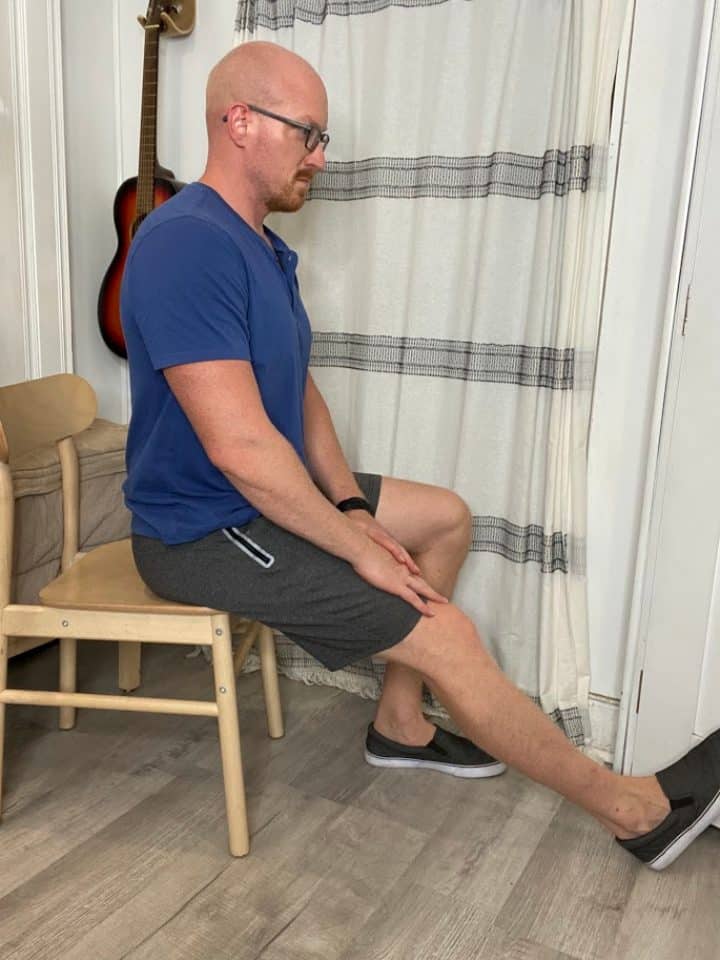
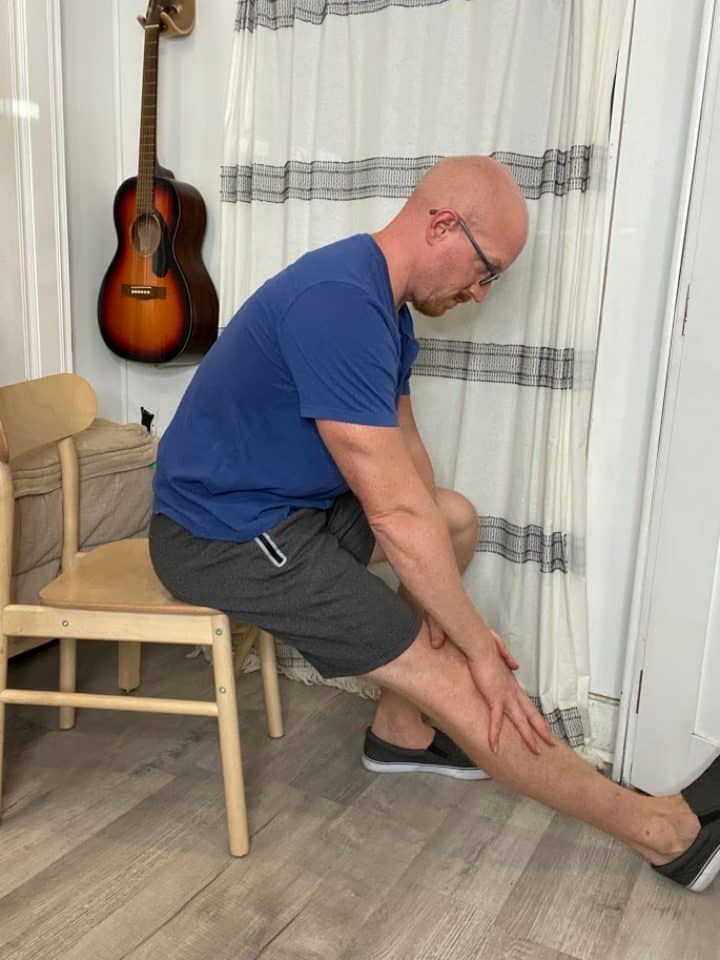
- Seated in a chair, place the leg to be stretched and extended in front of you (the knee should be straight).
- Keeping a straight back, bend forward via hinging at the hips.
- Once you feel a tolerable stretch behind the back of the leg, hold for at least 30 seconds or up to 1 minute.
3. Side Opener

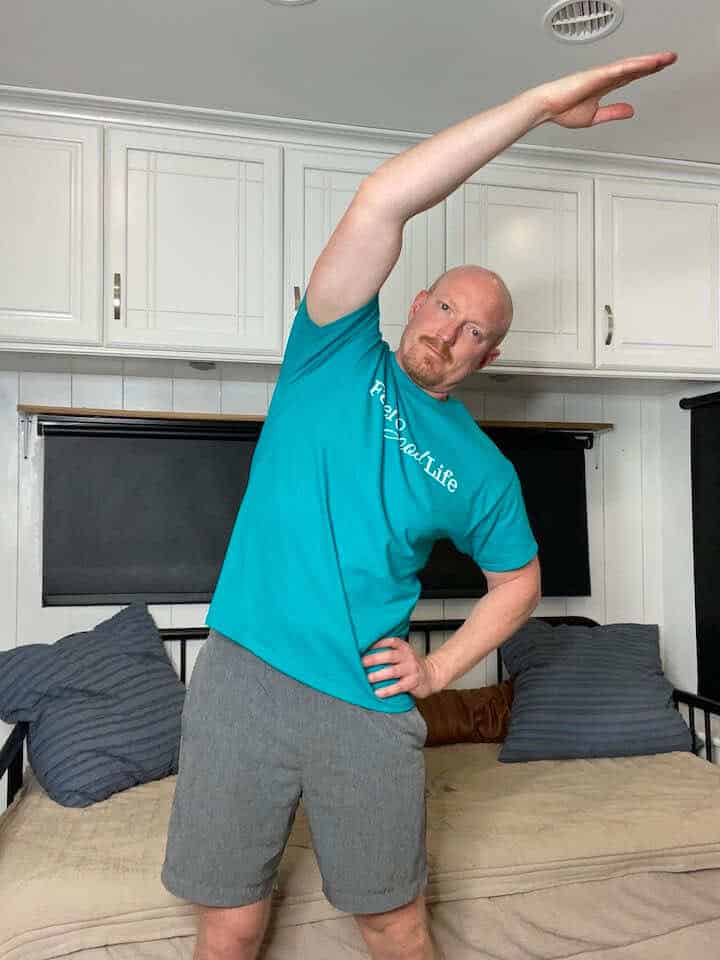
- Stand with your feet shoulder-width apart (seeing a pattern here with your feet? When your feet are shoulder-width it gives you good stability). Keep your weight evenly distributed throughout the standing stretch.
- Place your left hand on your waist for stability. Lift your right arm over your head. Slowly bend toward your left side. It’s important to keep your hand on your hip for good support. Bend until you feel a good stretch on the right side of your torso. Hold for 5 seconds then repeat. Switch sides after 3 sets.
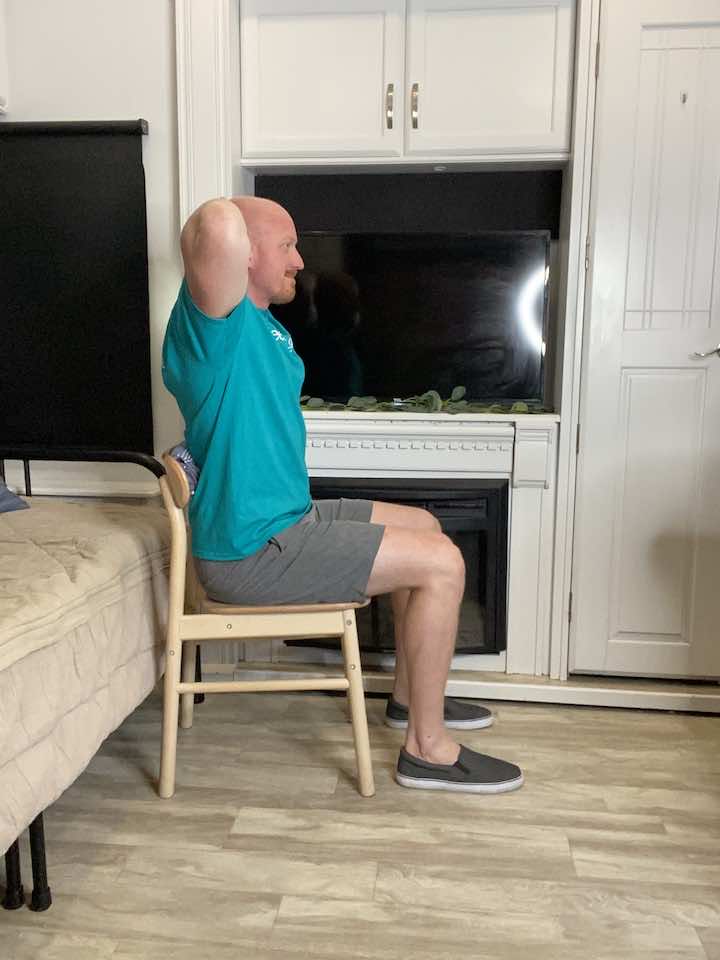
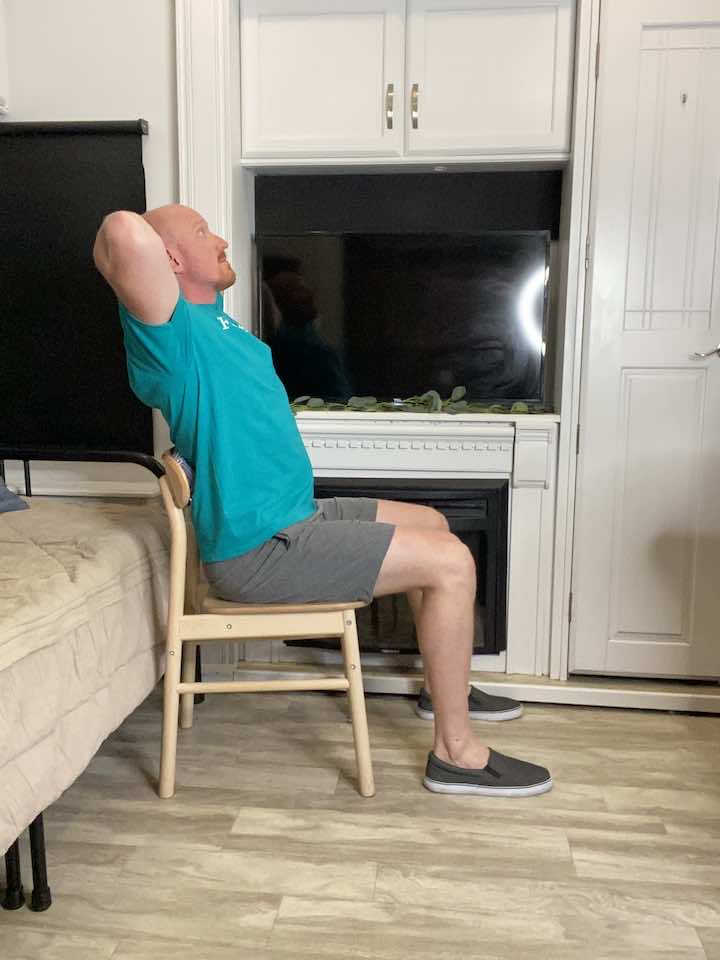
4. Reach the Sky
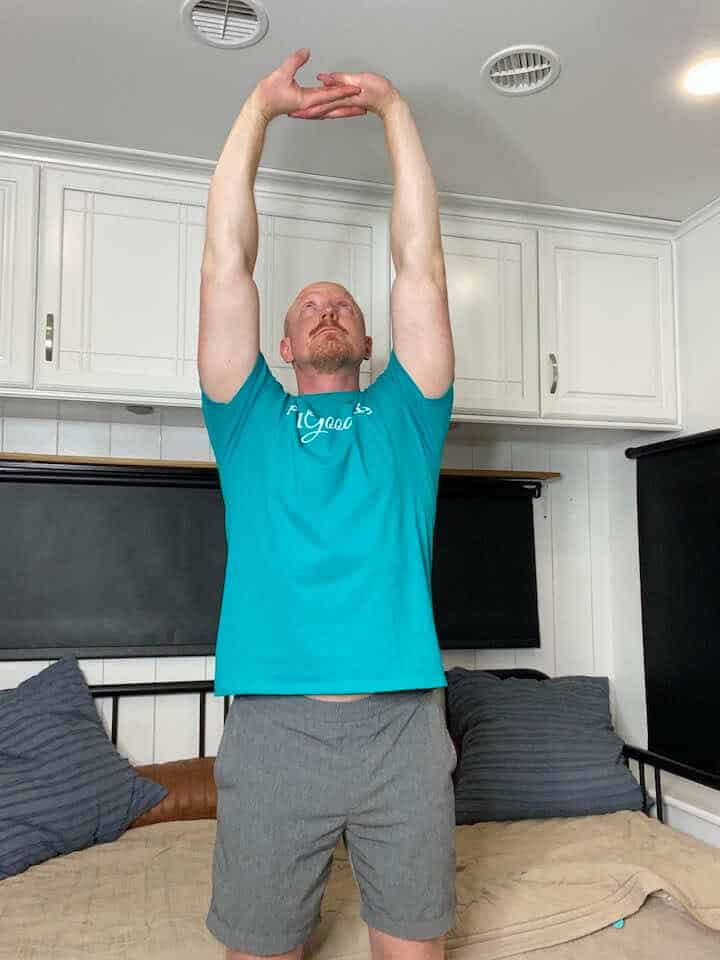
- Stand shoulder-width with knees parallel. Keep your spine neutral and not hunched over.
- Interlace your hands and reach up toward the sky with your elbows straight. It’s important to keep your shoulders down.
- Look toward the sky, right at your hands. You should feel like you’re dangling! As you do this, squeeze and release your thighs, and repeat.
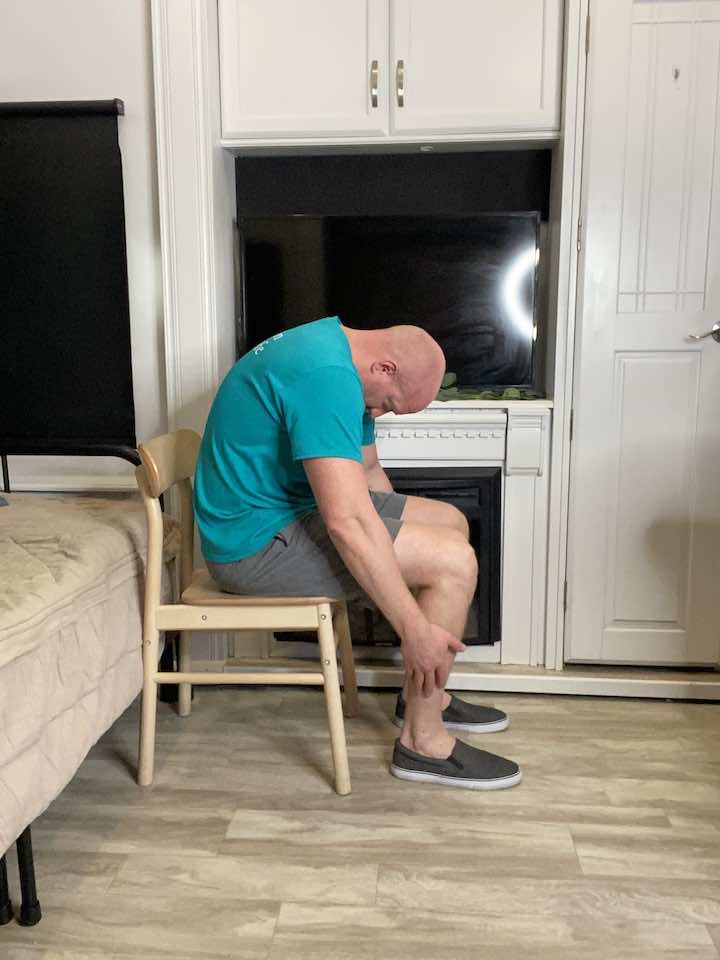
5. Rag Doll Stretch

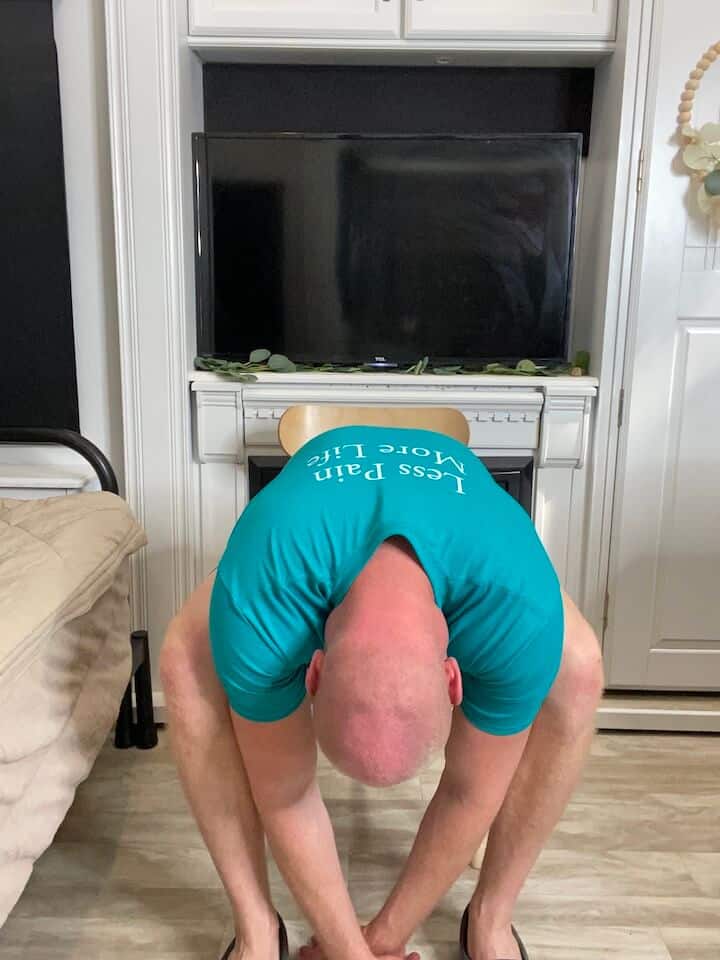
- Sit on the edge of the chair, and slowly fold your arms and chest down until your hands touch the ground. Take a few deep breaths, and on every exhale, sink lower and lower into the stretch.
- When you are ready to return, walk your hands up your legs, pressing into your palms to slowly realign one vertebra at a time.
- Repeat this stretch 2 more times.
6. Seated Cat/Cow
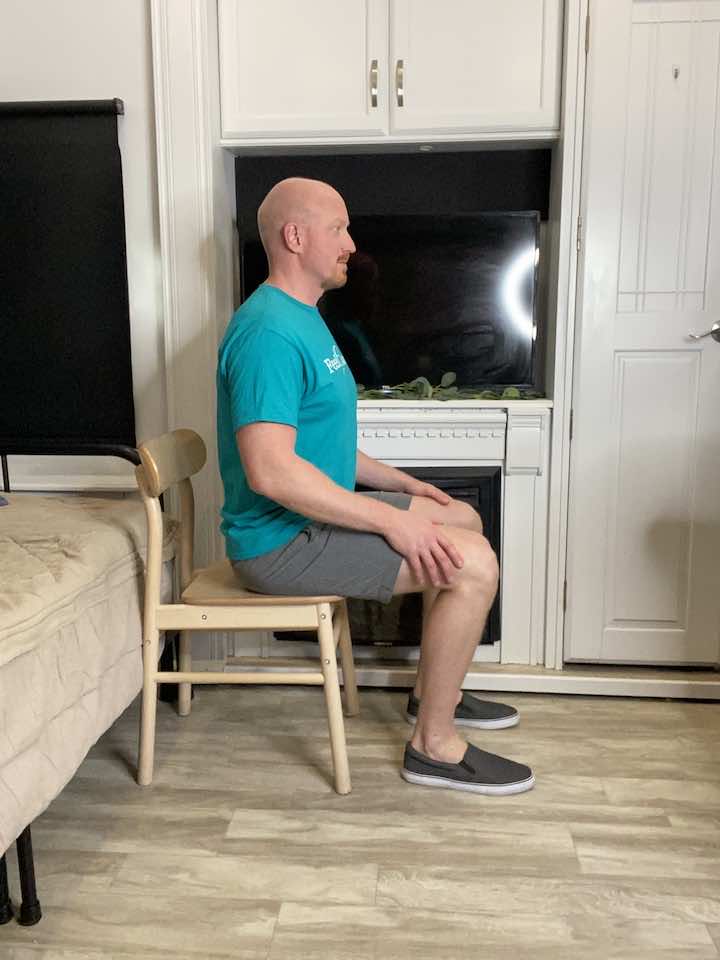
- Sit on the edge of your chair and place your hands on your knees.
- Take a deep inhale and expand your belly, sides, and back similar to the pelvic tilts.
- Upon exhaling, round your spine, sliding your hands down your knees and tucking your chin for greater depth.
- Go as far as comfortable (or until your exhale is complete).
- Inhale and return past the neutral position and into a slight back arch.
- Repeat these two movements 5 times moving with your breath.
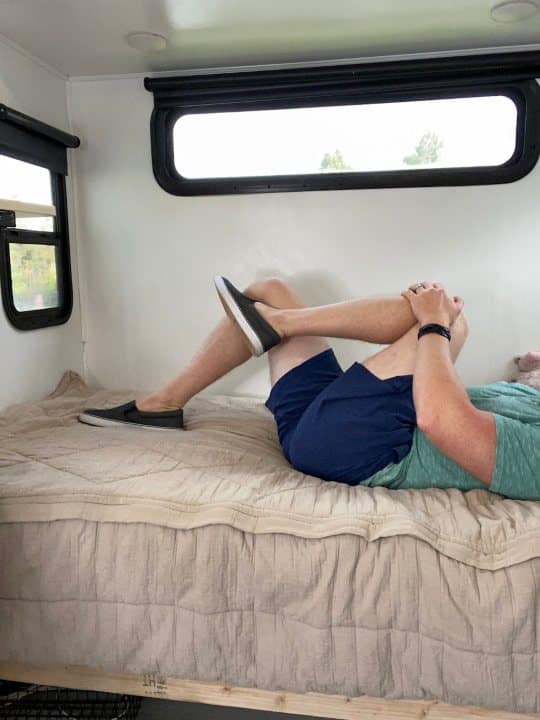
7. Knee-to-Chest Stretch
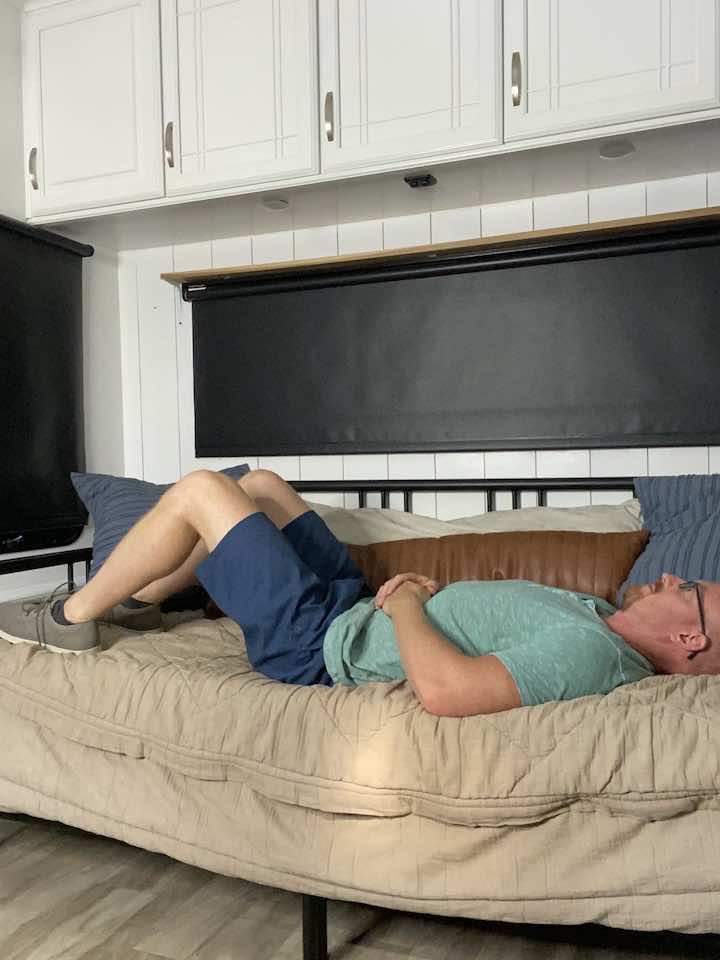
- Starting position: Laying on your back with your knees bent and feet flat on the bed. This is a nice, decompressed position for the spine to begin in.
- Reach the hands behind the thigh of one leg and slowly pull the leg so that your knee moves in towards the chest. Keep the intensity of the stretch gentle and the leg as relaxed as possible.
- Hold at least 30 seconds or up to 1 minute. Repeat on the other side.
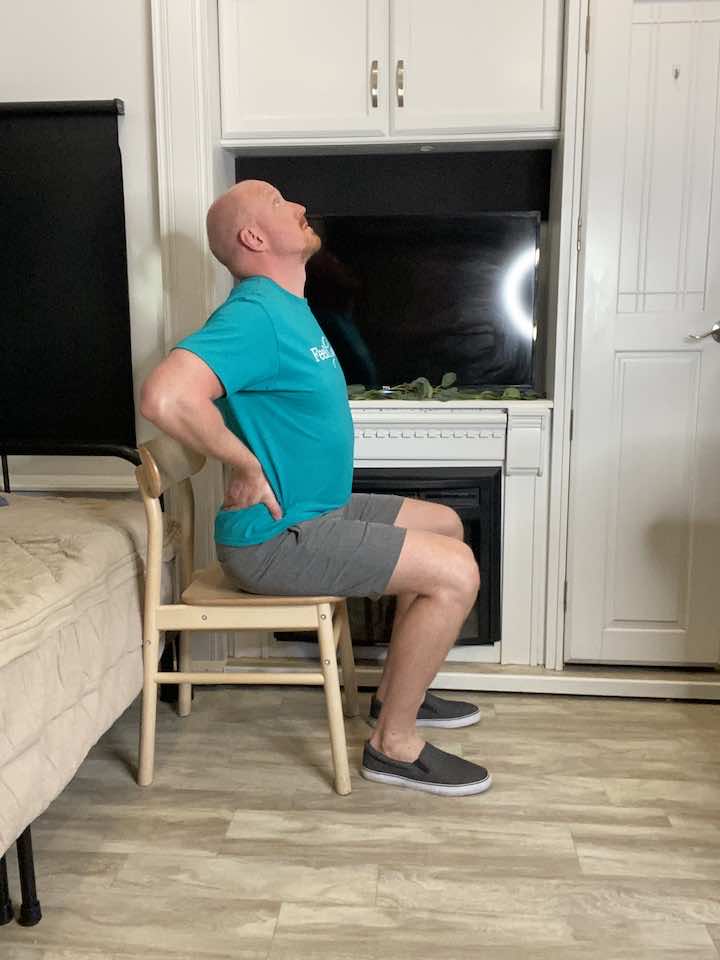
8. Seated Back Bends
- Sit in a chair with your knees at a 90-degree angle and shoulder-width apart. Place a ball or large rolled-up towel between the middle portion of your back and the chair. The ideal placement is at bra strap level. Guys, you’ll have to use your imagination to get the placement correct.
- Now slowly lean your upper back over the ball one vertebrae at a time. Make sure not to arch using your lower back. You want to roll the middle back over the ball.
- Don’t expect huge movements here. Each single vertebra doesn’t have a large range of motion. And since you are isolated your thoracic, focus on precision over huge movements. Continue to perform this stretch for 20 seconds.
- Repeat 3 times.
9. Low Back Opener
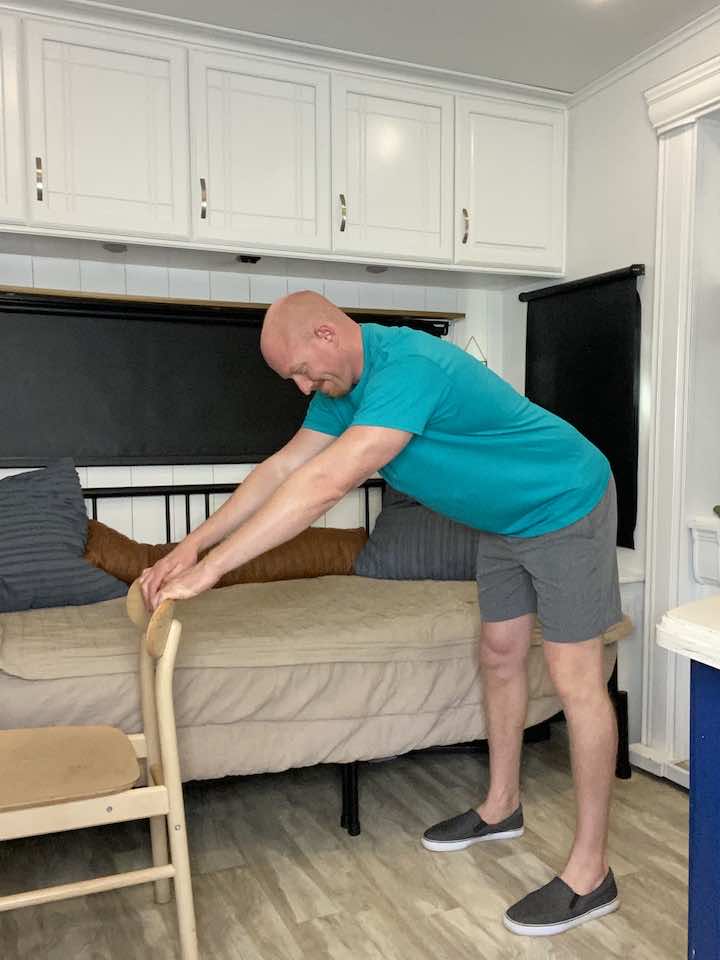

- Stand with your feet shoulder-width apart while facing the back of a chair. Place your hands on the backrest and hinge from your hips as you lower down. Ideally, you should lower it to about 90 degrees but don’t go that far if you are especially tight. Bonus points if you are able to get your arms straight. If you can’t, that’s okay too.
- Hold for 20 seconds. Repeat 3 times.
Conclusion
In conclusion, these nine stretches are a great way to alleviate tightness and discomfort in the lower back. I encourage you to take a few minutes out of your day to try these stretches and see how they make you feel. Even if you’re feeling a bit hesitant or intimidated, remember that it’s never too late to start taking care of your body. You deserve to feel your best, and by incorporating these stretches into your routine, you’re taking an important step toward that goal.
Let me know in the comments below how these stretches worked for you or if you have any other favorite stretches for the lower back. And if you have any feedback or thoughts on these stretches. Let’s keep the conversation going and encourage each other to prioritize our physical health.
Wondering What's Next?
Discover 11 Easy, At-Home “Stretch Exercises” for Stronger, Pain-Free Joints (click below)