

Free download: Top 10 Natural & Easy Remedies for Joint Pain from Home. Learn these helpful remedies.
Knowing how to exercise with a sprained wrist can be a little challenging. While you want to move the recovery process along, you might also be concerned about worsening your injury.
The most important thing to know is that it is possible to exercise with a wrist sprain!
Before we get to which exercises are best for a sprained wrist, let’s take a closer look at what a sprained wrist is and additional treatment recommendations.

Table of Contents
What is a Sprained Wrist?
The wrist is made of 3 joints:
- Distal radioulnar joint
- Radiocarpal joint
- Ulnocarpal joint
The radiocarpal and ulnocarpal joints connect with specific carpal bones that are located in the hand itself.
There are multiple ligaments that connect different bony structures in the wrist. This helps to ensure consistent support and stability to the wrist joints.
When any of these ligaments are injured, this results in a wrist sprain. Knowing this anatomy will help guide which exercises are best for a sprained wrist.

Grades of a Wrist Sprain
There are 3 grades of a wrist sprain possible:
Grade 1: This is a mild sprain. The ligaments have been overstretched, but not actually torn. This may take 1-2 weeks to heal.
Grade 2: This is a moderate sprain. There is usually partial tearing of the ligaments, but not a complete tear. This severity of sprain could take anywhere from 1-2 months to heal.
Grade 3: This is a severe sprain and a complete tear. It’s not uncommon for surgery to be needed to correct this. After surgery, rehab and recovery could take several months to a year for the full healing process.
Causes of a Sprained Wrist
It’s common for some type of trauma to cause a wrist sprain. The following are common causes of a sprained wrist:
- Fall onto an outstretched hand
- Repetitive overuse
- An abnormal wrist motion or twisting of the wrist, with or without a heavy load
What Does a Sprained Wrist Feel Like?
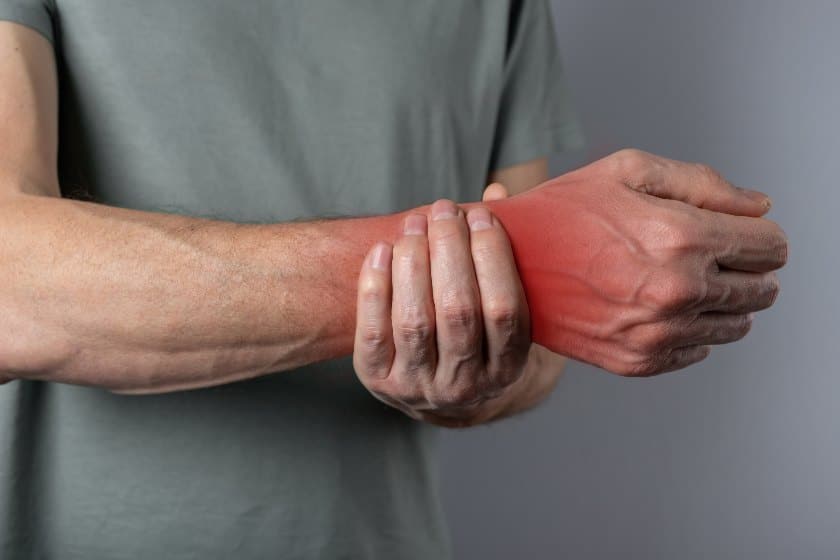
A sprained wrist will usually feel achy and tender.
You may also notice swelling immediately or soon after the moment of injury.
There may also be warmth and/or bruising of the wrist.
Depending on the severity of the sprain, you may also notice the following challenges with wrist function:
- Decreased wrist range of motion and mobility
- Decreased hand and wrist strength
- Difficulty picking up and holding heavier objects, such as a full water bottle
Treatment Options for a Sprained Wrist
R.I.C.E.
Before beginning exercises for a sprained wrist, in the first 48 hours of treating this injury, the R.I.C.E. method is an essential go-to.

Make sure to rest the wrist and keep it elevated, such as on a pillow.
Ice regularly, typically in 20-minute increments (take at least a 30-minute break in between icing sessions).
You will also want to consider using some type of compression on the wrist. This may be a wrist brace or wrap. You can use this during the daytime and at night while sleeping (just make sure it’s not applied too tightly, especially at nighttime), to give the wrist some additional support while it’s healing.
All of these measures will help to control initial pain and swelling.
See Your Doctor
If after the first 48 hours, you haven’t noticed any improvement in your symptoms, then go see an appropriate healthcare professional, such as your primary care physician or an orthopedic specialist who specializes in wrist injuries. You may have a more severe sprain or potential tear that needs more medical attention than what you can give yourself at home.
Your doctor will likely order some imaging, especially if a trauma like a fall was involved. This usually includes X-rays to check for a fracture, and possibly a CT scan or MRI to check if a tear has occurred.
If there is no tear or a partial one requiring no surgery, your doctor will likely send you to occupational or physical therapy to rehab your wrist.

If a full tear has occurred, and you require surgery, expect to participate in therapy to rehab the wrist once cleared by your surgeon.
For a mild sprain or partial tear not requiring surgery, your doctor and/or therapist, will suggest some sprained wrist exercises to perform at home.
Massage
After you’ve allowed initial healing to begin (usually the first week after the injury), a gentle soft tissue massage can be helpful for recovery.
Often, the forearm muscles that connect to the wrist will become tight after a wrist sprain, so a massage can be especially helpful for them.
This can be performed by a professional Licensed Massage Therapist (LMT), or you can practice a self-massage at home.
A self-massage can be performed using a foam roller. If you don’t have a foam roller, but are a baking extraordinaire, you can even use a baking pin with a towel on top for cushion.
Check out this video below to show you how you can self-massage the forearm muscles that connect to the wrist at home.\
Sprained Wrist Exercises
The wrist has the ability to move in 4 key directions:
- Wrist extension
- Wrist flexion
- Wrist ulnar deviation
- Wrist radial deviation
Depending on the exact ligament/s sprained, one or more of these directions will be affected.
While the sprain has occurred at the wrist, it’s common for hand and forearm function to also be affected and need to be included in your sprained wrist exercises.
After allowing the appropriate rest time after the initial injury, wrist sprain exercises will key in on improving mobility, any limited range of motion, and weakness present.
While there are many possible exercises to include for your wrist sprain, we’re going to take a look at the top recommended exercises.
4-Way Wrist Range of Motion
Range of motion exercises for the wrist will key in on promoting tolerable movement and stretching of the wrist. Remember, don’t push into pain! It’s okay if a motion is uncomfortable but try to avoid making pain worse.
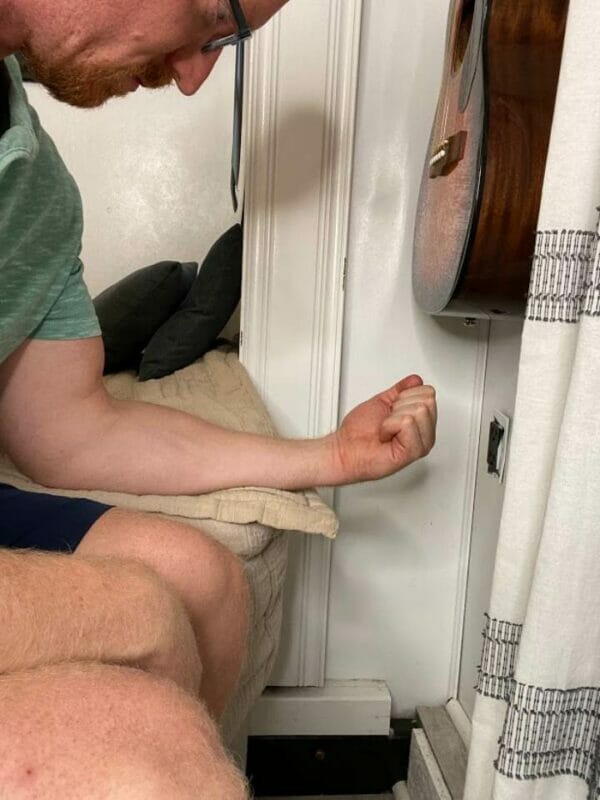
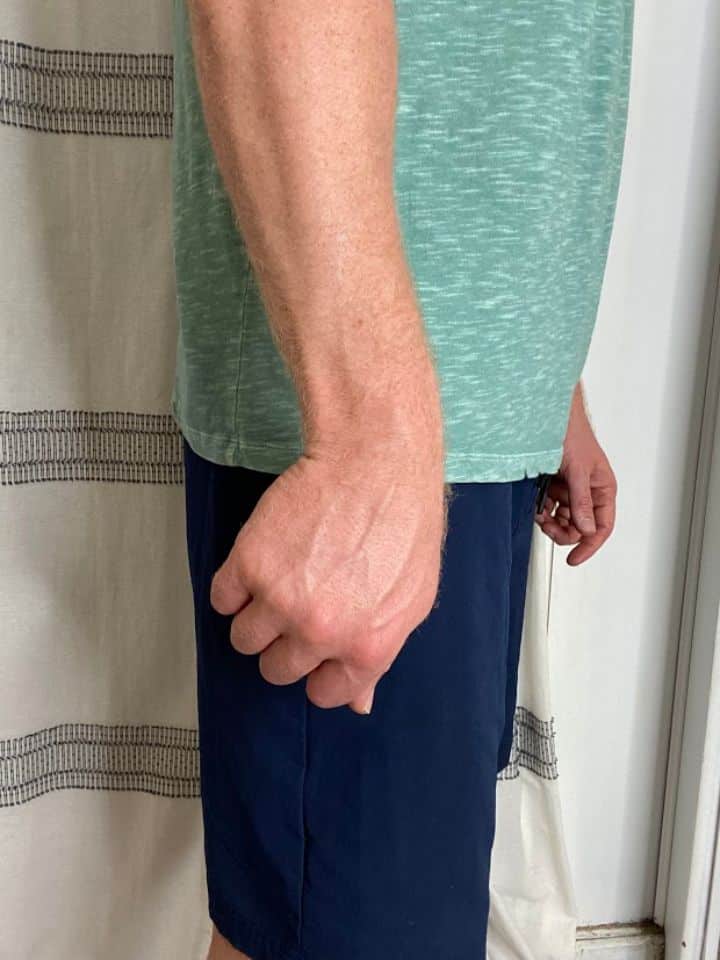
1. Wrist Extension
- Starting position: Seated with your forearm resting on a table (e.g. kitchen table). The hand and wrist should be hanging off the edge of the table with the palm facing down towards the floor.
- Slowly bend your wrist upward as far as you can tolerate, hold for 2 seconds, then slowly lower back down.
- Repeat 10x for 2 sets.
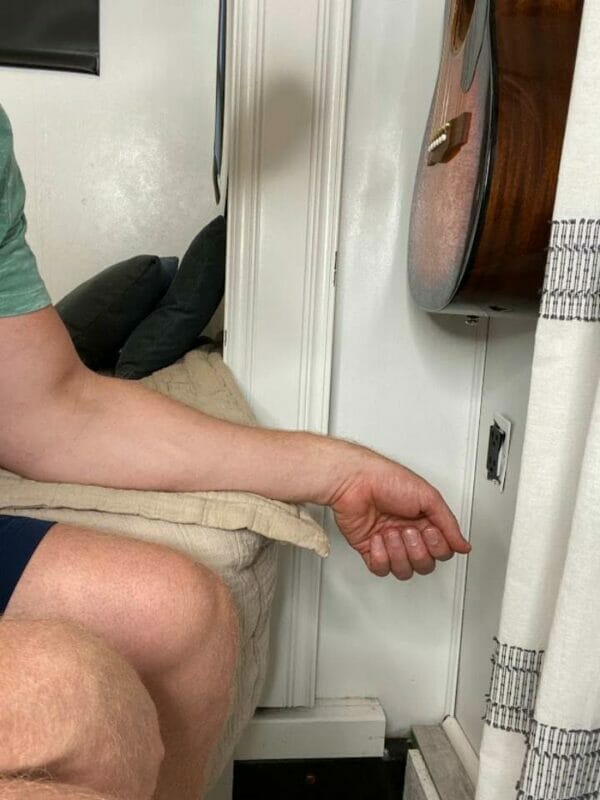
2. Wrist Flexion
- Starting position: Seated with your forearm resting on a table (e.g. kitchen table). The hand and wrist should be hanging off the edge of the table with the palm facing up towards the ceiling.
- Slowly bend your wrist upward as far as you can tolerate, hold for 2 seconds, then slowly lower back down.
- Repeat 10x for 2 sets.
3. Wrist Ulnar Deviation
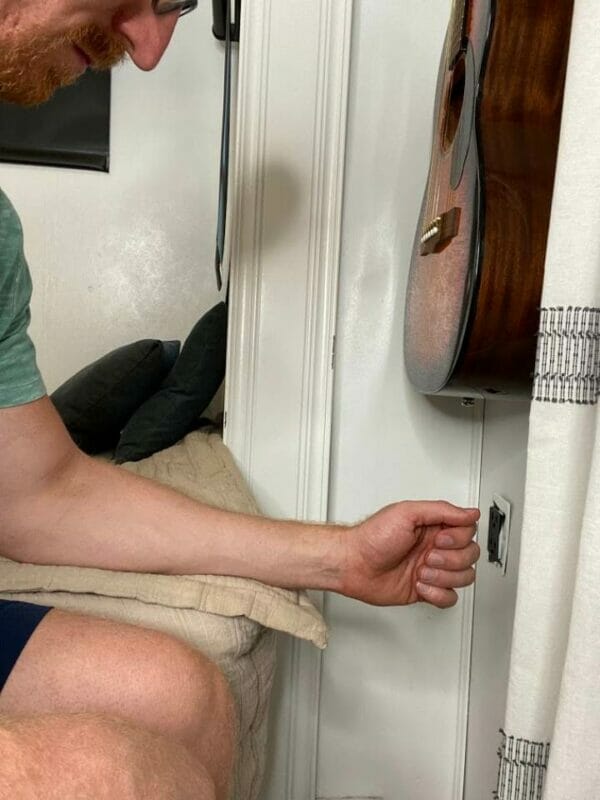
- Starting position: Seated with your forearm resting on a table (e.g. kitchen table). The hand and wrist should be hanging off the edge of the table with the arm turned so that the thumb is pointing up towards the ceiling.
- Slowly bend your wrist down towards the floor (towards your pinky finger) as far as you can, hold for 2 seconds, then slowly return to your starting position.
- Repeat 10x for 2 sets.
Tip: The above position for wrist ulnar deviation is performed with gravity assist. To advance this, you can stand with the arm by your side, and as you move the wrist into ulnar deviation, you’ll be moving more against gravity.
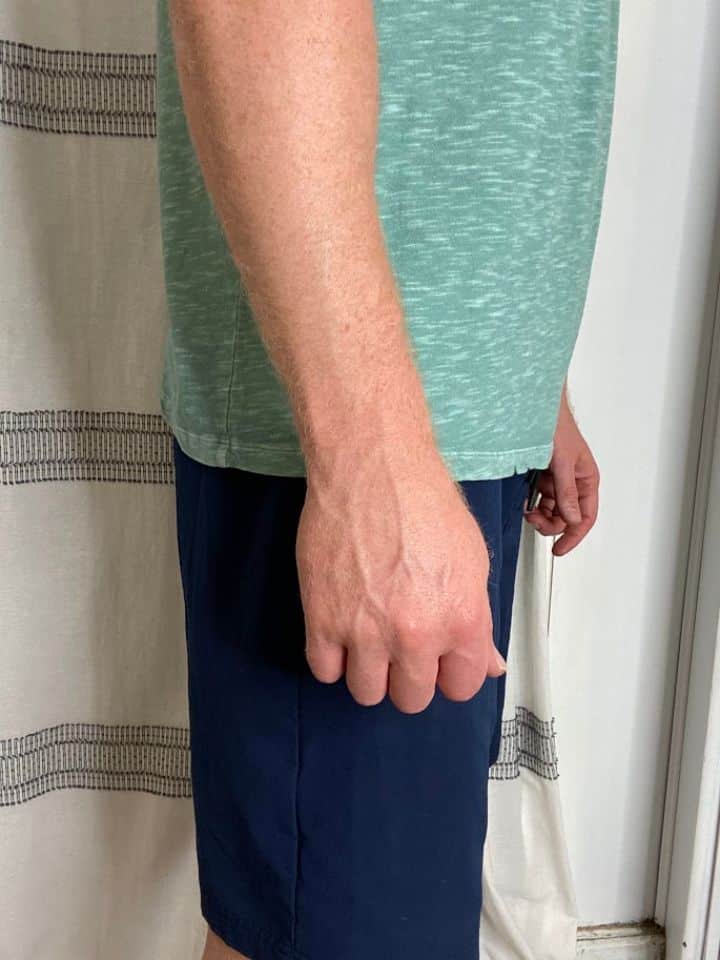
4. Wrist Radial Deviation

- Starting position: Seated with your forearm resting on a table (e.g. kitchen table). The hand and wrist should be hanging off the edge of the table with the arm turned so that the thumb is pointing up towards the ceiling.
- Slowly bend your wrist upward towards the ceiling (towards the thumb) as far as you can, hold for 2 seconds, then slowly return to the position you began in.
- Repeat 10x for 2 sets.
For a full live demo of how to perform each of the above directions in sitting, take a look at the video below.
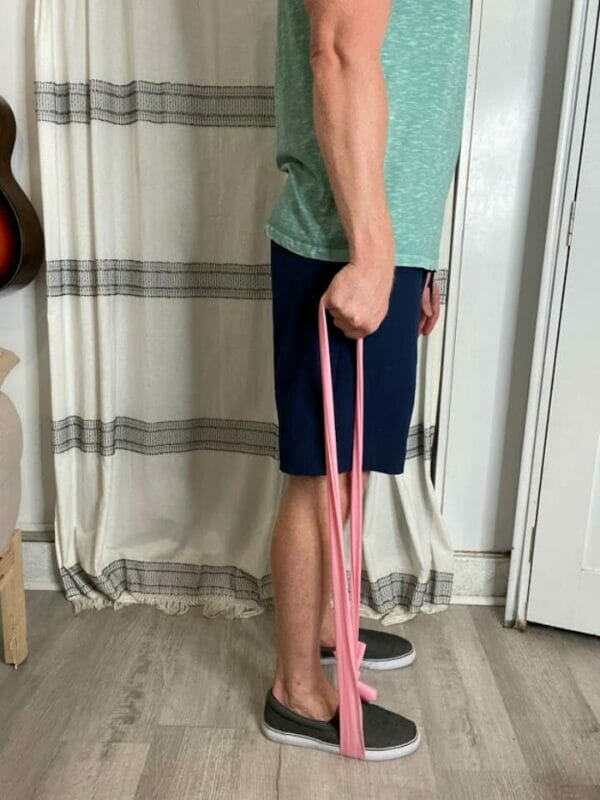
4-Way Wrist Strengthening with an Exercise Band
As your full mobility continues to improve, you’ll want to begin gentle sprained wrist strengthening exercises for each of the 4 wrist motions.
You can use an exercise band (light or medium resistance) or a small weight (1-2#) for these. We’ll demo using an exercise band, as you’ll have to position this more specifically than you do with a small weight.

1. Wrist Extension
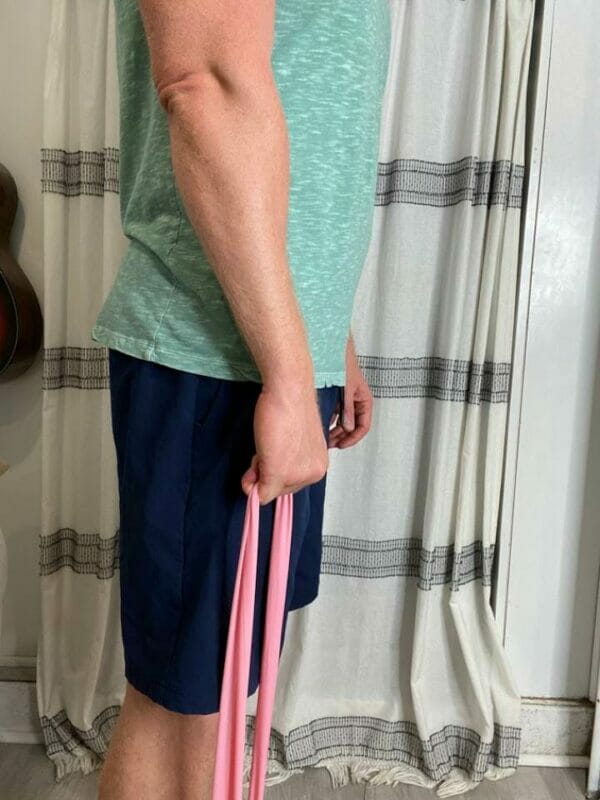
- Position yourself exactly the way you did in wrist extension range of motion above.
- This time, hold one end of the resistance band in the affected hand, and place the other end under a foot to anchor it.
- With your palm facing down already, slowly extend the wrist up towards the ceiling, hold for 2 seconds, then lower back down.
- Repeat 10x for 2 sets.
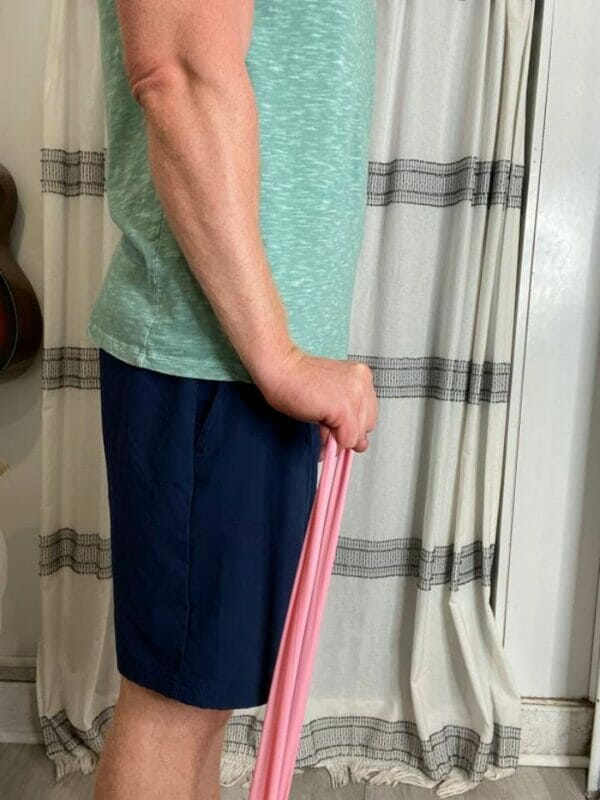
2. Wrist Flexion

- Position yourself exactly the way you did in wrist flexion range of motion above.
- Again, hold one end of the band in the affected hand, and place the other end under a foot to anchor it.
- With your palm facing up already, slowly flex the wrist up towards the ceiling, hold for 2 seconds, then lower back down.
- Repeat 10x for 2 sets.
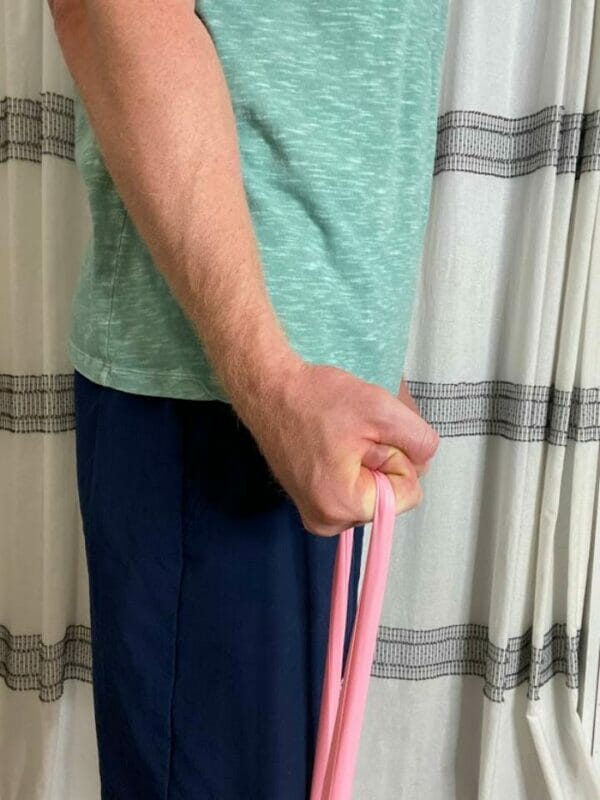
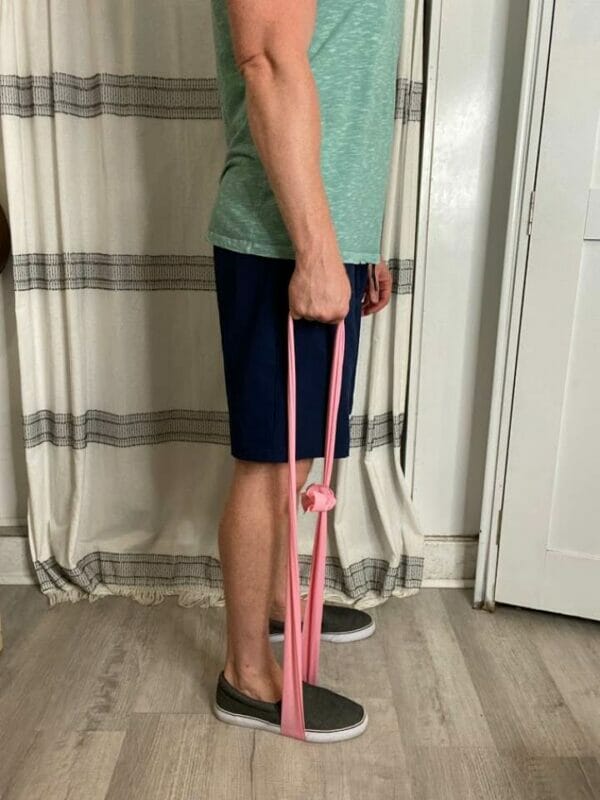
3. Wrist Ulnar Deviation
- Position yourself the same way you did in wrist ulnar deviation range of motion above.
- Hold one end of the band in the affected hand, and the other end of the band will be held by the opposite hand. The band should be positioned vertically towards the ceiling.
- With the hand and wrist already positioned with the thumb up towards the ceiling, slowly bend your wrist towards the floor, hold for 2 seconds, then return to your beginning position.
- Repeat 10x for 2 sets.
You can also advance this one, similar to the range of motion stretch, to a standing position.
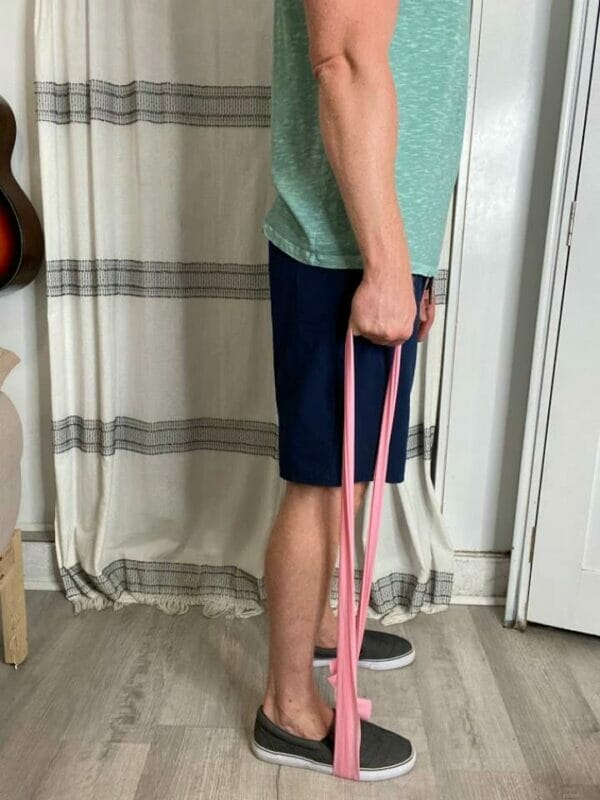
- While standing, have one end of the band under a foot and hold the other end in the affected hand.
- The arm should be by your side, with the palm facing your thigh on the same side.
- Slowly move the wrist in the direction of the pinky finger, hold for 2 seconds, then return to where you began.
- Repeat 10x for 2 sets.
4. Wrist Radial Deviation
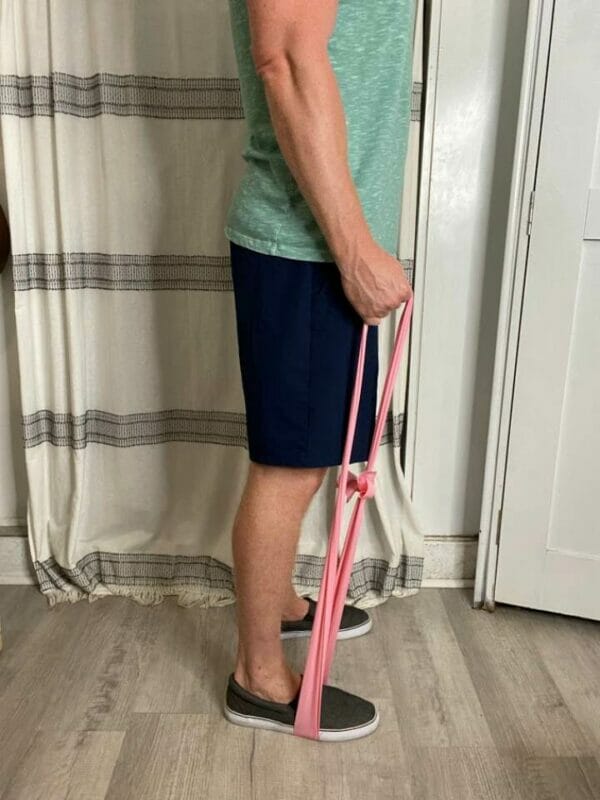
- Position yourself the same way you did in wrist radial deviation range of motion above.
- Hold one end of the band in the affected hand and place the other end under a foot to anchor it.
- With the hand and wrist already positioned with the thumb up towards the ceiling, slowly bend your wrist up towards the ceiling, hold for 2 seconds, then return to your where you began.
- Repeat 10x for 2 sets.
For a full demo of how to perform each of the above resisted directions in sitting, check out the following video.
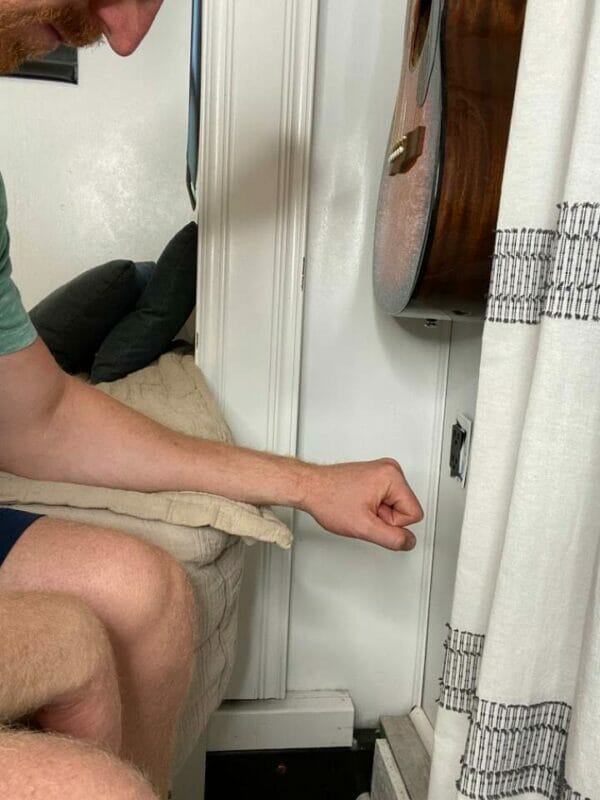
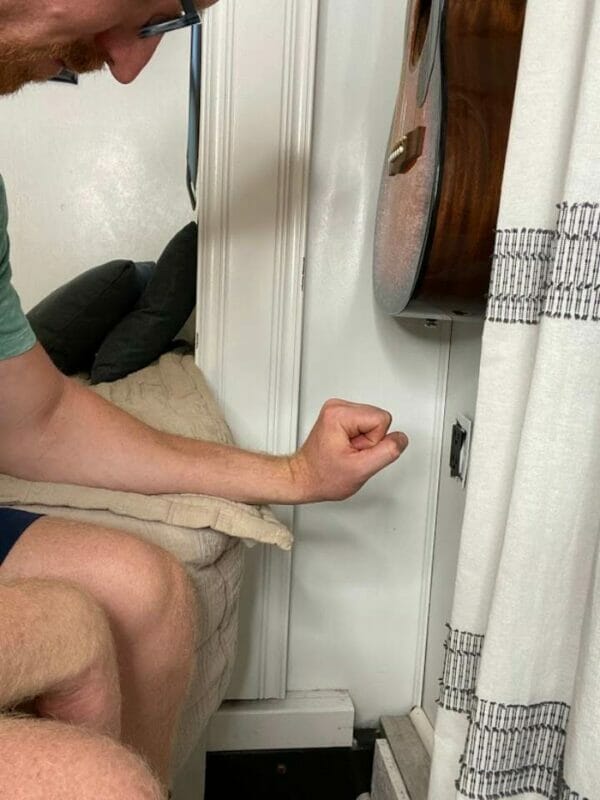
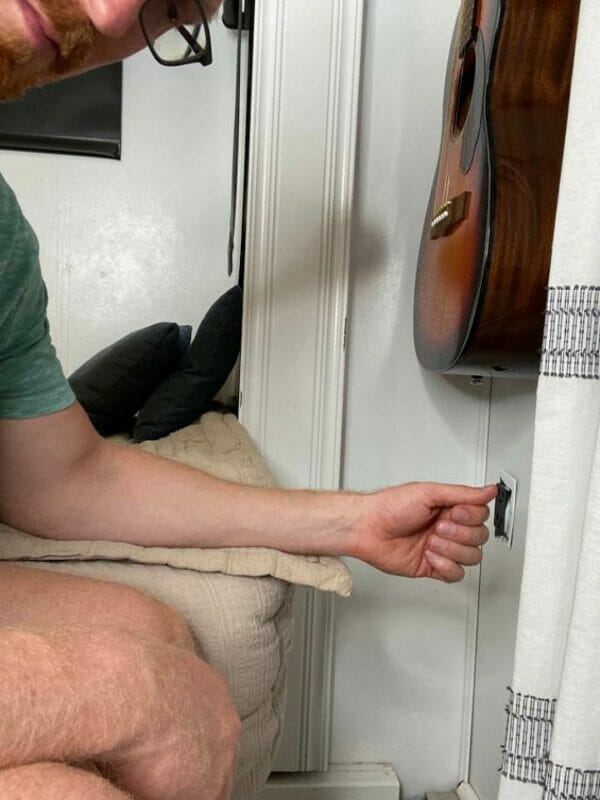
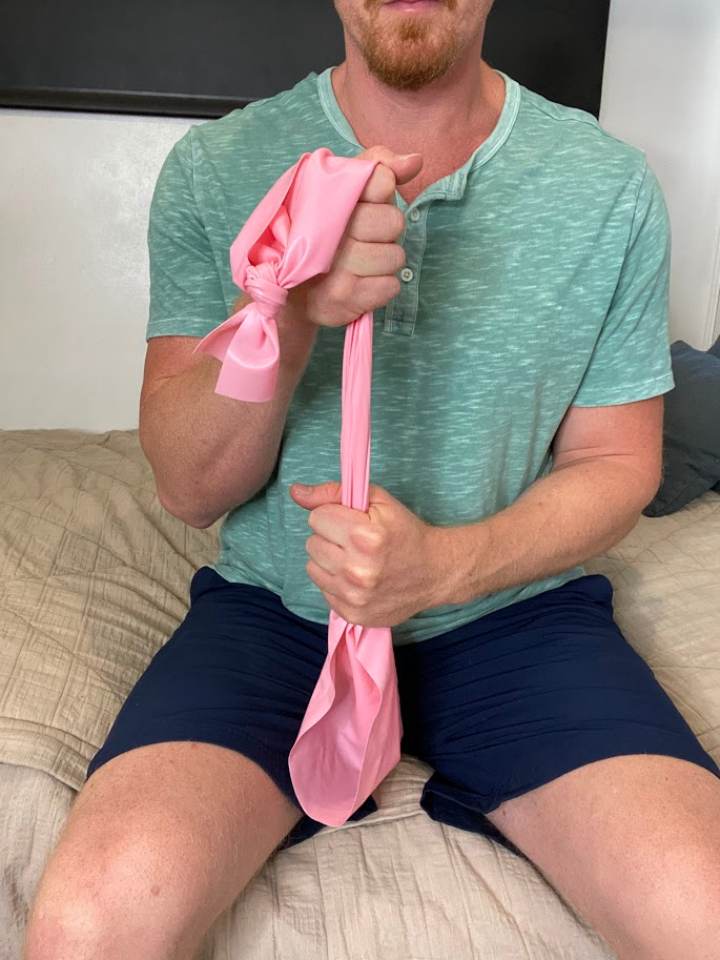
Grip Squeeze
It’s not uncommon to experience a weakened grip strength after a wrist sprain. For this reason, it’s helpful to include grip strengthening exercises in your sprained wrist exercise home program.
A grip squeeze exercise can be performed using a stress ball, if you have one available at home. If you don’t have a stress ball, you can also use a rolled-up towel to squeeze or some other type of firm ball (e.g. tennis ball, softball).
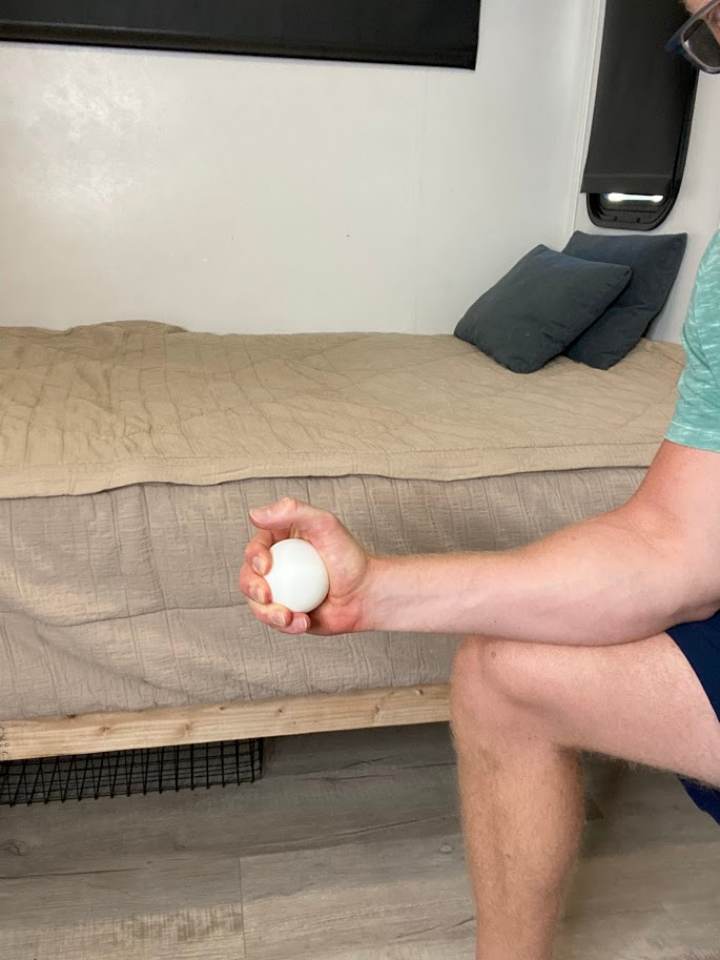
- Begin with the injured wrist supported in whatever position feels most comfortable (e.g. on a table, pillow or resting on your legs).
- Position the arm neutral so that the thumb is pointed towards the ceiling.
- Gently squeeze the object and hold for 5 seconds, then relax.
- Repeat 10-15x for 2 sets.
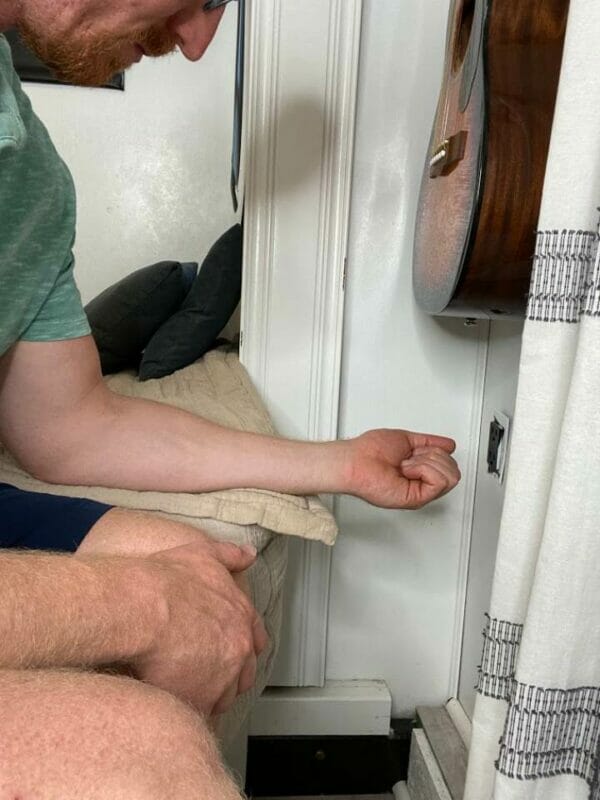
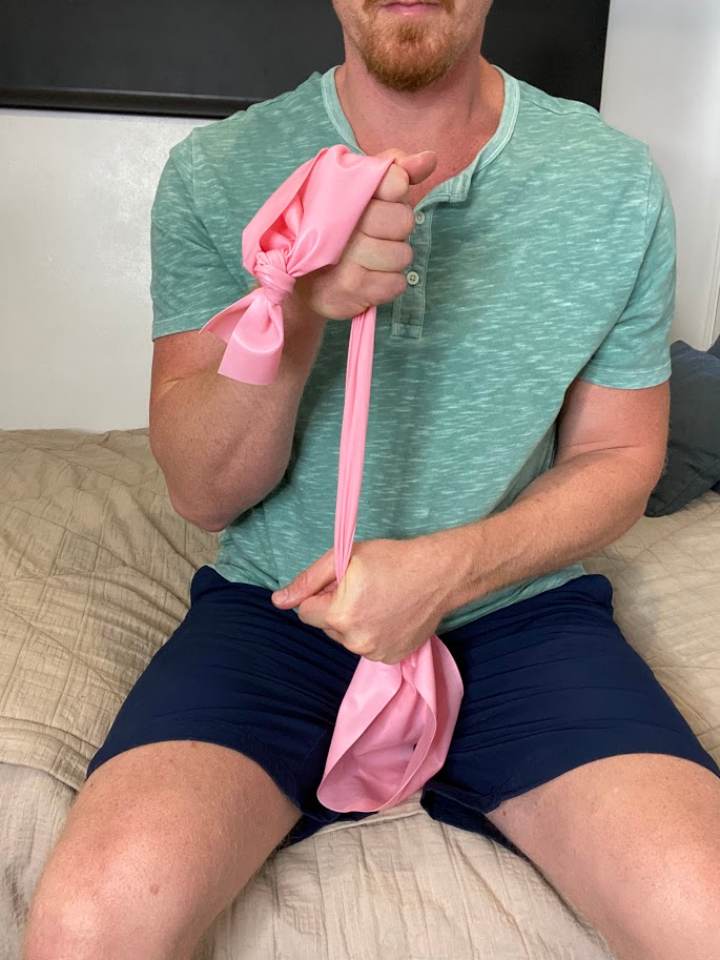
Rubber Band Finger Spring
While the grip squeeze exercise focused on the finger flexors, this sprained wrist exercise will focus on the finger extensors.
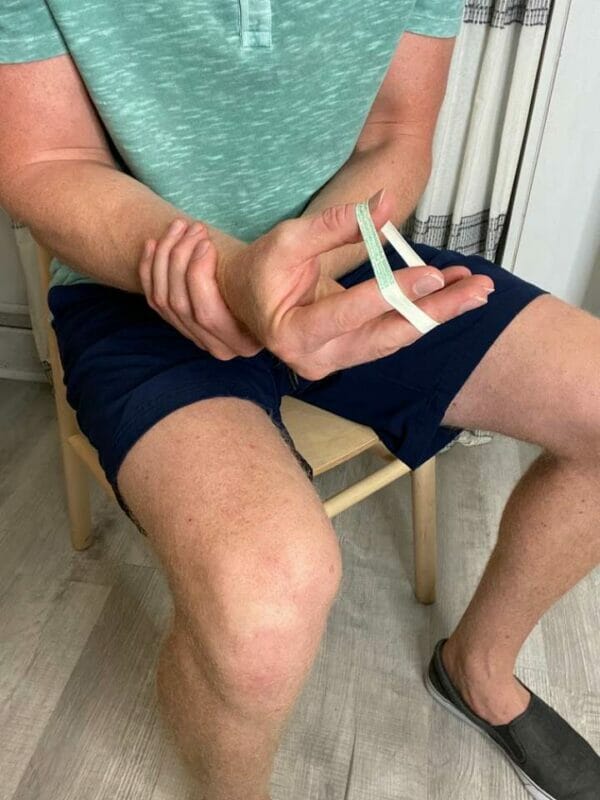
- Position the wrist and hand in a supported and comfortable position, similar to the grip squeeze exercise.
- Place the hand so that the palm is facing down.
- Apply a somewhat taut rubber band so that it’s placed around the tips of all 5 fingers. The fingers should be pinched together so that the tips are touching.
- While keeping the fingers as straight as you can, slowly stretch the fingers apart from one another.
- Hold for 2 seconds, then return to your original position.
- Repeat 10-15x for 2 sets.
Exercise Routine for a Sprained Wrist

It’s been found that early mobilization and use of the injured wrist, as tolerated, is better than immobilizing the area for long periods.
With mild injuries not requiring surgery, try to begin the range of motion exercises after your initial 48 hours of resting.
After about a week, as long as pain is controlled, you can add in the other recommended sprained wrist exercises.
For the above exercises, begin by practicing each 2x per day, every day, for 1 month.
If after 1 month you’re noticing improvements in your pain and wrist function but still are not back to where you were before your injury, continue practicing these exercises, but can reduce your practice time to 1x per day, every day, for another month.
At this point, with a mild injury, you should be feeling good as new. If your symptoms have resolved, then you can change your sprained wrist exercise routine to a maintenance program. This means to practice these exercises 2-3x per week for maintenance of your results.
If at any point the wrist is becoming exceptionally sore and having increased pain, then you may need to reduce how often you’re practicing and give it a little more rest. Make sure to listen to your body and don’t do anything to make pain feel worse.
It’s not a bad idea to continue these exercises long-term as a maintenance program to reduce your chances of re-injury. You can even practice them on the other wrist too!
FAQ:
Should I wear a wrist brace or wrap while exercising?
While a brace or wrap will help initially with pain and swelling, as you begin moving and exercising the wrist, try to remove these items. You’ll want to encourage the surrounding muscles and soft tissues to support the wrist versus relying on a brace or wrap.
Can I get a massage with a wrist sprain?
Sure! You may want to wait about a week after your injury to allow the tissues to begin healing, but a gentle soft tissue massage can be helpful for recovering. Always let your massage therapist know about any injuries you’ve had or are currently recovering from.
Will my sprained wrist heal without exercise?
Sometimes a mild sprain will heal and recover with rest alone; however, once a sprain has occurred, you’re at a higher risk for re-injury. Wrist exercises will help to lower this risk.
Wondering What's Next?
Discover 11 Easy, At-Home “Stretch Exercises” for Stronger, Pain-Free Joints (click below)