
Free download: Top 10 Natural & Easy Remedies for Joint Pain from Home. Learn these helpful remedies.
There are a variety of reasons as to why one might experience hip pain. Hip impingement syndrome is a common diagnosis you may have heard of.
What exactly causes hip impingement? Can you fix hip impingement?
Let’s take a closer look to see what hip impingement is, the causes, and 5 exercises to eliminate pain.
Table of Contents
Basic Anatomy of the Hip
Before you can truly understand what hip impingement is, it helps to know a little bit about the anatomy.
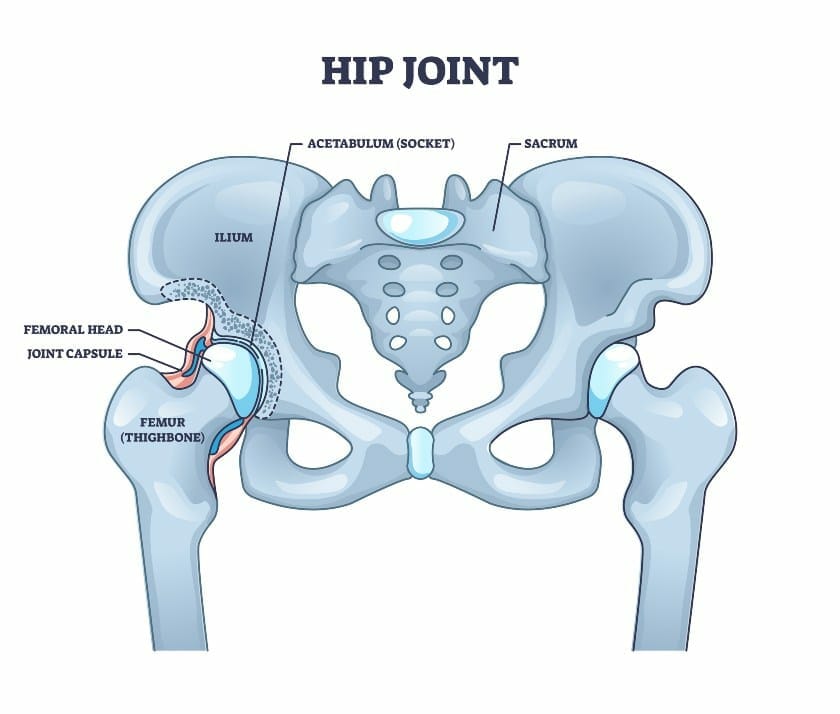
The hip joint is considered one of the most flexible joints in the body. It has a significant amount of hip mobility and range of motion available.
The hip joint is a ball and socket joint. It’s formed by the femoral head, or thigh bone, (the ball) and the acetabulum (the socket) of the pelvis.
In a healthy hip, there should be a smooth gliding motion of the femur head in the hip socket, or acetabulum. This occurs through the labrum in the acetabulum, which further deepens the hip socket, and the cartilage around the ball and socket joint.
Surrounding muscles and ligaments help to keep the hip supported and stabilized, promoting functional mobility.
Not only are the hip muscles important for supporting the hip joint, but also the muscles along the thigh, pelvis and lower back play a vital role.
What is Hip Impingement?
Hip impingement, or femoroacetabular impingement, will occur when an abnormality develops in either or both the femoral head and acetabulum.
This will cause uneven movement and rubbing, or pinching, of the structures against each other.
Causes of Hip Impingement

As mentioned above, hip impingement is usually caused by an abnormal hip structure of the femoral head, acetabulum, or both. This commonly involves bony overgrowth or bone spurs in and around these structures.
When this occurs, it leads to incorrect hip joint mechanics. The subsequent irregular joint movement can cause increased friction and pinching of the surrounding soft tissue structures.
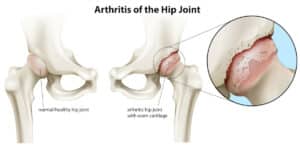
Hip impingement that continues without treatment can create increased risk for the following to occur:

- Hip arthritis
- Labral tears
- Cartilage break down
Types of Hip Impingement
There are three primary types of hip impingement that can occur, depending on the source of the structural breakdown.
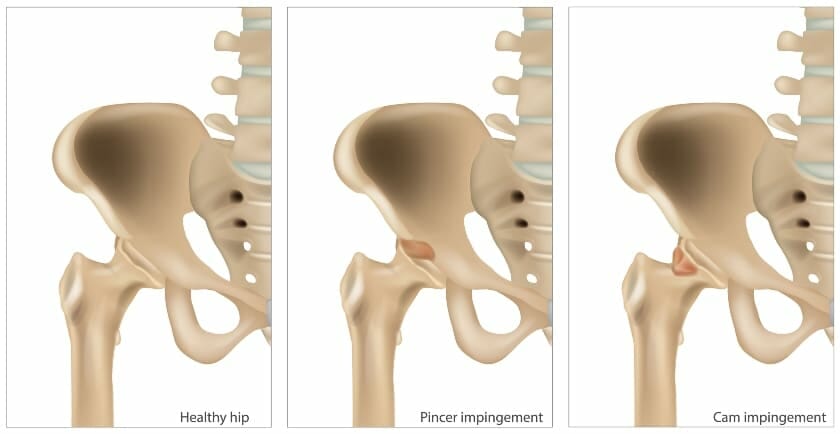
1. Cam Impingement
Cam hip impingement is when the abnormal bony growth and structure affects the head of the femur.
This causes a misshaped femoral head, which will affect its ability to smoothly glide in the hip socket.
2. Pincer impingement
Pincer hip impingement occurs when the irregular bony growth and structure form on the acetabulum. This causes an overgrowth of the acetabulum over the femoral head.
As a result, every time you flex or bend the hip, the neck of the femur will hit the overgrown acetabular rim. Repetition of this leads to damage of the surrounding structures and the bone itself.
3. Combination
It’s possible for a combination of a cam and pincer impingement to occur.
This means structural changes and bony growths have occurred on both the head of the femur and acetabular rim.
Confirming a Diagnosis of Hip Impingement

A physical examination from a healthcare professional, such as an orthopedist or physical therapist, can help confirm or rule out a diagnosis of hip impingement.
During this exam, it will be determined if hip impingement is the source of your hip pain, or possibly some other cause.
Symptoms of Hip Impingement

What does hip impingement feel like?
You can experience hip impingement pain in the front or back of the hip, otherwise known as anterior hip impingement or posterior hip impingement. Anterior hip impingement appears to be more common.
The following are common symptoms that may be experienced with femoroacetabular impingement:
- Hip pain and/or stiffness
- Increased groin pain with significant hip flexion
- Decreased range of motion
- Pain with increased time sitting
- Pain with any repetitive hip flexion movement, such as with deep squats or bicycling
- Car transfers
- Standing after prolonged sitting
Take a look at this video that demonstrates the best mechanics for car transfers when you’re having hip pain.
Special Orthopedic Tests
There are a number of special orthopedic hip impingement tests that can be performed to confirm or rule out a suspected case.
We’ll key in on three of the most commonly performed tests.
A. Fadir Test
The FADIR test will typically trigger anterior hip impingement pain if found to be a positive test.
While laying on your back, the painful hip joint is placed in a combined position of flexion, adduction, and internal rotation.
This test is considered positive if it re-creates pain primarily in the front, anteriorly, but can also be in the outer aspect of the hip, or anterolateral.
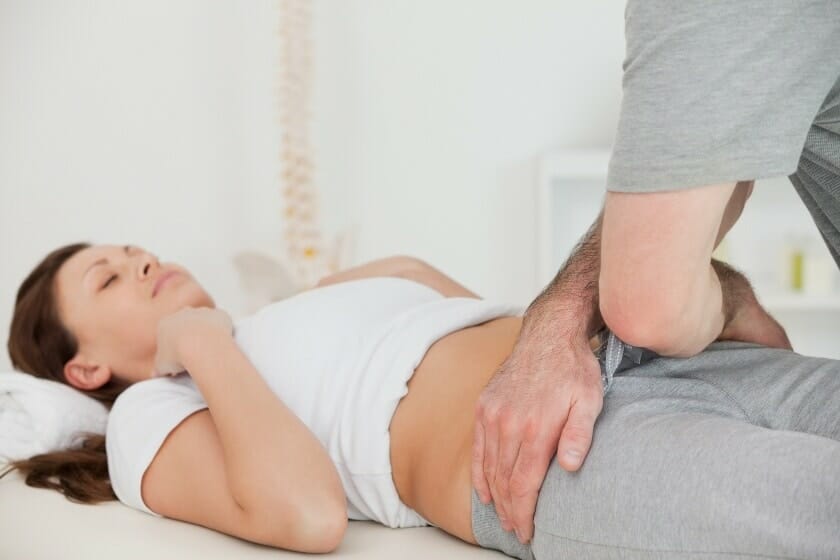
B. Faber Test
The FABER test can be used to assess multiple possible hip pathologies. This may include general dysfunction of the hip joints, muscle strain in the groin, sacroiliac or SI joint dysfunction, or posterior hip impingement.
The painful hip joint is placed in a Figure 4 position while laying on your back. The unaffected leg is straight in front of you.
The affected leg is pulled into a bent or flexed position, then abducted or moved away from the opposite leg, and finally placed into external rotation. The ankle of the affected leg will end up resting on the opposite thigh.
The opposite hip bone will be stabilized with one hand from your medical practitioner, as the other hand applies a gentle stretch in a downward direction.
The test is considered positive if it re-creates pain in a certain anatomical area. Pain in the back of the hip will usually indicate posterior hip impingement.
C. Hip Scour Test
The hip scour test is a special test that is able to assess the presence of general hip dysfunction or a potential labral tear.
While laying on your back, the painful hip is placed into hip flexion, then passed between hip internal internal rotation with adduction, and hip external rotation with abduction. This range of motion occurs while an axial load is applied through the hip.
The test is considered positive if painful. The location of pain can help further determine the source of pain.
D. Imaging

Various imaging tests may be ordered by your physician to assist in determining the cause of your hip impingement.
An X-ray will show where any potential bony lesions or growths are present. It will also show overall alignment of the hip joint, pelvis and lumbar spine, depending on which regions of the body the X-rays are ordered for.
A more advanced imaging test, such as an MRI, will give a better visual of any soft tissue abnormalities that could be causing hip impingement, such as a labral tear.
Treating Hip Impingement
A. Conservative Options
When pain first begins, it’s typically recommended to rest and ice your hip.
You should also aim to modify your activity level as much as possible, in order to avoid further pain exacerbation.
If your pain level is on the higher side, your doctor may recommend anti-inflammatories, or in more severe cases a steroid injection.
It’s very common to receive a referral to physical therapy to address your symptoms.
B. Hip Impingement Exercises/Physical Therapy
Your physical therapist will perform an intake of your medical history and a physical examination.
Range of motion and muscle strength will be assessed in the hip joint, knee, pelvic region, and lumbar spine. Although the source of hip impingement primarily stems from a problem in the hip joint, it may contribute to or be contributed to by any dysfunction in the knees, pelvis or low back.
Physical therapy exercises will be prescribed and assigned via a home program to address any deficits found during the examination.
Exercise may include, but is not limited to, hip strengthening exercises and stretches, core strengthening exercises, improving hip mobility, knee, pelvic and lumbar strengthening and stretching exercises.
While there are many common exercises used in physical therapy to address this diagnosis, the following 5 hip impingement exercises are excellent choices and highly effective.
1. 3-Way Leg Kicks in Standing

This is a dynamic exercise your physical therapist may prescribe to address the hip flexors, hip abductors, and hip extensors.
- Begin standing in front of a sturdy surface, like your countertop, in case of need for balance support. You can tie a resistance band around the ankles (light, medium or heavy resistance) or use an ankle weight (~2-3#).
- Keep both legs straight during this exercise. You will be in a single leg stance on your supporting leg, while keeping a straight leg on the kicking side.
- Slowly kick the leg forward, then back to your starting position.
- Repeat the kick to the side, then back to your starting position.
- Finally, kick back, then return to your starting position.
- Repeat the sequence for 10 repetitions each direction, then switch to the other leg (balance exercises can be helpful to improve stability in the standing leg, so it’s not a bad idea to practice the exercise on both sides to give the affected leg a chance to balance in a single leg stance).
- Practice 2 sets on each leg.
Don’t worry about kicking the leg high. This should be a gentle kick performed without causing hip pain.
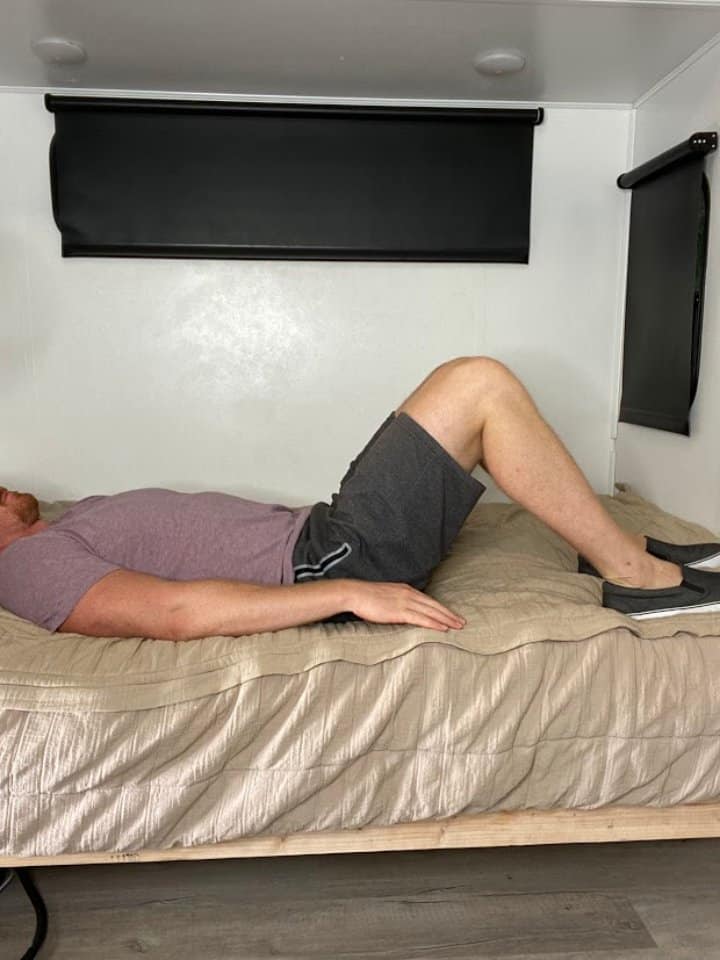
2. Single Leg Bridges
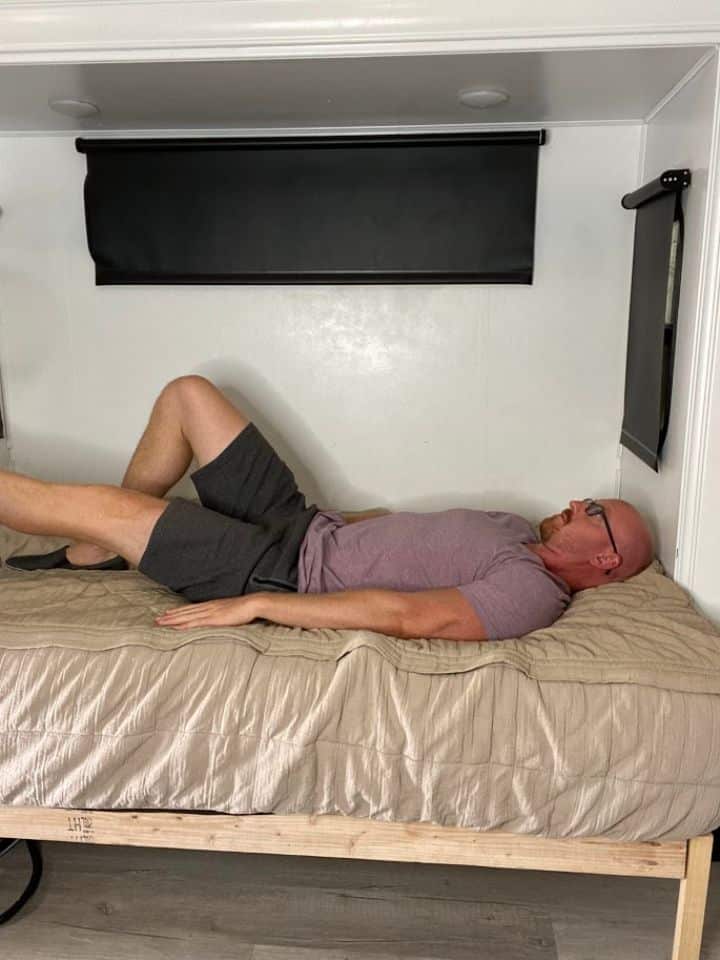
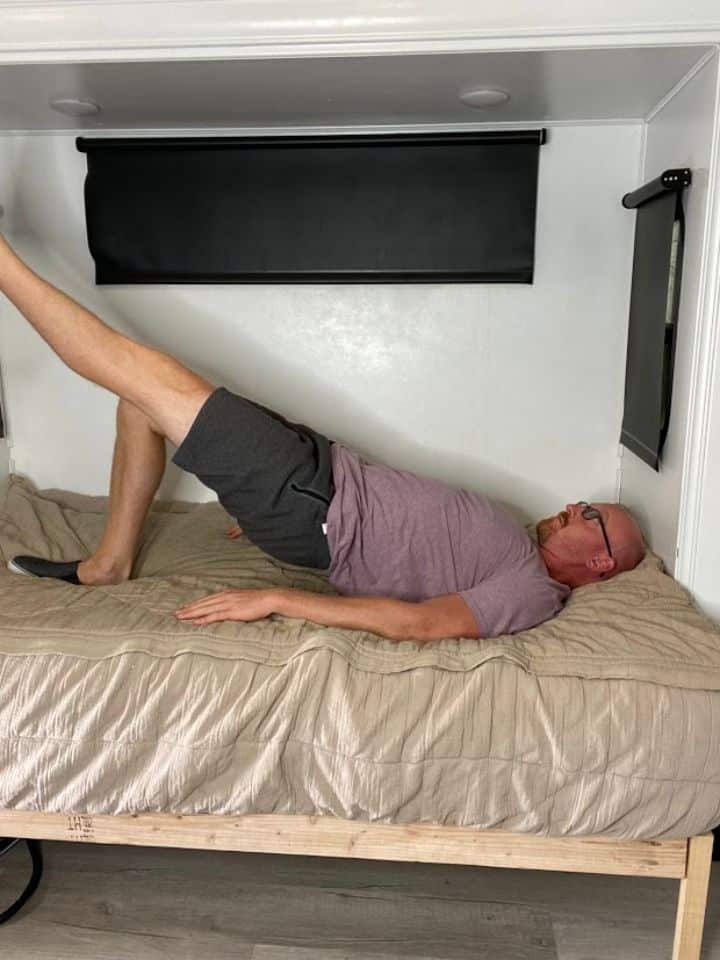
Single leg bridges are a great exercise to target the glutes and low back.
This is considered a more advanced bridge compared to a double leg bridge, so you should make sure you can do a double leg bridge successfully without pain prior to attempting it with a single leg.
- Begin laying on your back (can perform on your bed, couch or the floor) with both knees bent and the feet flat on the surface.
- Keep the leg you’re strengthening in your starting position, and extend the opposite knee so that the leg is straight (both thighs should remain parallel to each other).
- Apply pressure through the foot on the floor, while simultaneously lifting the hips off the ground.
- Lift the hips as high as able, then slowly lower to the surface.
- Repeat 10 repetitions for 2 sets, then switch to the other leg for symmetry.
Make sure if you feel pain to modify the height of your bridge. If pain persists, then do not continue.
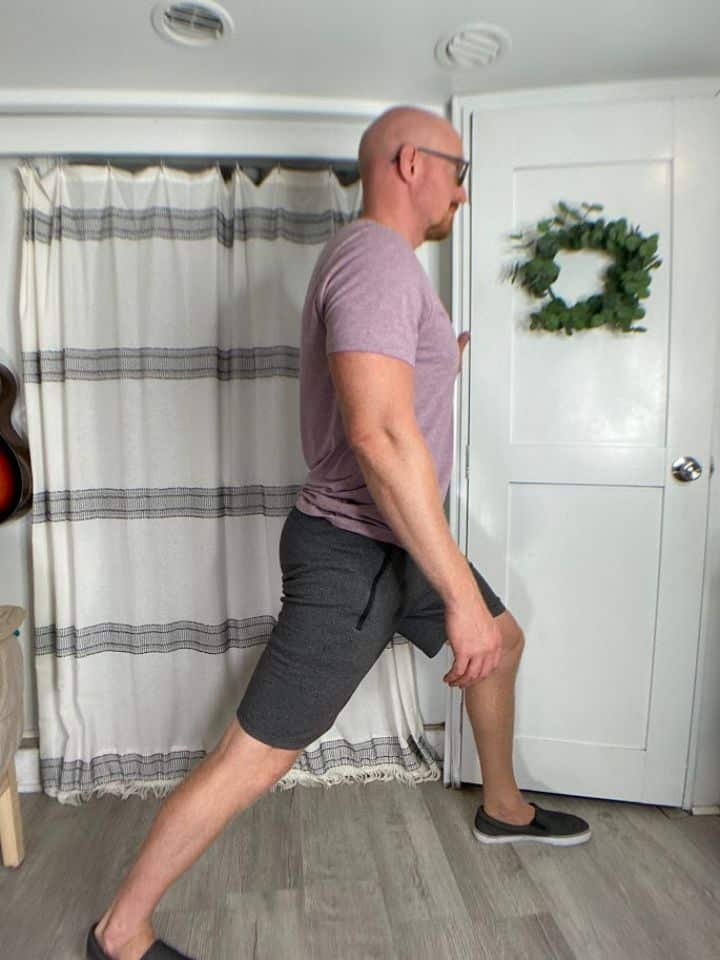
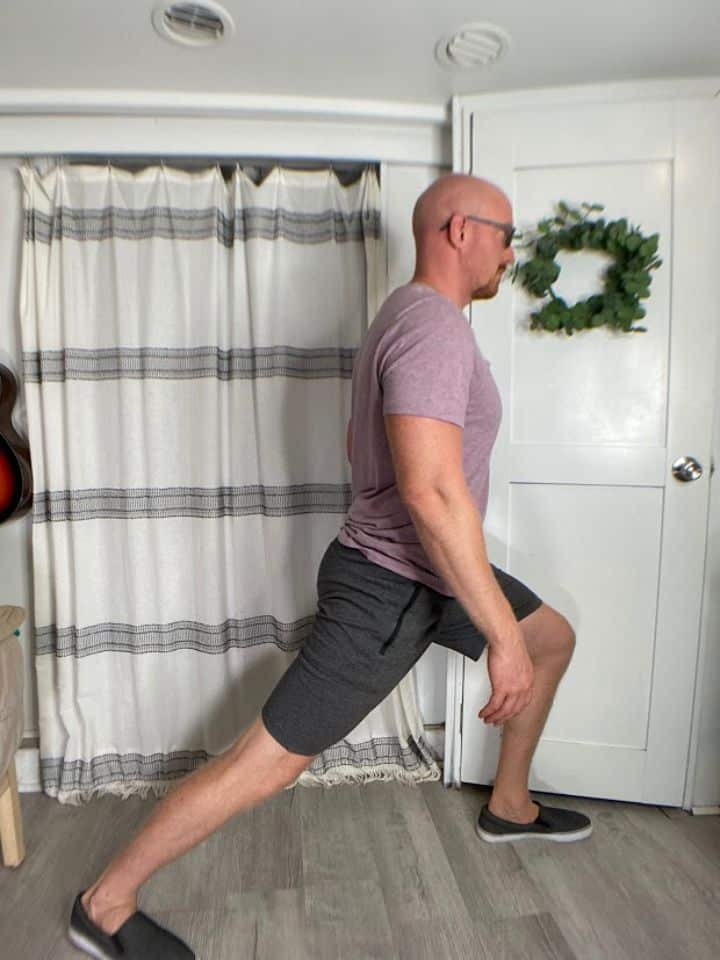
3. Standing Lunge Hip Flexor Stretch
There are a many possible stretches for hip impingement.
Due to the commonality of anterior hip impingement, and the location of pain in the front of the hip being a common symptom associated with it, a hip flexor or groin stretch can be very beneficial for pain relief.
A hip flexor stretch can be performed in a variety of positions. This particular example will discuss a standing lunge hip flexor stretch.
- Begin standing in front of a sturdy surface, such as the countertop, in case you need additional balance support.
- Position the unaffected leg forward and the painful leg back (the further apart the legs are, the stronger the stretch for the hip flexors).
- The front leg should have a bent knee, while the other knee in the back should be straight.
- Lean the body forward towards the front leg until a stretch is felt in the front of the hip in the back leg (make sure to keep both heels on the ground).
- Hold the stretch for at least 30 seconds or up to 1 minute.
- Repeat a second time.
- If the opposite hip generally feels tightness, you can also repeat on the other side.
If you’re looking to combine a hip flexor stretch with a self-massage, check this video that demonstrates the best position and tool to use!
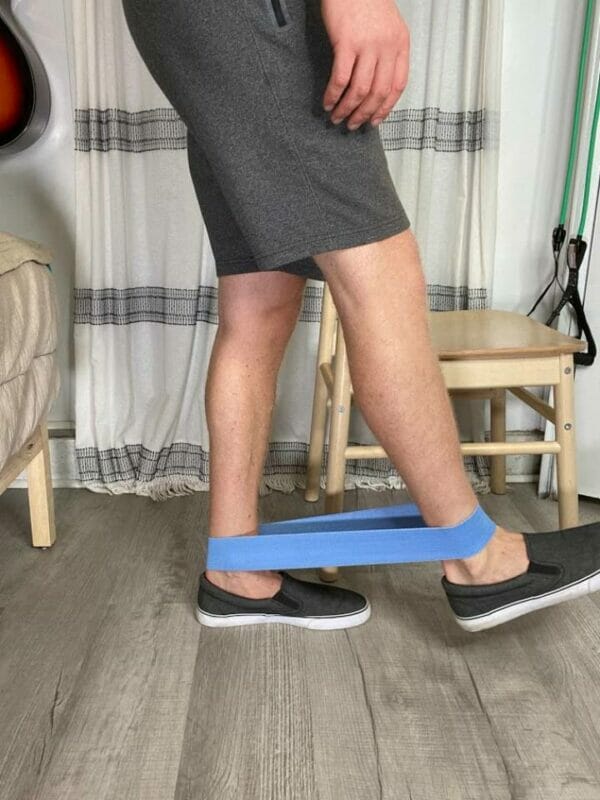
4. Lateral Walk With a Resistance Band


This exercise focuses on strengthening of the hip abductor muscles, located on the outside of the hips.
- Position yourself in front of a sturdy surface again, such as your countertop, for balance support.
- Tie a resistance band around the legs (light, medium or heavy resistance). For a greater challenge, tie the band around the ankles. For less of a challenge, tie the band around the thighs.
- Begin on one end of your countertop, with the knees bent into a small squat.
- Step to the side to begin moving along your countertop.
- Step about hip width apart with the leading leg, then have the second leg follow along.
- Continue taking side or lateral steps all the way along your countertop, then return in the opposite direction.
- Practice 5 laps back and forth.
5. Hip Flexor Isometric Hip Strengthening Exercise
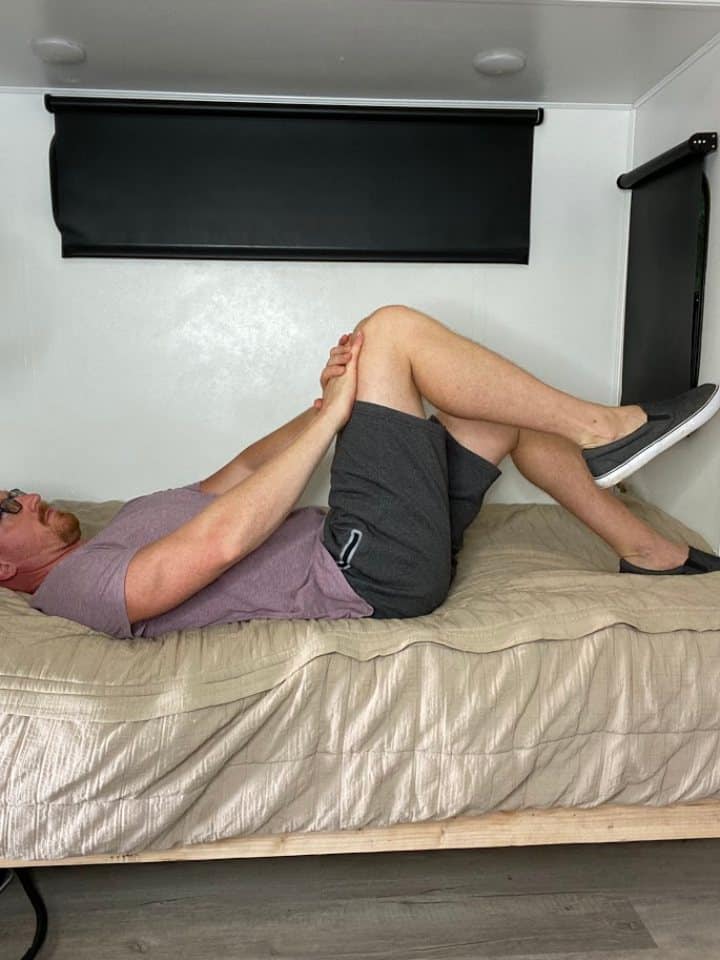
This exercise targets the hip muscles in the front of the hip, or your hip flexors, as well as the abdominal muscles. It will be performed on one hip at a time.
An isometric exercise is a sub-maximal contraction performed without moving the limb through its available range.
- Begin laying on your back (can lay on your couch, bed or floor) with the knees bent and feet flat on the surface.
- Move the knee on the painful side towards you, stopping once the hip is bent 90 degrees.
- Place both hands on the front of the thigh.
- Gently push the thigh, while the thigh pushes back with an equal force.
- Hold this contraction for 5 seconds, then return to your starting position.
- Repeat 5-10 repetitions.
This can be performed on the healthy leg for overall hip health and symmetry.
Here’s a video demonstration of this particular exercise, as it can be a little difficult to picture if it’s your first time trying it.
Here’s a video demonstration of this particular exercise, as it can be a little difficult to picture if it’s your first time trying it.
Hip Impingement Exercises to Avoid

While in physical therapy, your physical therapist will also discuss hip impingement exercises to avoid.
You’ll want to avoid any motions and positions that cause increased hip pain. This will typically include positions of excessive hip flexion or bending of the hip, especially if greater than 90 degrees.
Try to avoid twisting motions at the hip. This type of motion can especially be painful if the cause of your hip impingement is a labral tear.

Generally speaking, if using resistance during an exercise, begin with a lighter amount. Once you’re able to determine your baseline starting point, you can gradually add more resistance to avoid straining the hip muscles.
C. Hip Impingement Surgery
If conservative options, such as physical therapy, are not successful for relieving your pain, then you may need to consider surgery.
Types of Surgery
The exact surgical procedure for hip impingement will depend on what is causing the problem.
Usually this will involve an arthroscopic procedure, which will help in maintaining the original hip joint, unlike a total hip replacement procedure.
Surgery may involve a simple cleaning out, or debridement, of the hip joint. If a soft tissue tear, such as a labral tear, is involved, then this may need to be repaired.
Regardless of the exact type of surgery, the procedure is meant to decompress and remove any structures impinging on the joint.
Recovery Time
Surgical recovery will also vary depending on the exact procedure performed.

The average time usually anticipated to recover after a hip arthroscopy will be about 6 weeks, although this may vary.
If you required a more extensive surgery, such as a labral repair, your recovery will typically be longer. A hip labral repair could take on average 2-3 months to recover from.
Final Points

If you begin experiencing hip pain, it’s best to have it addressed in the early stages. The longer you wait, the more challenging it can be to successfully heal conservatively.
Make sure to listen to the advice of your doctor and physical therapist.
Practice finding the right balance between resting the painful hip and functional training. The goal is to avoid any position, activity or exercise that causes further pain.
Apply the above recommendations and you’ll see results in no time!
FAQ:
Can I prevent hip impingement?
Preventative measures can be taken to avoid hip impingement. Try to maintain overall healthy hips with the right balance of hip mobility and strength.
While you can’t necessarily control bony growths in or around the joint, promoting full functional hip mobility is one of the best preventative measures to take.
Who can I see for my hip pain?
Your primary care physician can perform a general assessment and screening for your hip pain. After this they will likely refer you to an orthopedic specialist or a physical therapist for further examination and treatment.
Can I use machines in the gym with hip impingement?
Yes, as long as they don’t cause increased pain or place you in a position that causes further hip impingement, such as excessive hip flexion.
Wondering What's Next?
Discover 11 Easy, At-Home “Stretch Exercises” for Stronger, Pain-Free Joints (click below)


2 Responses
Iam very impressed with what I have read can't wait to put it to the test as I have suffered hip pain for the last 3years and still waiting on appointment for further investigation here's hoping your exercises work thanks alot
You're very welcome, Thomas! I hope these exercises are helpful.